Originally posted by Jim Bob
View Post


-
Re: Brick Oven Photos
So you are starting the curing process today and cooking next Saturday? 7 days is great for the process. I took it very slow increasing the temp as instructed by Forno Bravo, 100 degrees per day. It has apparently made a difference. I have absolutely no cracks or splits in the interior cooking area.
Sounds like you have the oven very well insulated. I used not only the 4" of loose vermiculite but a layer of the high heat insulation cloth wrapped in chicken wire under that.
Jim BobLeave a comment:
-
Re: Brick Oven Photos
thanks for the compliments on the brick work , i was schooled by an old world Italian mason ! The oven floor dia. 36 inches with a dome height of 19 inches. The outside shell has 4 inches of vermiculite/concrete shell and then a layer of chicken wire with waterproof cement. As this project progresses i will build a block structure around this and stucco. I will also add some roman element accents so stay tuned. As for cooking pizza , I am starting the seasoning process today and we are having a party on sat. so pizzas will be cooking . I will let you know how i make outLeave a comment:
-
Re: Brick Oven Photos
concreteoasis:
Oven looks great. How big is inside diameter of the oven? It appears to be 42" or bigger. Great brickwork.
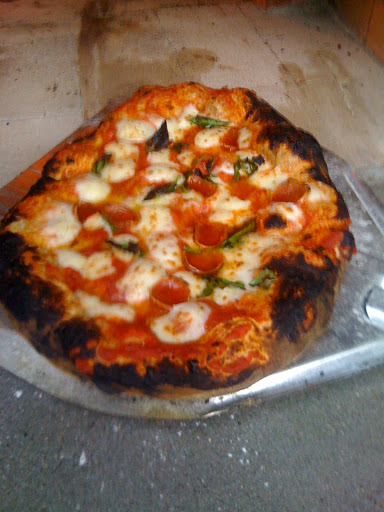
I have had several good pizza cooks in my oven since it was built this past summer. It took me a while to adjust to the temperature variance in the dome & floor and what was the ideal temp to cook pizzas. Have found that if the floor temp is greater than 850, it is wise to use a cheap pizza pan to allow top to cook more evenly with bottom of pizza. I tried one pizza at 1110 degrees on dome and 1000 on floor. Man, did it burn fast!!! Had to cool it down.
Also found that if I mess up on sliding pizza off of peel, it is easy to make it a giant calzone instead.
I did try the SeaBass on a cedar plank too. It was fantastic. Did find out though that it is necessary to turn the fish over halfway thru the cooking in order to cook evenly.
Jim BobLeave a comment:
-
Re: Brick Oven Photos
a few pics of the start of mineLeave a comment:
-
Re: Brick Oven Photos
Dmun,
Yes, but these two brick masons were so fast that they were able to lay many courses in a day's time and clean them up before leaving.
Breven,
I kept wondering why they were saving all of the old brick pieces, loose dry mortar, mortar bags, concrete block pieces, & a small pile of pea gravel. Obviously if the walls ever come down my yard will be a waste dump!!! That's why I wasn't sure about the excess thermal mass outside the oven perhaps soaking some of the heat away from the inside of the oven, making it tougher to maintain a good high heat. But since curing the oven haven't had many opportunities to try it out. BUT SOON!!!!
Jim BobLeave a comment:
-
Re: Brick Oven Photos
Wow...filled the house with sand...that makes sense.
Very cool, whatever you paid him- it looks like it was worth it!Leave a comment:
-
Re: Brick Oven Photos
It's interesting that your mason left the mortar hanging out and finished all the joints at once instead of cleaning them up as he went along:

I like an all-brick oven enclosure. I did mine that way partly because stucco is not one of my skills in life.Leave a comment:
-
Re: Brick Oven Photos
Breven,
Yes, i do have some pics of the roof. I watched the contractor and I still didn't believe it. Wasn't sure how in the world he planned to make a slanted brick roof without any support. Take a look. He filled the void with everything but the kitchen sink. We used some old gutter material to line the oven and pour the remaining vermiculite into it. Then he topped it all with sand and leveled it out. Then used that for a base for a nice level and smooth layer of brick on the roof. Turned out great. Not sure if I have too much thermal mass as opposed to insulation or not outside the oven. Did make strong effort though to ensure the full 4" thickness of the loose vermiculite.
Jim BobLeave a comment:
-
Re: Brick Oven Photos
Jim-
Do you have any pics of the roof? Curious how you did that...
Oven looks fantastic!Leave a comment:
-
Re: Brick Oven Photos
Rick,
Thanks for the feedback on utilizing the lower storage area. Sounds like a plan. When complete could you take some pics and send them? Sure would like to see it in action.
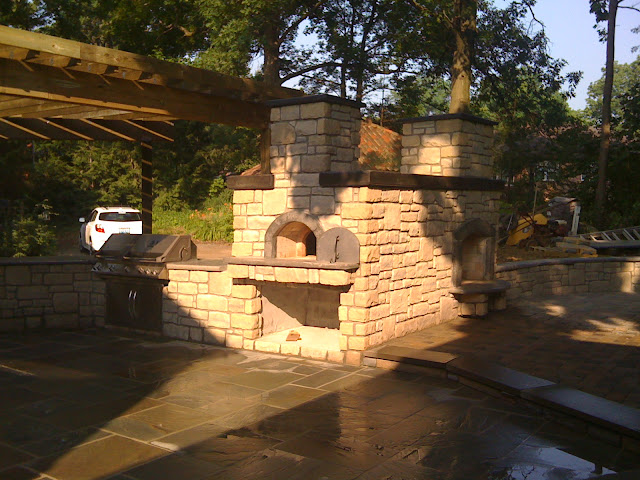
I had hip replacement surgery two weeks ago and have been out of commission temporarily. Hope to be back firing the oven in another week or two. I really like having a cooking surface that is 52" above the ground!! I am 6' 31/2" tall and it is just right.
Jim BobLeave a comment:
-
Re: Brick Oven Photos
Hey Jim Bob,
I just read your post about not knowing what to do with the bottom (storage) part of the oven. I'm planning to make an expanded metal bin that will open like a giant drawer on some full extension angle iron runners and wheels. I already drew out the plans for the runners and I think it will work just fine. That way I won't have to 'crawl' in the bottom to get wood! I'll just pull open the front door but it will really be a drawer!
Best to ya,
RickLeave a comment:
-
Re: Brick Oven Photos
Ken,
Thanks.
Did you notice the yellow cords hanging out the brown box in the front of the oven? Those are the two thermocouple probe leads from the dome and the floor of the oven. I found that brown electrical box at Lowe's and it works fine to house the wires.
I still haven't decided what to do with the lower opening. Too damn low for me to store anything. Way below knee level!!
Jim BobLeave a comment:
-
Re: Brick Oven Photos
Very NICE Jim Bob. I love the night time shot. Gorgeous oven.Leave a comment:
Leave a comment: