Announcement

Collapse
No announcement yet.

A quick photo history

Collapse
X
 
  • Filter
  • Time
  • Show
Clear All
new posts

  • #16
    Re: A quick photo history

    Thanks Christo, I figured it's going to need to dry out a bit, and heard that the ovens need to be seasoned before they become pretty consistent. Overall I was pleased, except for my lack of ability to place the pizza properly and manage the fire. I've been making pizza's on my grill(s) and have become pretty handy with the peel, but the grill(s) are accessible from above, which is a lot easier. The last couple pizza's I've made I've used parchment paper, and it has worked out great. What are the feelings about parchment paper in a WFO?

    Comment


    • #17
      Re: A quick photo history

      Got the top hearthstone laid last nite. Started cleaning up for a party on Saturday. Yesterday was the last day to work on the oven until after the party, according to my better half 
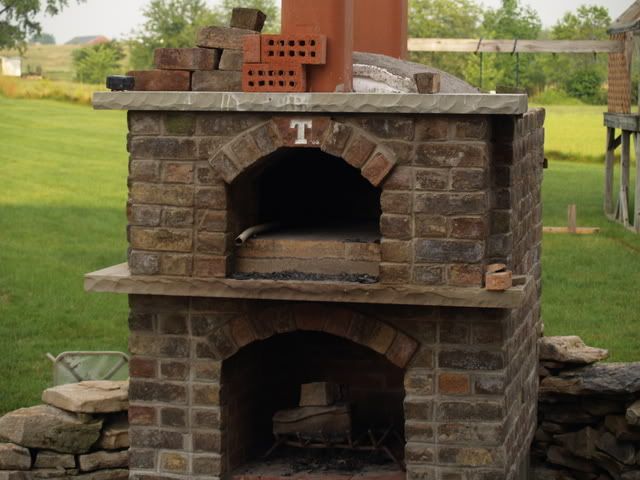
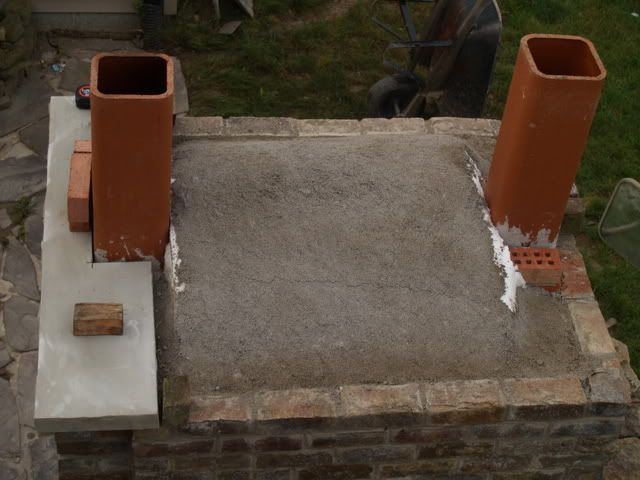
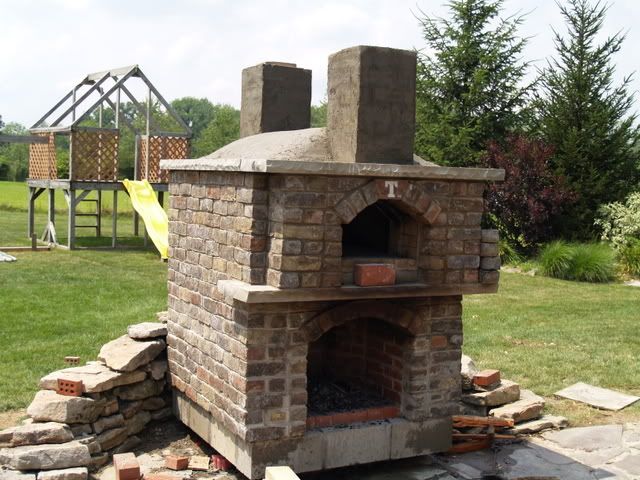
Anyway, I'm still trying to figure out my final design for the roof and chimneys. The current plan is to lay the 10 hole bricks on end the entire height of the chimney and then stucco them. The bricks to the left of the chimney is the current design for the front, and I plan to lay about 2" of high strength concrete on top of the vermicrete(w/reinforcing wire), and then stucco on top of that. I'm thinking I may get 3 more 6" wide hearthstones to lay around the perimeter of the top? The oven is functional, but I need to make it weather tight. Here are the latest pics:
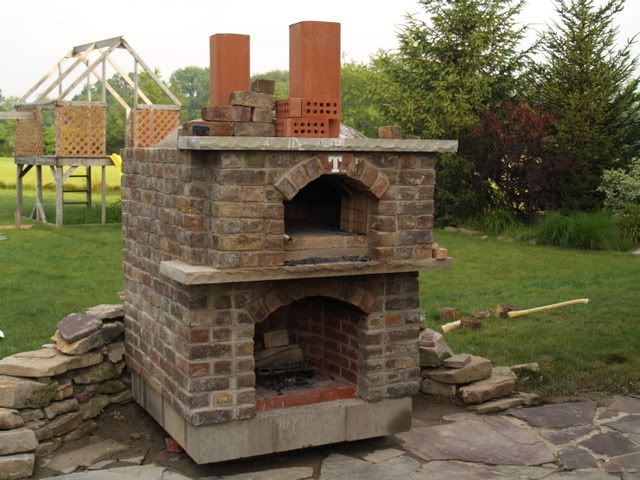


      After the hearth was in place and I tucked & pointed the joint, I put 2 9# pork butts on my Big Green Egg to smoke for the party. They've been cooking for 14 or so hours right now and should be done around noon. I pressure washed the flagstone and the patio furniture, to keep the wife happy also. Hopefully at lunchtime, I'll be able to take the pork off and put the 9# chuck roast on. It will hopefully be done before I leave for work tomorrow morning. I do need to remember to get some pizza dough out of the freezer in case I decide to fire up the pizza oven Saturday evening.

      Comment


      • #18
        Re: A quick photo history

        I made one Pizza using parchment because I was using a gluten free base and it was a little moist shall we say. the parchment blackened and pretty much burned around the edges because the floor heat was just way to high. most of those papers (at least the siliconised ones) are serviceable up to about 230C and my ovne floor is around the 400C mark.
        My oven took quite a while to get over the dampness of getting the fibre blanket and vermiculite soaked (winter here), but I am keeping it covered and it is going great now.
        Bob/.

        http://www.flickr.com/photos/2466202...7604958435358/

        Comment


        • #19
          Re: A quick photo history

          OK, since my last post, I decided to add hearthstones around the entire upper perimeter. I installed them last Wednesday. This morning I poured the cement roof, layed the chimney bricks, and put on the first coat of stucco. I still have the final, colored (terra cotta), stucco to put on the chimney and skirt, and lay the brick chimney caps, and finish the openings of the fireplace & oven. Almost there. I did have success last nite cooking 3 pizza's. I was overcautious, and could have cooked them for another 20 or 30 seconds, but they were good. Here are the pics.


          I've been using the fireplace a couple times a week. It is working wonderful. We had friends over twice last week, and sat around the fire, listening to music and talking. Very relaxing.

          Comment


          • #20
            Re: A quick photo history

            Too bad you can't put a trap door in the oven floor.

            When you're done making pizza's, dump the upper fire into the fireplace, throw on a couple logs and you're in business.

            It's turned out really great!!! It's gonna be so sweet when it turns chilly!

            Christo
            My oven progress -
            http://www.fornobravo.com/forum/f8/c...cina-1227.html
            sigpic

            Comment


            • #21
              Re: A quick photo history

              Christo - It's funny you mention that. I got up early last Sunday to bake a breakfast focacchia. (Focacchia bread with butter, brown sugar & cinnamon). It was pretty cool that when I shoveled out the ashes to bake, that I had a nice fire going in short order. It was a nice cool morning so I didn't mind at all.

              And, thanks for the compliment. It's been fun, I'm a little dissappointed it's almost over. Oh well, I'll have to find something else to turn my attentions to.

              Comment


              • #22
                Re: A quick photo history

                Hey Chevelle! Saw your recent post and went back to your build.

                I like your concrete roof. I spent lots of time trying to figure out how to do mine and settled on EPDM rubber membrane - I think I like your solution better. I could have simply poured 2 inches of concrete on the top and sloped it towards the drain area. All the worry about isolating the rubber roof from the chimney would have been eliminated.

                How is it holding up? Any new pics? Love pics of fired up ovens in snow!!!

                Christo
                My oven progress -
                http://www.fornobravo.com/forum/f8/c...cina-1227.html
                sigpic

                Comment


                • #23
                  Re: A quick photo history

                  Christo - Just took a look at your build also, fantastic work & design. Those columns are beautiful! How did you get the 'raised panel' look?

                  The oven is holding up very well. I do have to admit that I still have work to do, or as some would call it, finishing! My intention was to stucco the roof & chimneys with colored stucco, but I haven't sold myself on that or a chimney cap design, so I've just been using the oven. I'm almost ready for another door. I made my first one out of oak, and it's pretty charred. I have my old firepit that has a copper roof & skirt that I think I'm going to use to make the next door out of. I have some of the hearth insulation left that I'll use in the door also. Anyway, I will try to get some winter oven pic's as I'm going to be doing my holiday cooking on Friday. My wife & I decided that we are going to give a nice basket & linen filled with a hearth loaf, homemade pasta and a bottle of wine to our close friends & family. My plan right now is, fire the oven early Friday am, cook a few pizza's for lunch, and then 3-4 loads of bread, along with a few glasses (or bottles of wine) with the xmas tunes playing indoors and out.

                  The oven has really helped me expand my cooking skills. I have my goto dough and sauce recipes. (I've been working on both of those for about a year) We rarely have anything but plain pizza anymore. I also have my goto hearth bread, focacchia, & ciabatta recipes. I normally pull some sort of a roast or a whole chicken from the freezer on bread baking days. Once the last load of loaves comes out, the roast & potatoes goe in. It's all pretty easy and efficient.

                  Comment


                  • #24
                    Re: A quick photo history

                    70-
                    The oven is just O.K. I mean awesome! I really like it. Thanks for sharing.

                    Now, I want to see the 70 Chevelle.

                    Also, do you think you could share your recipes? Like: pizza sauce, crust or bread doughs. I am always looking for new ideas.

                    That is my 66 GTO in the avitar.

                    fb66

                    Comment


                    • #25
                      Re: A quick photo history

                      Nice Goat! I updated my avatar.

                      Not the best pic, but you get the idea. 3 coats Dark Montanna Blue, 3 mid coats of violet pearl, and 3 coats clear. It's a poor mans chameleon paint. (Looks black at night, blue in the shade, and pops dark purple metallic in the sun)

                      Thanks for the compliment on the oven, it was a fun project.

                      I don't mind sharing my recipes at all, but I'll have to get back with you tomorrow.

                      Comment


                      • #26
                        Re: A quick photo history

                        70 Chevelle,
                        Your car looks great! I had a friend in Florida who had his '70 Chevelle SS 454 stolen right out of his garage. They broke in the front door, took the keys and open the garage. We could always hear the car start. They must have pushed it a little ways before starting the car. They found it days later gutted. He put it back together. It looks great.
                        Hook me up with your recipes.
                        FB66

                        Comment


                        • #27
                          Re: A quick photo history

                          I've owned my Chevelle for 14 or so years. It took 8 of those to get it on the road. (ie: bodywork, paint, engine, tranny, interior) I used to be pretty protective. Now I just use common sense. I have a good appraisal & insurance, so if it happens I'm only out my blood, sweat & tears!

                          I adapted a recipe I got from another website for my sauce. It's simple and delicious.

                          28 oz San Marzano Tomatoes (I use Delallo's brand and Lavalle)
                          14 g brown sugar
                          7 g sea salt
                          3.5 g herbs & spices (see below)
                          3.5 g garlic powder
                          3.5 g onion powder

                          herbs & spices (dried & crushed)
                          earthy component
                          4 parts oregano
                          1 parts parsley
                          sweet component
                          4 parts basil
                          1 parts fennel seed
                          savory component
                          2 parts rosemary
                          2 parts thyme
                          spicy component
                          1 parts paprika
                          1 parts black pepper

                          The 'parts' are whatever measurement you want. I normally use tablespoons and put the mixed ingredients in a mill, (coffee grinder), and then I'll put the entire mixture in a leftover spice jar and use as needed.

                          Once you put your spices together, measure out 3.5 grams worth in a bowl. Wet (just enough water to moisten the spices) and put in the microwave for a minute on defrost. You'll know you've got it when you get the delicious aroma. Put your can of tomatoes in a food processor, along with the spices and pulse until you have the consistency you like. I do drain some of the juice from the tom's so it's not too watery. It seems too simple to be as good as it actually is. I normally make a whole batch and then portion out for 1 or 2 pizza's and freeze.

                          For dough, I actually have 2 recipes, one for the wfo, and one for the indoor oven.

                          WFO recipe

                          Caputo pizza flour 100%
                          Hydration 64%
                          Salt 1.5%
                          Yeast (IDY) .54%

                          I incorporate the dry ingredients and then add the water. I mix by hand in a large tupperware container. It has become the most efficient way for me. I have one bulk rise for 1-2 hours then I portion into individual balls, 250g, and put in the fridge for 16-24 hour ferment. (If I make a big batch, I'll vacuum pack & freeze after the bulk rise.

                          Indoor oven recipe

                          Con-agra Kyrol hi-gluten flour 100%
                          Hydration 63%
                          Salt 1.5%
                          EVOO 1.5%
                          Yeast (IDY) .54%

                          The mixing & rising are the same as above. When I cook in my indoor oven, I use 2 stones, one on the bottom to place the pizza and one on the highest rack. The pizza's really turn out excellent.

                          I use my indoor recipe, when I'm being lazy, and also when I make spinach & feta pizza in a 12" CI skillet. I saute the spinach with garlic & olive oil. While the pans still warm and has the leftovers, I stretch my dough and put it in the skillet. Then I place the spinach, feta cheese, and a little mozzerella and throw it in the oven. It's one of the family favorites.

                          Comment


                          • #28
                            Re: A quick photo history

                            I just ran across this thread trying to find a design for a fireplace/oven combo - we're building a patio, and wanted a fireplace/pit as part of it. I would also REALLY like a WFO, primarily for breads. We were talking with the owner of a landscaper we were considering using, who suggested building the fireplace into the retaining/seating wall for the patio. I could then build the oven on top of that at a (hopefully not too much) later time.

                            Your idea of running the fireplace flue behind the oven seems like a sensible one and it doesn't look like it makes the base that much larger than others I've seen. I was wondering about the dimensions of your structure. Specifically, how big is your base, and how wide are your firebox opening and oven interior? Space is a consideration, as we live in town and I'm hoping to keep at least 10' away from my shed and my neighbor's house so as not to have to build the Sears Tower of chimneys in order to meet code. Thanks for the info.

                            Bob

                            Comment


                            • #29
                              Re: A quick photo history

                              Reschaff - From what I could find and remember, the base ended up being 48" x 52". The firebox opening for the fireplace is approximately 24" x 26". The interior of the oven is 31" x 31", the dome height is 17.25" and the entry to the oven is 11.75" x 18".

                              Here is another link to my build with some additional photo's & dimensions. http://www.fornobravo.com/forum/f6/f...ning-4035.html

                              Something to consider, do you want a fire pit or fireplace? Pits are nice if you are going to have more than a few people sitting around. My fireplace can keep about 4 people warm around it. With a pit, you can surround it, aside from wind direction. I've built fires in pits that kept upwards of 15 people warm and it shined like the sun! Anyway, consider what your needs are and decide from there. With a pit, you may be able to save enough money to have the oven built right away?

                              I will say that I'm having an issue that has also been recently discussed with moisture getting thru the dome and wetting the insulation. I'm now trying to figure out how to design an actual roof over the top that passes fashion with the boss and doesn't require any 'unbuilding'. At Saturday evening's 'board meeting' (my wife and I sitting by the fire, listening to music, and discussing the worlds problems over a few glasses of wine) I developed my master plan. I told her I'd like to extend my flagstone patio 10' further into the yard and then another 14' behind my garage/shed/barn. Then extend the gabled roof of the garage/shed/barn 10' over the 14' x 10' area and build a dedicated oven. It would basically create a small pavilion extended off the patio. Then rebuild a dedicated fireplace on the flagstone patio. Great plans, but last year I built the oven, which gets a good deal of use, and this year I built an outdoor kitchen, extended the roof over my deck and added 4' to the deck. I guess I'll need something to do next year????? Here's a pic of my current project. I just finished installing the base board and foot rest yesterday, but haven't gotten any pic's of it all completed yet.

                              From this:


                              To this:


                              The roof:

                              You can see the end of the gabled roof of the garage/shed/barn in this pic that I would extend 10':

                              Comment


                              • #30
                                Re: A quick photo history

                                70chevelle, thanks for the info. A pit would be nice, but like I said, space is an issue. The entire patio will probably only be 19x14 due to our small property, so a pit and an oven will take up too much space. You have a beautiful property, btw. Looks a lot like my neck of the woods actually. What part of PA do you live in? I'm in Northumberland, at the confluence of the North and West branches of the Susquehanna.

                                Comment

                                Working...
                                X