Attached Files


-
Enclosure walls have been poured. I used some wire mesh to hold 1/2” rebar in place wrapped around the enclosure wall close to the top. Since there will be rafters forming a conical roof, there will be an outward load on the wall at the top. That outward load will pit the concrete in tension, so that is where the rebar is. I also poured the wall thicker on either side of the outer arch to buttress the walls there since there will be the weight of a full masonry chimney sitting the arch. I am thinking about using theroseal on the enclosure walls under the stone veneer to keep water from seeping through.
-
The package of rockwool was only $50, seemed like a cheap way to make sure I’m well insulated. The problem with the rockwool is that it doesn’t form as well to the shape of the dome. My plan to stuff more rockwool and fill with perlite is more to fill the gaps than add more insulation.
Once the clay flue liner is mortared on and has had a few days to dry I will start drying fires with charcoal briquettes. I already picked up a couple of bags based on your advice in another thread Russell. Thanks for all of the great advice you provide on this forum!Leave a comment:
-
That is going to be quite a insulated beast. I am not sure you will gain much more efficiency with dry perlite and rockwool in over the CaSi and Rockwool but if thats what you want to do have at it. Being in an enclosure will significantly reduce water issues from above and setting the p/vcrete on tile will minimize upward water migration. You can also begin the slow/low cure with charcoal biquettes which will get you around 200F with no flame impingment and you can cook a dutch oven at the same time. Curing is one point where builders get excited, go too fast, too hot and crack the oven. The turtle wins the race in curing.Leave a comment:
-
For insulation I picked up two boxes of one inch thick ceramic fiber blanket. I set aside enough to wrap the clay flue liner with one layer and put the rest on the dome. This got me three layers over the entire dome and four layers for the lower foot. I picked up a package of rockwool since it is significantly cheaper and won’t actually be touching the dome (although I think that would be fine since it is rated to 2,150F). With the rockwool added most of the dome has 6.5” of insulation on it. Once the enclosure walls are up I will stuff some remaining rockwool in the larger gaps and fill the rest of the void with loose perlite.
I built up a layer of P/V Crete around the base of the oven to support pouring the concrete enclosure walls. I’m going to use hardboard for the form walls. That P/V Crete will hold the bottom of the inner part of the form in place. The P/V Crete is sitting on tile with landscape fabric over it to keep it off the hearth just like under the dome. This introduced a surprising amount of water into the floor and dome. The next day I could see a line in the dome where the water had absorbed to that was about 2 courses up the dome.
I waited a few days for the dome to dry out some and then put a small electric heater in there to help dry it out more. The dome walls are currently sitting at about 160F). I’m at least a week away from having the enclosure walls poured and the clay flue mortared on. I figure I will run the heater until that is done and then start drying fires.
Attached FilesLeave a comment:
-
-
The clay flue liner is just sitting in place in these pictures, but it gives an idea of what my plan is and what the transition for the flue looks like. I do have another section of liner, but I’m not sure if I’m going to use it.Attached FilesLeave a comment:
-
-
The FB set looks reasonable. I had GI Metal peels but needed a rake so I ordered from Amazon - G.a HOMEFAVOR Pizza Oven Ash Rake, Stainless Steel Charcoal Rake Pizza Oven Accessories, 47 Inch Long Handle, Ash Rake Tool for Wood Fired Pizza Oven $31.
I would have liked a longer one and thought I could order a second as they are shipped in three threaded sections but the middle section is male on both ends, so no go.
As rsandler stated, I like wooden peels for loading pizza and metal for manipulating and removing. My oven is 42" diameter and my peels are 59" handle.
Leave a comment:
-
The FB tools are nice; I got the 3-piece set, and later acquired the square peel (or possibly a different square peel? can't remember). I only use the square peel for loading bread; I use short-handled wooden peels for loading pizzas in the oven. I still have and use the oven rake. I kinda miss the oven broom--the wooden brush eventually degrades due to heat (true of any model, not FB-specific) and since I couldn't find a replacement one that fit the FB version I bought something cheap that twists onto a broom handle when the first one died. Never was quite as good though. The premium stainless steel round peel is a nice upgrade over the one that comes with the basic set. Blade on the basic one is a little flimsy, and kept getting bent.
As far as handle length, my ovens are/were both 36" diameter compared to your 40", but I've never found them even close to being too short; you're probably fine there.Leave a comment:
-
Question about tools: I’m getting pretty close to starting my drying fires and eventually cooking, so I have been looking at different options for tools. I’m wondering how long the handles are for the tools you are currently using and if you find that length adequate?
I’m leaning towards ordering a set from Forno Bravo since I’d like to give them some business since they so graciously host this forum and seem to be pretty readably priced. These have a 47” handle, but even in the description say that they are good for their smaller ovens. Most available tools have similar or shorter handles than these. The back of my oven is 51” from the front of the outer arch.
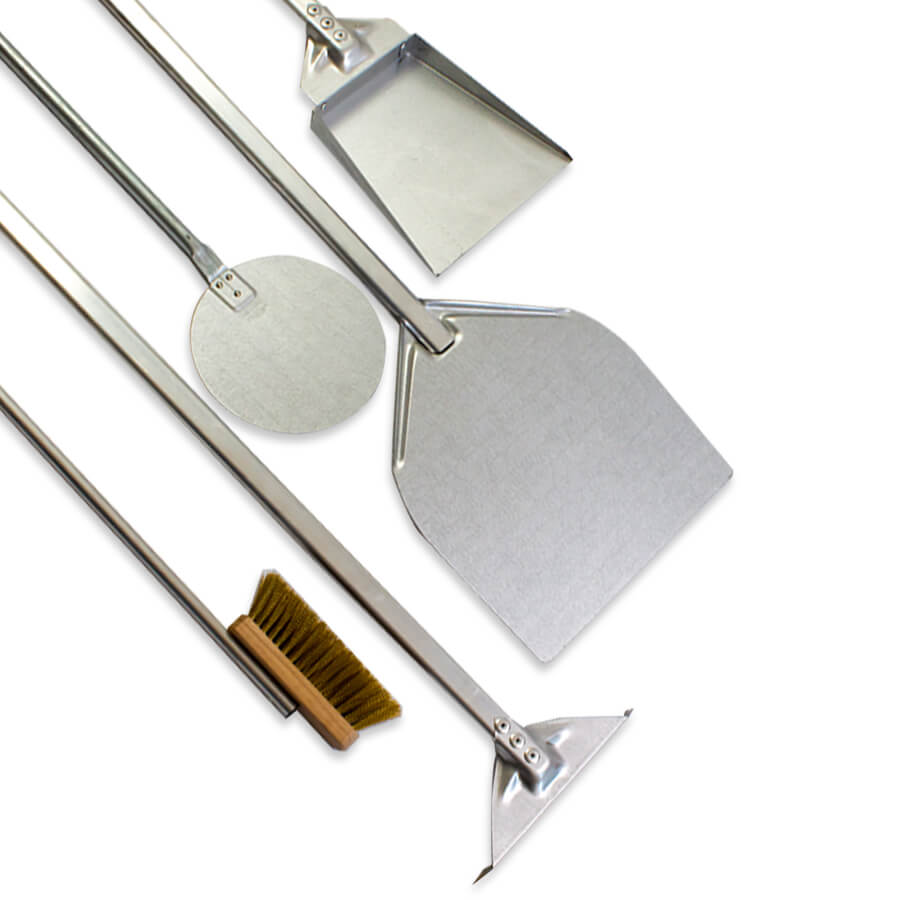
I’m assuming a link is ok to include since it is for Forno Bravo.Leave a comment:
-
I finished the flue by adding a few heavily worked firebricks so there is a smooth transition to the chimney. I will install an 8.5x13 clay flue liner in the remain hole. I’m holding off doing that until the enclosure walls are in place. I have been tarping the oven when I’m not working on it and the height of the flue liner will make that much more difficult.
I’m planing on wrapping the clay flue liner with an inch of ceramic fiber blanket and then bricking around that. I think that will address the cracking concerns of the clay flue liner due to temperature differential across the thickness.
I also added a picture of the detail of the backside of the outer arch and how that interfaces with the inner arch. I will stuff ceramic fiber into that vertical gap after the mortar has set for a few days.Attached FilesLeave a comment:
-
-
I got the outer arches mortared in today. For the heat break between the inner arch and the inner most outer arch, I cut a grove in the arch bricks and glued a strip of ceramic fiber to the inner arch. I will also stuff some ceramic fiber into the vertical gap between the two once the mortar has had some time to cure. These two structures are completely separate. I did also fill the gap at the ends of the floor brick gaps with high temp fireplace sealant/caulk (it is good to 2732°F).
Attached FilesLeave a comment:
-
-
I built the outer arch walls using the same method to isolate them from the inner arch. Since the walls are completely independent from the inner arch and the floor, I wanted to add some temporary buttressing before building the outer arches since they are a little wobbly. My plan is to pour the enclosure walls using concrete to keep the round shape. The CMU’s are glued to the hearth and will be removed prior to the enclosure wall concrete pour. The calcium silicate board will remain. I will use something to isolate the concrete wall from the calcium silicate board to keep it from absorbing water (probably just aluminum foil).Attached FilesLeave a comment:
-
-
Great work on this build! If it was me, I'd just use sealant to close the ends. That way ash will fill the remaining gap and you won't have to deal with ash dribbling out the sides
Leave a comment:
-
Thanks guys!
I started working on the outer arch today. I added a heat break to the floor by cutting a 1/4” deep notch out of the entry way floor bricks and filling it with a 3/8” thick strip of calcium silicate board. I’m planning on letting the remaining 1/8” gap fill with ash. Does this seem like a decent plan? I did pick up some high temp sealant. Should I use that in this gap rather than letting it fill with ash?Attached FilesLast edited by NewEnglandNewb; 08-25-2025, 06:16 PM.Leave a comment:
-
Leave a comment: