Announcement

Collapse
No announcement yet.

Gus's Corner - Timo's Build

Collapse
X
 
  • Filter
  • Time
  • Show
Clear All
new posts

  • #16
    Re: Gus's Corner - Timo's Build

    Gus, the build looks great so far. I wish I would have found some of those arch bricks. Would have saved me a lot of cutting and mortar. Just a thought, but I don't think I saw any footers in your foundation slab. If you live in northern IL, I am assuming you have a frost line. It is too late now, so hopefully you will not have any movement from the frost. Keep up the good work. Looks like you are on the move to a speedy build.
    Scott...
    Smuth's Build
    www.openhearthovenworks.com

    Comment


    • #17
      Re: Gus's Corner - Timo's Build

      Timo, looking at your arch layout, I think you want that center brick(the one laying flat where the vent opening is) to have some bevel on the ends. More like a keystone shape. I think if you lay up your arch bricks tight on both sides of the vent you'll end up with a taper to the center section and you can cut that angle on your center brick ends.

      I used standard firebrick and cut the long "L" shape you are describing to get the reveal at the arch, which worked nicely.

      Those taper bricks are nice, I couldn't find them in Chicago at any price.

      Doug

      Comment


      • #18
        Re: Gus's Corner - Timo's Build

        I am hoping to do two things to manage the frost: First, keep it dry. I packed 2 yards of crushed rock under the slab and set drain tile and river rock around the perimeter down to the crushed rock level. Also, I am hoping to keep the overall height about the same as width. It was a tough call. I told the inspector I'll do whatever you recommend to be safe and his comments were about the height not being much beyond the width should keep it good. We'll see come spring.

        I did bevel the keystone in the arch so it drops into place and locks in the arch. I just have to mention though, I am using a small tile saw and a hammer and chisel to make all these cuts. I laid out the hearth floor bricks and cut them today. I'll post a picture tomorrow. Very interesting stuff to cut. Firebrick seems to be softer than porcelain, but when I checked my blade...it shrunk a bunch!
        My Build Thread

        Comment


        • #19
          Re: Gus's Corner - Timo's Build

          Timo,

          You must have gotten a good deal on them...They told me they don't carry them..Darn, I was planning to get some, now maybe I will have to cut my own. or not we will see. I did luck out on a saw though; my best friends twin brother has his own masonary co. and he is going to lend me one.

          Peter
          Member WFO-AMB=WW

          Comment


          • #20
            Re: Gus's Corner - Timo's Build

            Depending on how many you are looking for I may have some left over. I haven't finished the arches yet, but I have 40 full, and split I have 80, which is more than I need. I'll let you know how it goes maybe you can use them for yours, too.

            Timo
            My Build Thread

            Comment


            • #21
              Re: Gus's Corner - Timo's Build

              Taper bricks are a standard refractory item: My Harbison-Walker branch had them in stock. They are mostly high duty since they are used for furnaces and such. It was a cost issue for me: They were four times as much as regular firebrick from the brickyard.
              My geodesic oven project: part 1, part 2

              Comment


              • #22
                Re: Gus's Corner - Timo's Build

                keep me posted I would gladly use them if you don't end up needing them. Let me know as things progress

                Peter
                Member WFO-AMB=WW

                Comment


                • #23
                  Re: Gus's Corner - Timo's Build

                  dmun, I think you mentioned early the differences between heat properties between low and high duty firebricks. I believe you are right about the taper bricks being high duty. Here's a pic of the regular flats and the tapers.

                  The tapers cut and look more like marble.

                  I am thinking that I do not want to mix the different bricks together at the vent arch seeing how that's the point of extreme heat. I believe it would be better to have the high duty bricks in that area to help with the smoke draw.

                  The whole point was do I make the arch bigger than the natural 15 1/4" width by adding splits or flats to the arch and to do that with the same high duty bricks would mean sourcing those.
                  My Build Thread

                  Comment


                  • #24
                    Re: Gus's Corner - Timo's Build

                    Well, this is really turning out to be a project. My wife is still OK with it all (Like she has a choice at this point) but is getting restless for an oven dome to begin taking shape. I have been trying to gather a critical mass of knowledge before placing the first bit of mortar on a brick. Here's my final spacing for the dome arch mock up.

                    And this is what I decided to do about insulation. I have 3 1/2" of perlite and on top that I have a 1" SuperIsol board. Looks like this:


                    I also have 100 square feet of 1" #6 Fiberfrax Durablanket.
                    I think I am ready to take the final plunge. Here we go.
                    My Build Thread

                    Comment


                    • #25
                      Re: Gus's Corner - Timo's Build

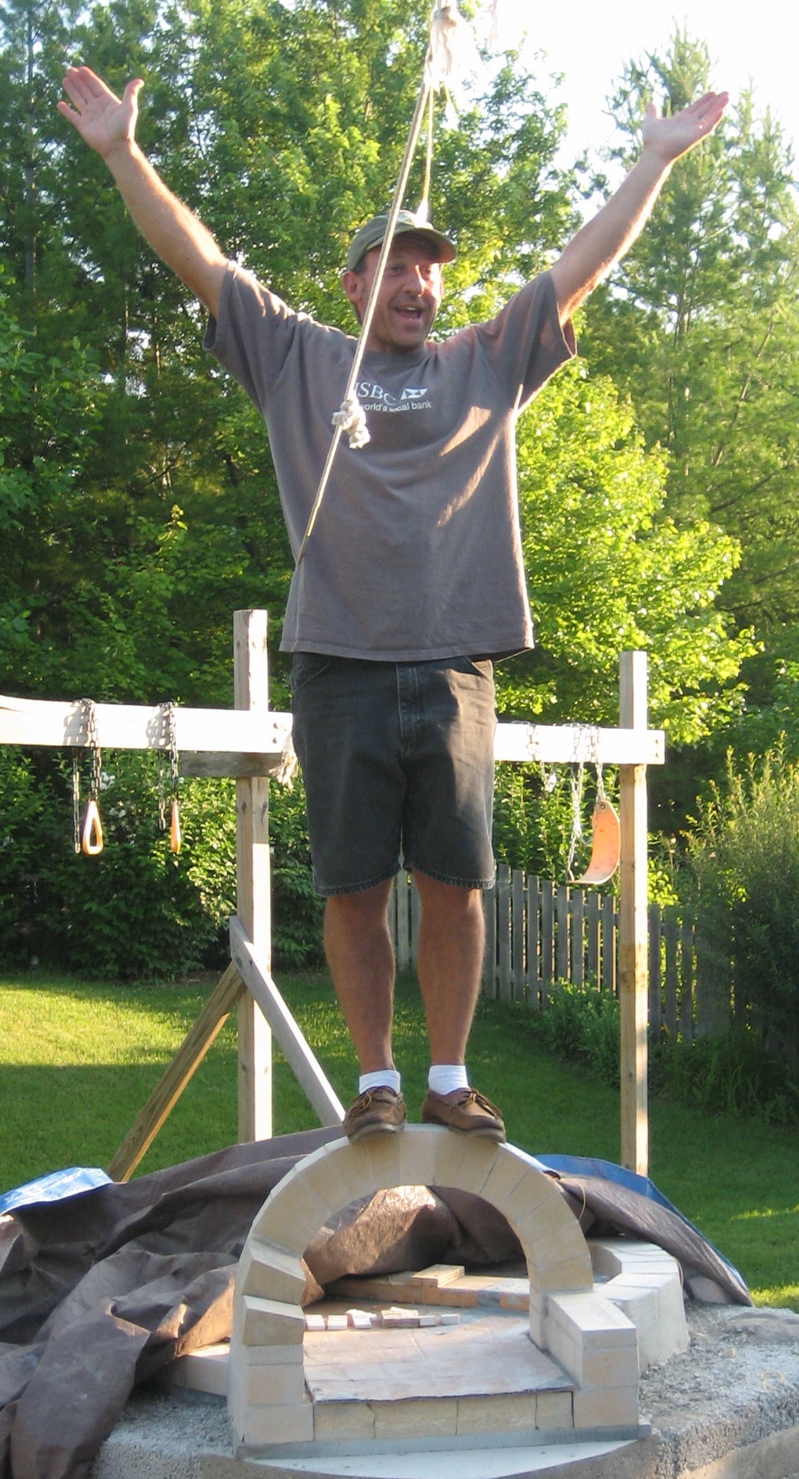
                      I slapped the arch together before the Fourth of July holiday and when I came back I wanted to see how strong it was so I took this picture. I removed the arch form about an hour after placing the bricks. The #2 taper bricks fit perfectly into the keystone I made. I had to tap it into place with a rubber mallet and that was that. The height of the arch topped out at 12 1/2" inches.
                      My Build Thread

                      Comment


                      • #26
                        Re: Gus's Corner - Timo's Build

                        That's the look of confidence!
                        My geodesic oven project: part 1, part 2

                        Comment


                        • #27
                          Re: Gus's Corner - Timo's Build

                          Nice looking arch, Timo. I wish I had made mine half-circle arches. It obviously will hold up the weight of your flue, etc.
                          This may not be my last wood oven...

                          Comment


                          • #28
                            Re: Gus's Corner - Timo's Build

                            Timo,

                            Looks great...it should move quickly now

                            Peter
                            Member WFO-AMB=WW

                            Comment


                            • #29
                              Re: Gus's Corner - Timo's Build

                              great job!

                              It's always nice to stand on something you've built....seriously - there's something about it... feels like victory!
                              -------------------------------------------
                              My 2nd Build:
                              Is here

                              Comment


                              • #30
                                Re: Gus's Corner - Timo's Build

                                Here's what I have so far. I had to slow down and heal some mortar burns in my fingers, but made some big progress after the first three courses. I found the first three tedious and I was stressing out over the beginning of the dome. I ended up using some extra wood trim for an interior door for my shims to set the dome spacing. That only took 2 1/2 weeks to figure out...

                                I am having some issues with the tips of the bricks touching the course below at this point. I guess I'll have to cut smaller blocks and space them out among some regular blocks. The outer arch and vent opening sort of turned out ok. The last block went in really tightly and was worried about it pushing out the whole left side if the arch, but luckily the mortar was still a bit wet in the last blocks that they kinda displaced a bit more mortar rather than moving the whole arch. The taper bricks are really strong not long after the mortar has set. I was able to remove the forms about an hour after completing. Just for fun I placed the 8x13" flue tile on top the arches and it was fine.


                                Well, I have basically compressed a half year's worth of weekends into the last month and will be approaching my oven work cut off point. After July 19th summertime is over and it's back to who knows when I get time to get to the oven...

                                I would like to close it in and set the flue next week, but who knows...
                                My Build Thread

                                Comment

                                Working...
                                X