Announcement

Collapse
No announcement yet.

Indoor Casa 2G90 build. LOTS of pics!

Collapse
X
 
  • Filter
  • Time
  • Show
Clear All
new posts

  • #16
    Since my last post I have been sidelined with some neck pain so I haven't gotten a whole lot done.

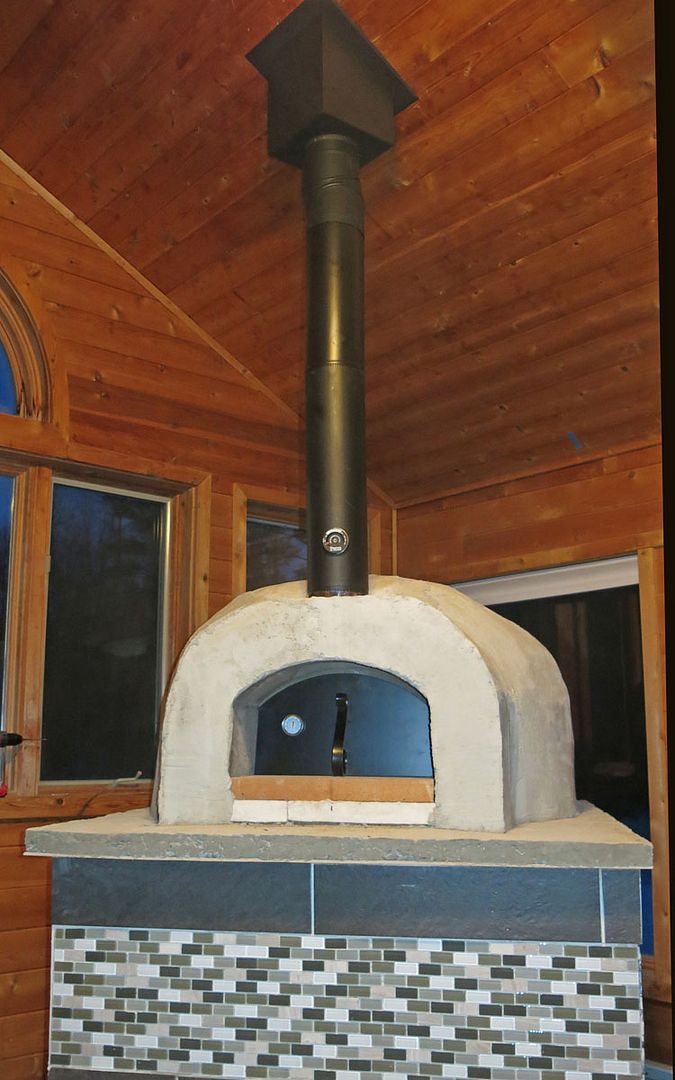
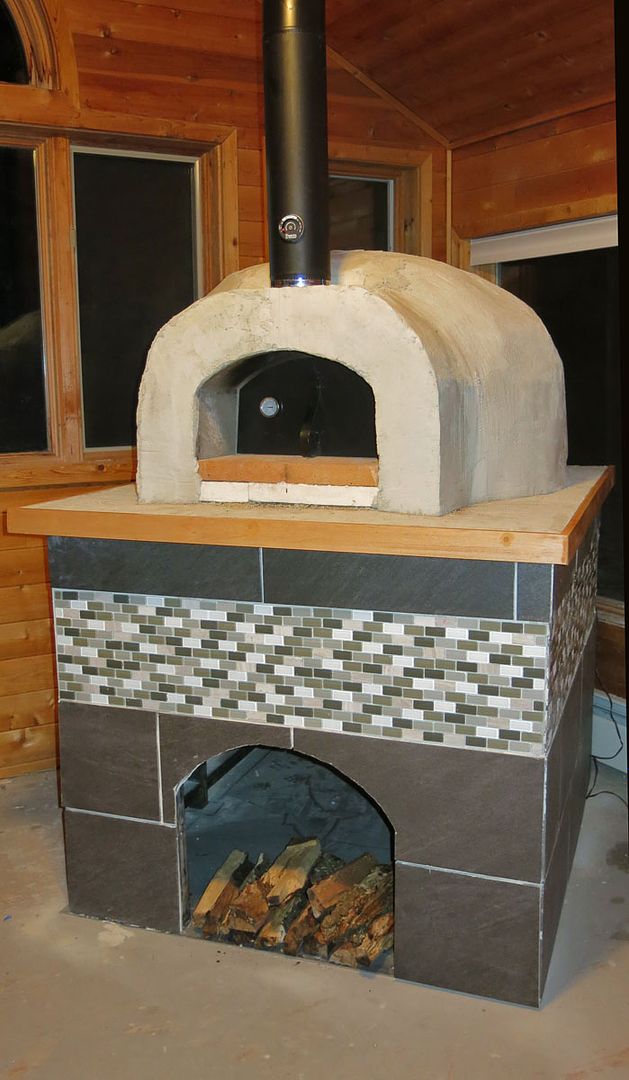
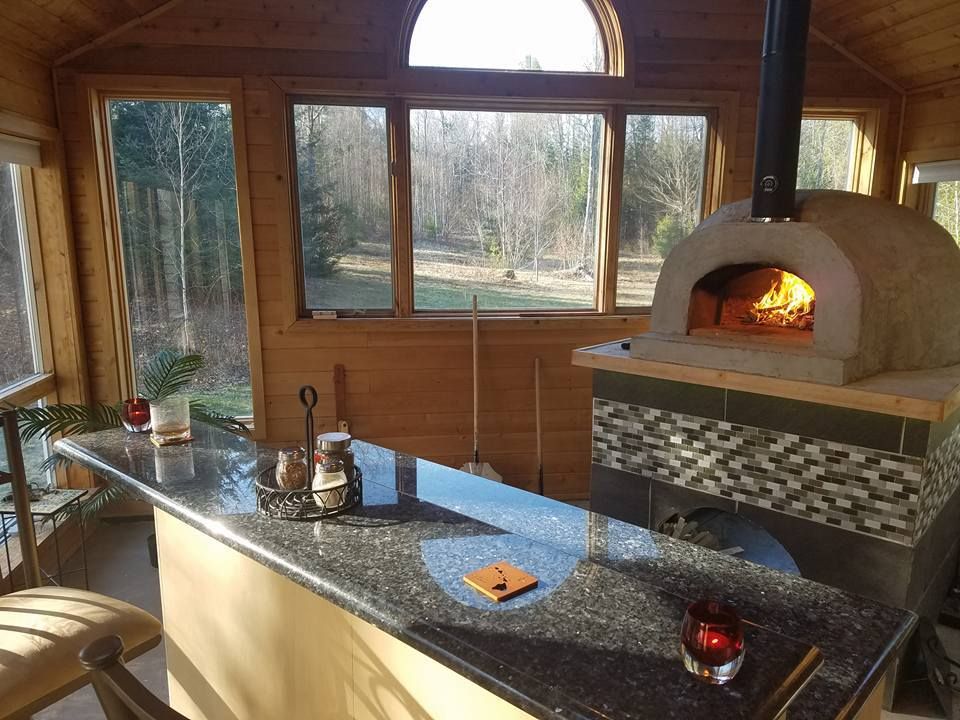
    But today I had a fellow come out and do the chimney install for me as I felt it was WAY over my skill level. I have a metal roof that is of the standing seam style and it just seemed very daunting for me to do the install. So I paid someone to do it for me and boy am I glad I did. There were two of them and it took 6 hours from start to finish, but in the end it came out beautifully and I am confident it won't leak. The flashing he put on looks incredible. Sometimes it is just makes sense to pay an expert.


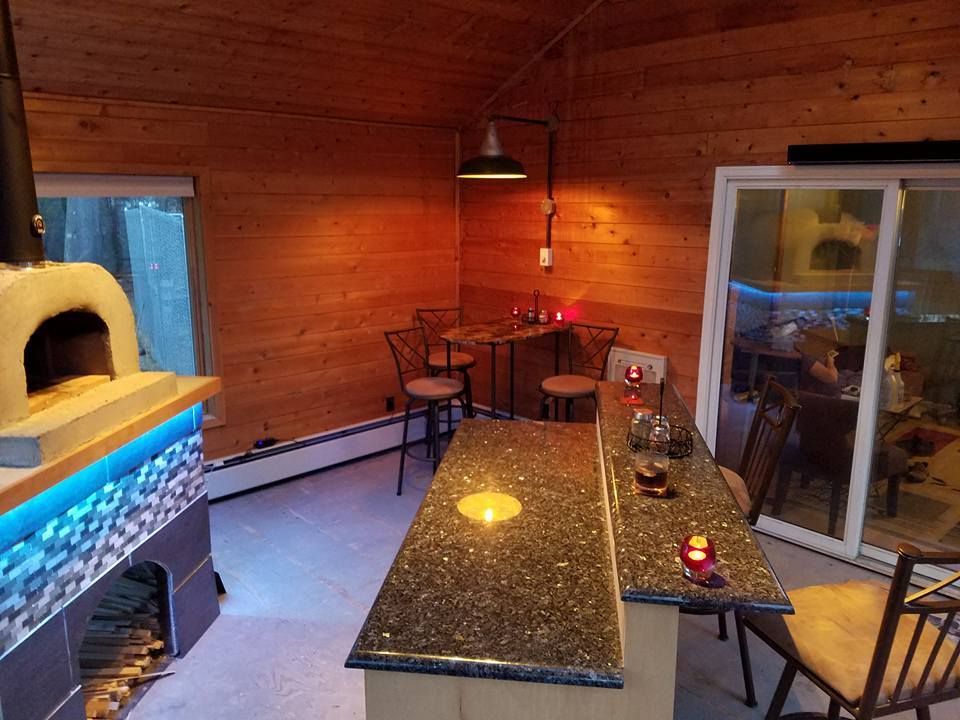
    Here she is, I think it looks GREAT!!!!


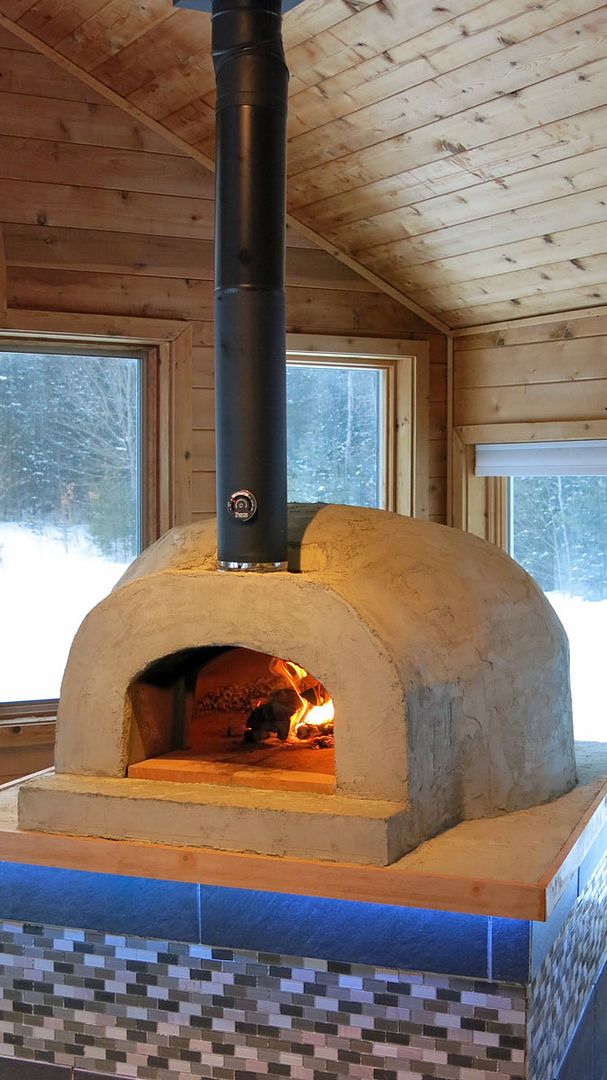
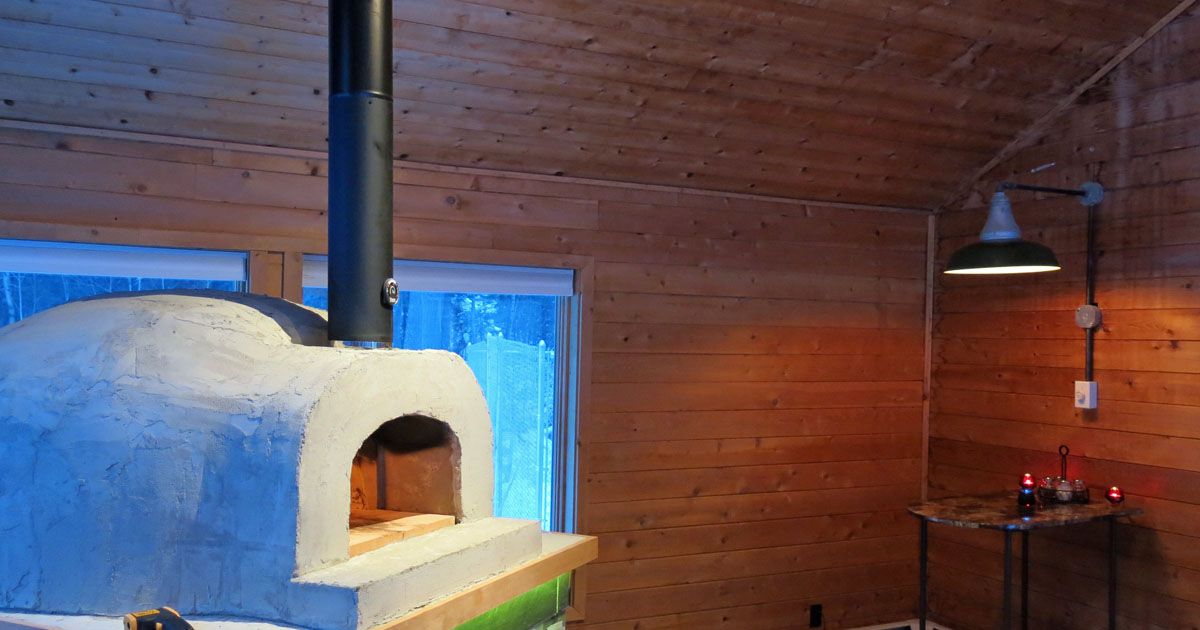
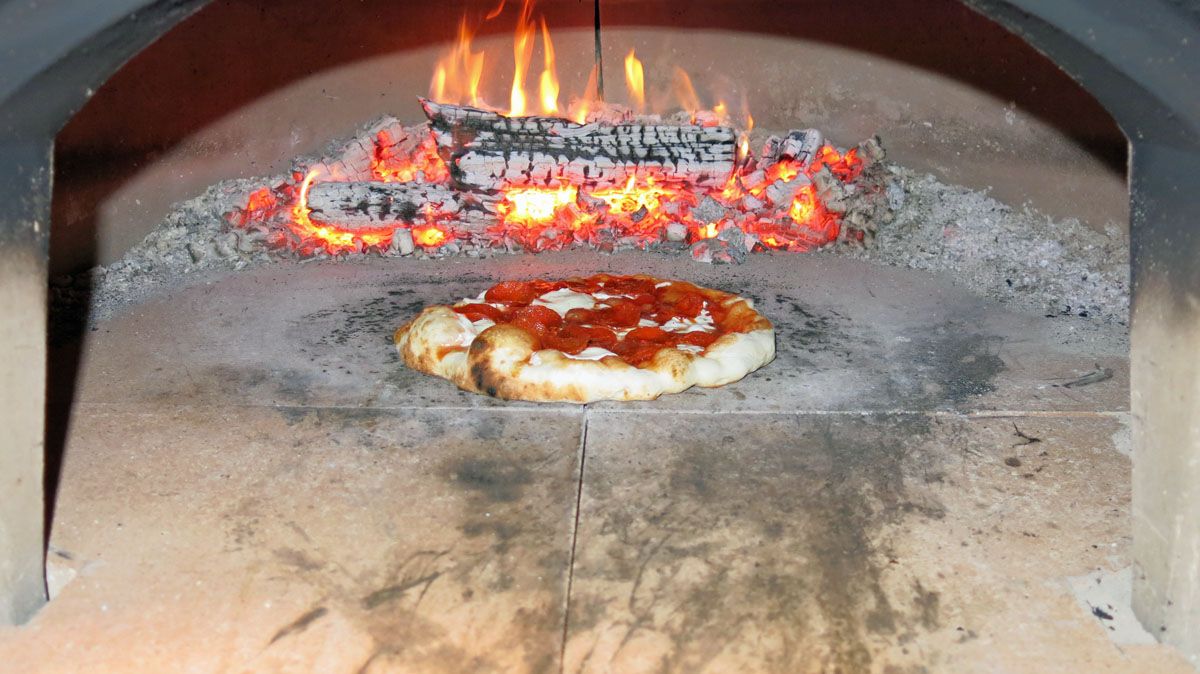
    But even more exciting, there is a curing fire in there! I can hardly express how nice it looked to have a fire going in the oven. It added so much atmosphere to the room. The chimney draws like crazy and absolutely no smoke came out of the oven opening, it simply ran up the chimney exactly like it should. Of great interest is the fact that I could clearly see the moisture coming out of the oven dome pieces as the fire burned. I mean it was blatantly obvious, I never would have guessed there could have been that much moisture left in pieces of concrete that appeared bone dry!!


    More coming soon. Hopefully I will have a good update before the weekend is out!

    Comment


    • #17
      Congratulations on the chimney. That looks great. Makes me wish I had someplace to put one inside too. Looks like it draws real nice too.

      What are you planning to do for the counter tops around the oven. I can't wait to see the final product.

      Randy

      Comment


      • #18
        Thanks for the nice words as always Randy.

        Around the oven I am simply planning on painting the slab the same color as the igloo which right now I think is going to be a soft brown. I had to order the finish stucco as no one had it locally so I am waiting for that to show up this Thursday, then the final coat of stucco will go on, the dome will be smooth, and I can paint! I am going to pour a landing across the entire front of the arch and put some very pretty black marble tiles down at the same level as the cooking deck. It should look nice.

        I got a fair amount done this weekend but not as much as I had planned. I faced the concrete slab in some very nice maple and then stained it. Personally I think it looks beautiful. The picture hardly does it any justice. If you look carefully you can see some smoke blackening inside the arch. I have had 3 of the 5 curing fires now and this thing is just rocking and rolling. This picture was taken almost 7 HOURS after the last bit of fuel was fed to the oven and it is still holding 325 degrees F. That is impressive to say the least. My chimney guy did such a good job on the install that no smoke escapes out the opening. It just sucks the smoke right up and out, it is awesome!


        I got my cool LED lights mounted under the perimeter of the slab. To be honest I think this is just way too cool. They can project a massive variety of colors and I just happened to take a pic when they were this kind of blue/purple. For the $30 they cost from Amazon I think they add a ton of character. I wish I had a fire going as well in this pic, but that is coming soon!


        I now have to get to work on the rest of this room. Tiling the floor, putting in an island to do prep work on, and installing some new lighting. More to come soon.


        Comment


        • #19
          I love your led lights. I wish I could have done something similar. That is right up my ally. I bet you must be excited about being almost done with the curing process. I can't wait to see the final product.

          Randy

          Comment


          • #20
            Wow a full month with no updates, sorry!

            My earlier post had mentioned some neck pain that I thought was getting better. I was quite wrong sadly. My pain got a lot worse and I had to go to physical therapy for a while. I finally got better and have been really busy on my project!

            I poured a landing on the front of the oven. After that I picked up the the really high quality stucco for the finish coat and put it on, it came out beautifully! I still left it fairly rough as I like that look a lot! The landing is awaiting its marble tile finish that will bring it up even with the cooking floor but it looks really nice right now. The oven has a nice finished look, but in my opinion it still needs a coat of paint.


            I have cooked a TON of pizzas and each one keeps getting a little better. My brass bristled brush has suffered considerably and I think I may need to order several more of them. They don't last long in the temps this oven generates.


            It doesn't take a lot of effort to get the cooking floor to these kind of temps or higher!! After a lot of pies I have found that 700-750 is my preferred floor cooking temp though.


            The facility I work at has an old warehouse that was being renovated and they were tossing these simply amazing porcelain coated lights. I was fortunate enough to snag one. I wish I could have gotten a bunch more, they are gorgeous.


            Comment


            • #21
              I cleaned up and rewired the light and with got it mounted on the wall.


              This is how it sits in relation to the oven. My wife bought this nice little table to go underneath it and we do have some chairs as well. however, I posed this photograph as the room isn't finished yet and I wanted to get a glimpse of how it is going to look, so more to come on this later.


              And for some fun here are a whole bunch of delicious pizzas!!


              Comment


              • #22


                Look at the char on that crust, perfection!! This is about a 2:30 cook time.


                Chewy and delicious with a crisp bottom, perfect!

                Comment


                • #23


                  Tomato, goat cheese, and buffalo mozzarella, wow!


                  Even pies that are ugly and misshapen taste wonderful!!!


                  That is all for now. Since I am back to 100% in the health department I am going back to work on the whole project with a lot of excitement. More to come soon!!

                  Comment


                  • #24
                    Wow for someone who was injured you sure have been busy. It is amazing how fast and easy it is to cool in these ovens . I know I was very nervous the first time I cooked but if you watch and pay attention it tells you what to do. I also like to cook in the floor temp range you stated. Keep up the good work. I can't wait to see it done.

                    Randy

                    Comment


                    • #25
                      Fyi, several of us have abandoned using metal brushes in the cooking area. There have been several incidents where a broken wire has been swallowed by someone causing serious stomach issues. Just a word of caution
                      Russell
                      Google Photo Album [https://photos.google.com/share/AF1Q...JneXVXc3hVNHd3/]

                      Comment


                      • #26
                        Originally posted by UtahBeehiver View Post
                        Fyi, several of us have abandoned using metal brushes in the cooking area. There have been several incidents where a broken wire has been swallowed by someone causing serious stomach issues. Just a word of caution
                        I agree, use a blowpipe instead, but remember to blow not suck.
                        Kindled with zeal and fired with passion.

                        Comment


                        • #27
                          Yes, don't inhale
                          My build thread
                          https://community.fornobravo.com/for...h-corner-build

                          Comment


                          • #28
                            I have an update tonight!

                            The island I built has now been finished and the granite was added today. It came out amazing.


                            From the reverse angle, the only thing left now is for me to put poly on the island and lay the floor tile. This has come out far better than I had ever anticipated.

                            Comment


                            • #29
                              I know this is an older thread but wanted to say thank you for this post. We are about to begin the process of picking up a Casa90 and this post has already answered most of my questions. Great job and it looks terrific! One question for you (or anyone else on here). How much ambient heat do you get from the oven into the space? Does it warm up the sunroom in the winter when you are cooking? We have an Earthship which is passive solar heating, in general the house stays pretty warm. We don't need any additional heat on sunny days but on a cloudy day we may need to bring up the temp a couple of degrees C. We would love it if this could take care of augmenting ambient temps as well.

                              Comment


                              • #30
                                Welcome to the Forum community! These ovens by design are not used to heat an area outside...Lots of insulation used to keep the heat inside the dome chamber. That said, I have had a guest over for a bake and she liked to stand in front of the open oven as the fire died down to get a little radiant heat on her back. Bottom line is the only heat you get is some from the open entry but I doubt it will add several degrees to a room.

                                I have noted that having a group of my friends tends to warm up any space.
                                Mike Stansbury - The Traveling Loafer
                                Roseburg, Oregon

                                FB Forum: The Dragonfly Den build thread
                                Available only if you're logged in = FB Photo Albums-Select media tab on profile
                                Blog: http://thetravelingloafer.blogspot.com/

                                Comment

                                Working...
                                X