Announcement

Collapse
No announcement yet.

Golden Hammer Oven.

Collapse
X
 
  • Filter
  • Time
  • Show
Clear All
new posts

  • #16
    hearth form

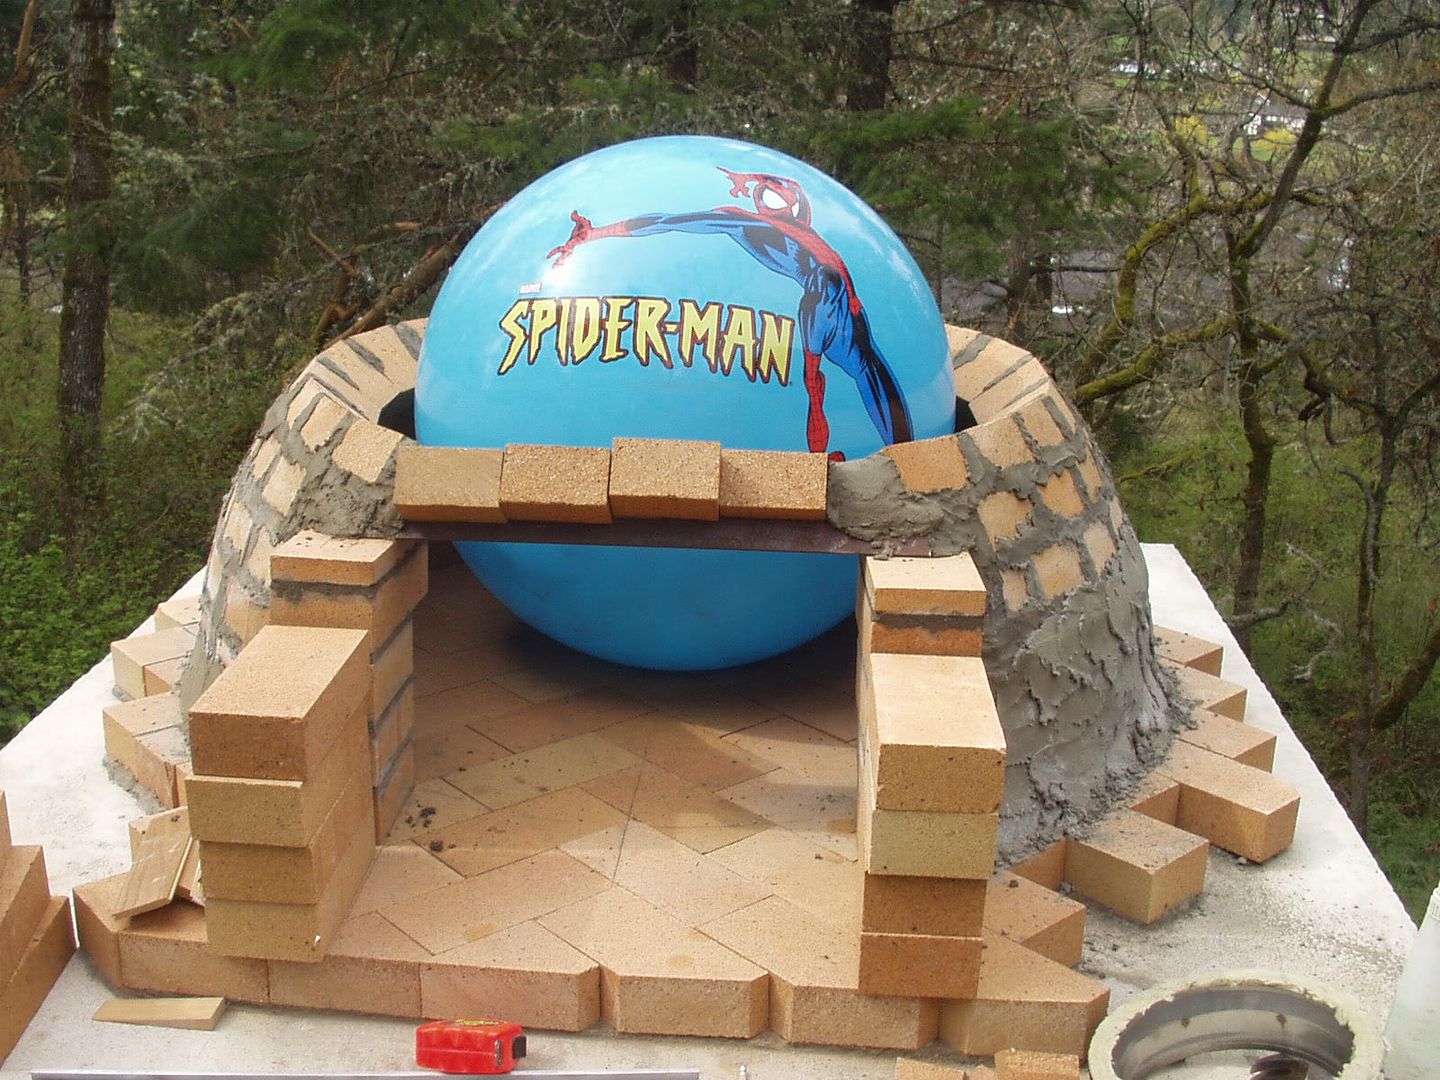
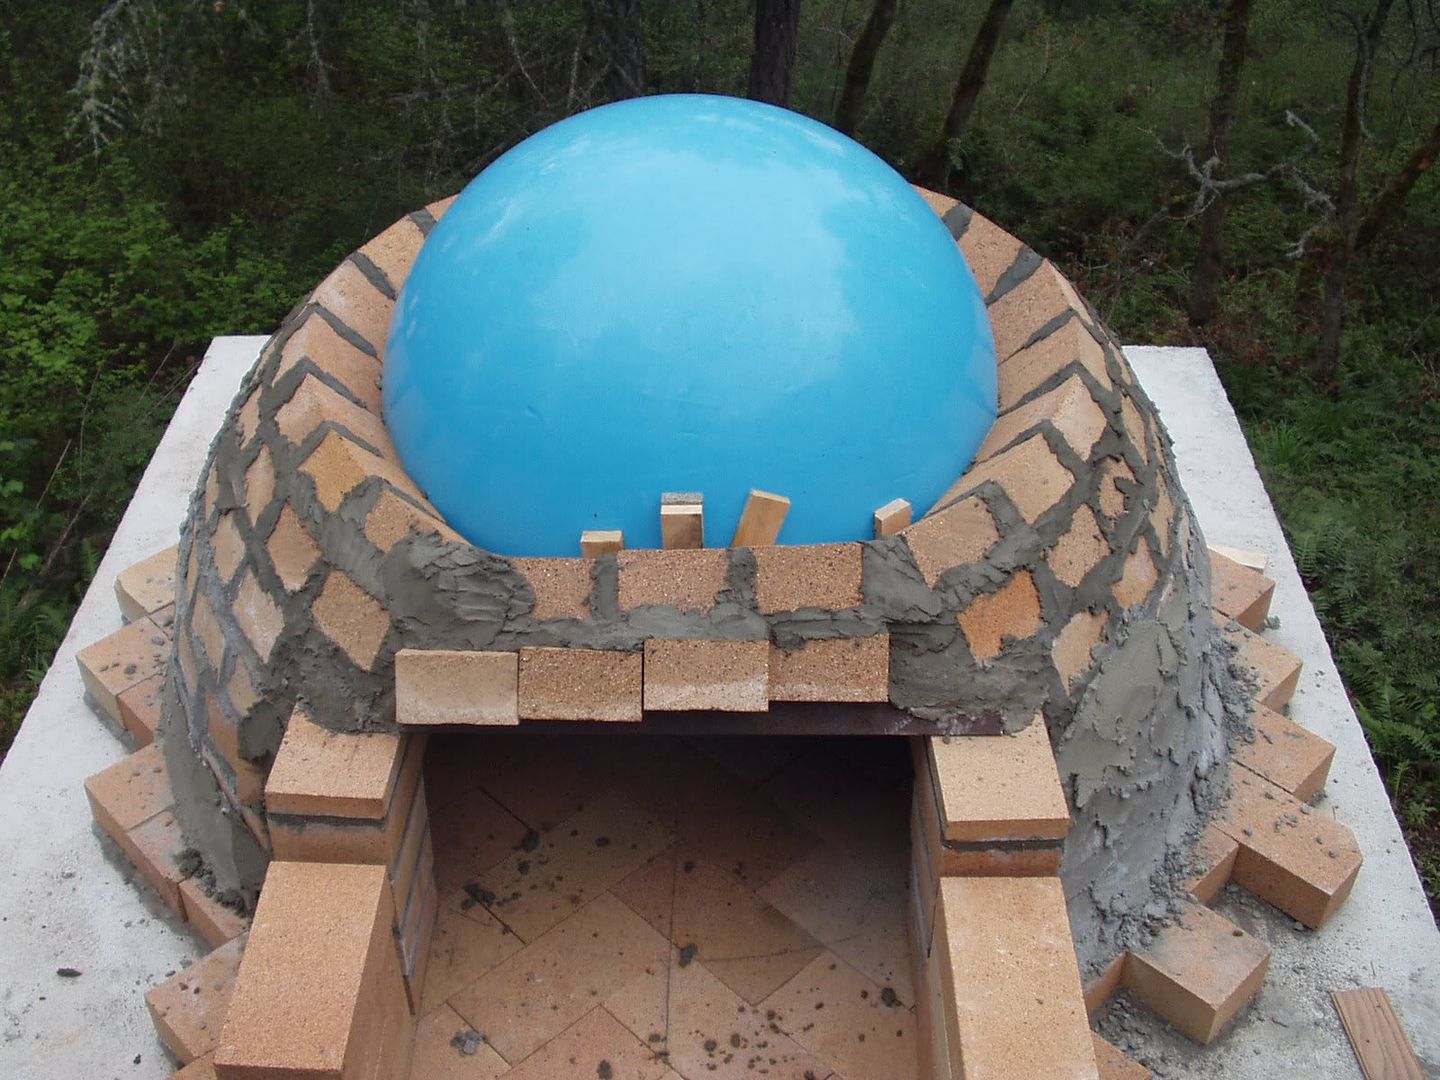
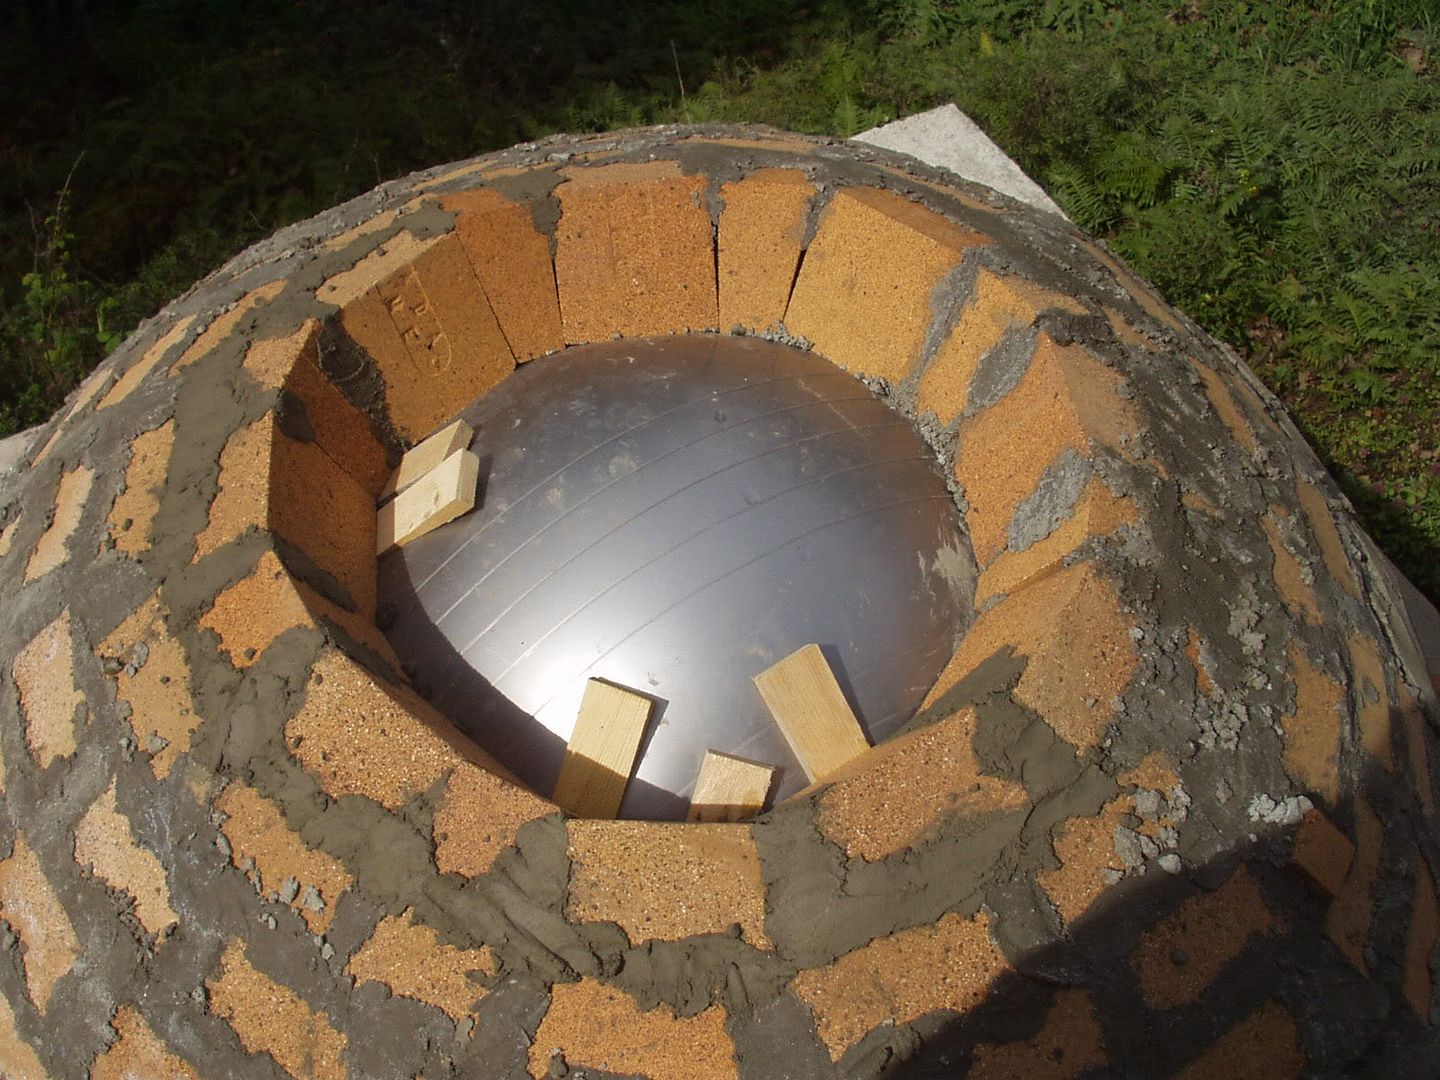
    I'm getting ready to pour my hearth, and am considering leaving the bottom of it in. If I used cement board in lieu of ply, i could just leave it in, correct? Should I use insulation board of some kind? I'm thinking about whacking a bunch of Galvanised screws through the bottom before I pour so it bonds better. I'll have photos as soon as we've capped the HEARTH STAND. Cheers, Nick
    Last edited by redbricknick; 07-19-2006, 09:16 PM.

    Comment


    • #17
      Yes you can leave the cement board in place. Make sure you support the cement board as it does not have the strength that plywood has. Not a bad idea to run some galvanized screws in there to help bond to the cement.

      Comment


      • #18
        Gosh dome it!

        So. I'm at the point where I have to tackle the dome. I have a few considerations with regards to method. The vein method seems like the no brainer, no painer method, though I am considering building it free standing for a couple of reasons. The first is the company I would be in. Was the duomo built without forms? Is it the true mason's method? I'm all for innovation, but tradition is very important to me as well. If I ran a piece of string with a tennis ball from the center of the hearth and ensured it touched the center of each dome brick, would I not get a perfect hemisphere? The second reason is to make a tight looking dome. Is it not easier to regulate the tightness and cleanliness of the dome brick joins with no forms obstruct view and hand access? What of the wire method? I can't find the thread that post is in.

        O.K. Now. The opening. I want to do the arch method. It seems that a few on this forum have tried and failed, others pulling it off. Of those who arched and won, who would do it differently if they could turn back the clock? Is it worth the agonising brick cuts which are involved?

        Cast refractory vent pieces. Do I need to fire them as Drake Remoray did? Did the N.Z oven guy fire his?

        So many questions. This is an invaluable forum, and I thank everyone profusely.

        Comment


        • #19
          The wire method

          I can't seem to find the original post either but they talk about it in this link.

          http://www.fornobravo.com/forum/show...ighlight=trick

          In regard to the arch - I'd go for it. There are so many built, I can't believe that it would be that difficult.

          Good luck!

          Les...
          Check out my pictures here:
          http://www.fornobravo.com/forum/f8/les-build-4207.html

          If at first you don't succeed... Skydiving isn't for you.

          Comment


          • #20
            arch opening

            Brick, I made my arch opening using a simple form from just 1/2 cut bricks. I cut some dome bricks to match them up to the arch better as I was going but really it wasn't a big deal. I took the "just start making it" approach. I ended up flaring the dome slightly to meet the arch because the arch was built perpendicular to the hearth but the dome starts to tilt away from the arch. I scratched my head about it a few times while doing it but I just put it together and it works. Maybe others have some wisdom about how to handle the transition but I think that's the way to do it.

            The wire trick uses wire instead of string and a tennis ball. The advantage of a wire is it should be easier to position the wire in place and have it stay. Unless you are always working on the arch with a companion you really need your hands free. I used shims instead of wire or string but did not use a form for the dome. When you get to the higher levels of the dome gravity is really pulling on you until you complete each chain and the tennis ball could be really inconvenient. Maybe a pingpong ball on the end of the wire if you really want a sphere?

            And I built up my vent with bricks and mortar so I don't know about casting. I think the issue with firing it depends on the refractory material you use - if it is heat curing then fire it, otherwise it can just be cast.

            Comment


            • #21
              Beach Ball reconsidered

              Originally posted by redbricknick

              "So. I'm at the point where I have to tackle the dome. I have a few considerations with regards to method. <snip> What of the wire method? I can't find the thread that post is in. "

              <snip>

              So many questions. This is an invaluable forum, and I thank everyone profusely.
              (M) Consider at least visiting the following URL in this forum:

              http://www.fornobravo.com/forum/show...ght=beach+ball

              (M) While I had popping problems using several balloons to support the last few courses, I would have used this builder's beach ball method if I had access to one very large beach ball.

              (M) If you leave the ball's valve stem accessible from the throat of your oven, you should be able to easily deflate it after your dome has dried for a few days; if not, popping the beach ball is always an option.

              ==========

              (M) As to the "wire" method, I would consider using a fishing tackle swiveling screw eye and a stick or dowel cut to the interior radius of your circular footprint. If you use a plastic anchor for the swivel and place it dead center for that radius, you should later be able to fill that tiny gap with your leveling sand. Even if you simply unscrewed it, the remaining "hole" would be so small as to be a non-issue.

              Ciao,

              Marcel
              Last edited by Marcel; 11-03-2006, 09:03 AM. Reason: I wrote diameter when it should have been "radius".
              "Everything should be made as simple as possible, ...
              but no simpler!" (Albert Einstein)

              Comment


              • #22
                Beach ball fotos phound!

                (M) I was able to trace back the location of Davy's images on PhotoBucket.

                (M) Clicking the following URL let me see an entire documentation of his oven building process:

                http://s74.photobucket.com/albums/i242/abpo/

                (M) To the "editors" of the new .pdf file for oven building instructions - directions, I submit that including such innovations as Davy used would greatly enhance the choice of oven builders to employ other options for their unique problems.

                (M) Here next follow a few images I copied from Davy's PhotoBucket site:


                Ciao,

                Marcel
                "Everything should be made as simple as possible, ...
                but no simpler!" (Albert Einstein)

                Comment


                • #23
                  Beach ball fotos 2nd try

                  (M) I don't know why the images didn't show up as I have done nothing different that I can tell from my usual Cop-Paste of the


                  I see, above, the "tag" but in the previous post I saw neither "tag" nor image!

                  Let me try 2 more. If nothing shows, then you can simply go to Davy's PhotoBucket URL at http://s74.photobucket.com/albums/i242/abpo/


                  (M) Trying a different approach:

                  <a href="http://photobucket.com/" target="_blank"><img src="http://i74.photobucket.com/albums/i242/abpo/Gcourse10.jpg" border="0" alt="Photobucket - Video and Image Hosting"></a>


                  (M) Everything shows as I pasted it, so I hope you'll see some images.


                  Ciao,

                  Marcel
                  Last edited by Marcel; 11-03-2006, 10:37 AM. Reason: Still trying to include an image
                  "Everything should be made as simple as possible, ...
                  but no simpler!" (Albert Einstein)

                  Comment


                  • #24
                    arch brick cuts

                    I'm really trying to go with the arch method for my oven opening, but my 10 inch brick saw isn't being friendly with me on the arch brick cuts. If I cut my bricks in half lengthways, I get 2 and a quarter inch thick bricks, and can then fit them through the saw to cut them into arch bricks, but I'm unsure of their rigidity at that decreased thickness. I'm trying to build an entryway and vent similar to Paulages' oven.

                    Comment


                    • #25
                      Originally posted by redbricknick
                      I'm trying to build an entryway and vent similar to Paulages' oven.
                      Paulages bought tapered arch bricks from Harbison-Walker. I went to their local branch here in Jersey and was underwhelmed. They didn't have refractory tiles, or tapered brick in stock, and their price for insulating board was through the roof. I bought my 2 1/2" insblock-19 from another retailer (H-W manufactures it) for a fraction of their price.

                      Sawing long arch sections is hard. Consider piecing them sideways, with pieces cut from splits on alternating ends, so you are cutting the easy width of the brick.
                      My geodesic oven project: part 1, part 2

                      Comment


                      • #26
                        If I get what you mean, you are suggesting I cement pieces together to make regular thickness arch bricks from splits. Would these frankensteined' bricks bear a decent load? I guess if I laid them up over a form, each split section would rest against the next, essentially making a few thin arches next to eachother to form the big arch.

                        Comment


                        • #27
                          Originally posted by redbricknick
                          If I get what you mean, you are suggesting I cement pieces together to make regular thickness arch bricks from splits. Would these frankensteined' bricks bear a decent load? I guess if I laid them up over a form, each split section would rest against the next, essentially making a few thin arches next to eachother to form the big arch.
                          That's it: Here's a picture of what I mean:


                          The arch sections would alternate through the use of a split front and back. I've omited three center bricks to have less lines to trim. This particular arch is designed to have something flat (like the end of a piece of refractory flue tile) sit on top of it, but you could easily use the same plan to make an arch top too. It's also designed to make both a short and tall piece out of a single firebrick (whole firebrick shown for comparison).

                          It'd be as strong as the mortar you put it together with.
                          My geodesic oven project: part 1, part 2

                          Comment


                          • #28
                            Thankyou so much dmun. I'm going to knock up a mock up from cardboard. and see how she sails.. My initial concern is getting away from traditional keystone arch construction. The feeling of knocking in my stone arch keystone without mortar and knowing it would stand like that forever was a good one, but also a total pain. If you are confident this design would stand with just mortar holding it up, I think I'd be willing to give it a go. (is there a high temp high strength refractory glue I could use in liue of mortar?) It's like lego. But lego which will provide my friends with pizza.

                            Comment


                            • #29
                              layers

                              Being that this is brick oven photos, and I haven't posted any in a while, here you go. Our hearth layer cake is six odd reinforced inches of premix mortar with splashes of fortimax, one and a half inches of calcium cilicate board, glued directly to the cement with cal sil fibrous adhesive, a layer of offcut refractory floor tiles for thermal mass, then tomorrow, fireclay, sand and a full (10"by10"by2") refractory tile cooking surface. The refractory cement you see in the front is in lieu of tile offcuts on the outer rim of the dome layout.
                              Is there a way I can Macguyver a thermocouple into the hearth somehow then connect it to a digital readout later? I'd rather not dig up my hearth later, and if there is someway I can rig something myself.. Isn't it just some wires?
                              Last edited by redbricknick; 11-06-2006, 12:28 AM.

                              Comment


                              • #30
                                Redbricknick:


                                Thermocouple installation is not a difficult thing to do.

                                You just could buy the thermocouple wire and make you own type length.

                                If you like, please search in this forum by thermocouples or by my name and you could obtain the most of the information that you are looking for.

                                I could answer you if any doubts still are there.


                                Luis

                                Comment

                                Working...
                                X