


 Tweet
Tweet
And I thought that I was the only one out there crazy enough to try to build a wood fired oven on his own. This forum is great! I am almost at the end of my journey. It started in the Spring of 2009 when I decided to down some trees in the back yard to make room for the oven. I had no idea what oven design that I would use. I just knew it was time to start. I spent the first few months hand digging the hole for the foundation. I became one with the spade and the clay. Solid clay. Five feet of it. After a hard rain, my hole would become a pond. The neighborhood kids found the hole to be quite exciting. Frogs, voles, mice, toads, and other various forms of life managed to fall/jump into this hole. Had no idea there was such variety of living things in my back yard.
With the footing framed up, the cement truck arrived. It was like a circus. Kids from far and wide came to watch the footing being poured. Now came the challenging part. I had never laid a cement block or brick in my life. I purchased mortar and cement blocks, tossed myself in the hole, and started to learn a new trade. Rough going at first. Couldn't manage to put down a level course for the life of me. Had so much mortar on my hands that I burnt off several layers of skin leaving blood stains on the blocks. Slowly but surely, I started to get the hang of it. Definitely gained a new level of respect for masons.
The next challenge was that I had no idea how to cut a cement block. I had figured out how to break a block in half. However, I needed to cut some of the blocks to a dimension other than half. After some internet searches, I read about diamond blades and how you could use a skill saw to cut the block. While the skill saw worked, I almost killed myself using it. Dust all over the place. Blade kept on getting stuck. Cuts were less than even. Stressed out thinking that I was going to cut a finger, hand or arm off.
After building the cement block wall up to grade, I poured another slab. Having mortgaged the house to pay for the cement truck to show up in the neighborhood, I started looking for other more cost effective ways to secure the needed cement. I found a rental business that sells pre-mixed cement that they put in a specially designed trailer that you tow behind your own vehicle. Much cheaper approach to getting the cement.
With a solid slab sitting at grade, I started to build the stand, which went up a lot faster than the foundation walls. By the time the snow arrived, I had the stand completed. I threw a tarp over the stand, retreated to the house and waited for Spring.
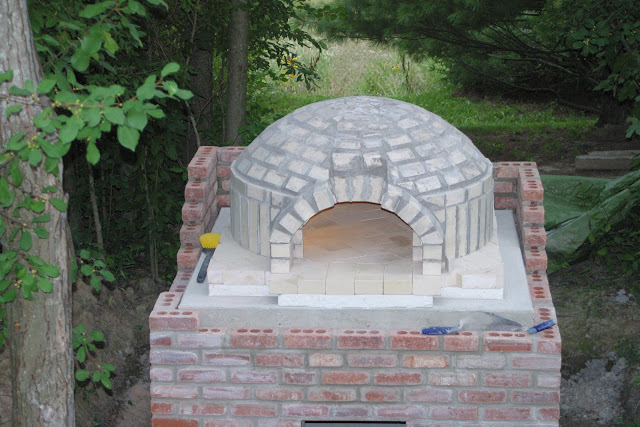
Before the snow melted, I started to think about how to build the dome. I really wish that I had read this forum more. I definitely did not choose the easiest method for building the dome. Using Google Sketchup, I designed a subframe system out of plywood that I built the dome around. Once the dome was self-supporting, I was able to pull the subframe out. The only problem with this method is that you do not have great access to the inside of the dome. I found myself having to crawl into the dome to add motar around some of the fire bricks. I definitely felt like a contortionist. With my torso and head inside the dome, I also learned that I am somewhat claustrophobic.
Getting back to the dome construction, I really wish that I had read more about tapering the fire bricks. I did not do this. As a result, I spent a small fortune on Heat Stop. On a positive note, I did buy a wet saw. The first one I purchased was actually a 14" tile saw from Home Depot. It didn't take long to realize that that was the wrong tool. Fortunately for me, it ended up breaking. Home Depot was great and took it back with no questions asked. I had purchased the Home Depot model because it had a $600 price point. After all the problems that I had with the tile saw, I figured that it was time to buy a wet saw that was actually designed to cut bricks. I ended up buying the BX-4 saw from MK Diamond. Definitely a pleasure to work with. Cuts even the toughest fire brick like butter. Unfortunately, it also came with a much higher price tag.
After the dome was completed I moved onto figuring out how to enclose the dome. I had originally planned on using metal 2x4 to create a structure around the dome. As I had no idea how to use metal 2x4's and as I had just gained a lot of experience laying cement block, I figured I would stick with masonry to create the enclosure. About 700 bricks later, I am almost done.
Here is a link to the photos of the project that I took along the way. Enjoy!
Picasa Web Albums - Daniel Woodruff - Wood Fired Oven
With the footing framed up, the cement truck arrived. It was like a circus. Kids from far and wide came to watch the footing being poured. Now came the challenging part. I had never laid a cement block or brick in my life. I purchased mortar and cement blocks, tossed myself in the hole, and started to learn a new trade. Rough going at first. Couldn't manage to put down a level course for the life of me. Had so much mortar on my hands that I burnt off several layers of skin leaving blood stains on the blocks. Slowly but surely, I started to get the hang of it. Definitely gained a new level of respect for masons.
The next challenge was that I had no idea how to cut a cement block. I had figured out how to break a block in half. However, I needed to cut some of the blocks to a dimension other than half. After some internet searches, I read about diamond blades and how you could use a skill saw to cut the block. While the skill saw worked, I almost killed myself using it. Dust all over the place. Blade kept on getting stuck. Cuts were less than even. Stressed out thinking that I was going to cut a finger, hand or arm off.
After building the cement block wall up to grade, I poured another slab. Having mortgaged the house to pay for the cement truck to show up in the neighborhood, I started looking for other more cost effective ways to secure the needed cement. I found a rental business that sells pre-mixed cement that they put in a specially designed trailer that you tow behind your own vehicle. Much cheaper approach to getting the cement.
With a solid slab sitting at grade, I started to build the stand, which went up a lot faster than the foundation walls. By the time the snow arrived, I had the stand completed. I threw a tarp over the stand, retreated to the house and waited for Spring.
Before the snow melted, I started to think about how to build the dome. I really wish that I had read this forum more. I definitely did not choose the easiest method for building the dome. Using Google Sketchup, I designed a subframe system out of plywood that I built the dome around. Once the dome was self-supporting, I was able to pull the subframe out. The only problem with this method is that you do not have great access to the inside of the dome. I found myself having to crawl into the dome to add motar around some of the fire bricks. I definitely felt like a contortionist. With my torso and head inside the dome, I also learned that I am somewhat claustrophobic.
Getting back to the dome construction, I really wish that I had read more about tapering the fire bricks. I did not do this. As a result, I spent a small fortune on Heat Stop. On a positive note, I did buy a wet saw. The first one I purchased was actually a 14" tile saw from Home Depot. It didn't take long to realize that that was the wrong tool. Fortunately for me, it ended up breaking. Home Depot was great and took it back with no questions asked. I had purchased the Home Depot model because it had a $600 price point. After all the problems that I had with the tile saw, I figured that it was time to buy a wet saw that was actually designed to cut bricks. I ended up buying the BX-4 saw from MK Diamond. Definitely a pleasure to work with. Cuts even the toughest fire brick like butter. Unfortunately, it also came with a much higher price tag.
After the dome was completed I moved onto figuring out how to enclose the dome. I had originally planned on using metal 2x4 to create a structure around the dome. As I had no idea how to use metal 2x4's and as I had just gained a lot of experience laying cement block, I figured I would stick with masonry to create the enclosure. About 700 bricks later, I am almost done.
Here is a link to the photos of the project that I took along the way. Enjoy!
Picasa Web Albums - Daniel Woodruff - Wood Fired Oven
Comment