Consider wetting the HardiBacker & add Acrylic Bonder
(M) In addition to the wire that maver suggested, consider spraying the HardiBacker with water just before stucco-ing so the backer board doesn't draw too much water out of your stucco. As added insurance consider using and Ad-Mix (liquid acrylic bonder - fortifier). It will make your mix even stickier.
(M) Good luck.
Ciao,
Marcel;


-
Re: Ready to Role Up My Sleeves
I also used concrete board and stucco - it will stick directly to the concrete board, but if I were doing it again I think I would have used a wire mesh. I'm sure it depends on the stucco product you use (most use a commercial product, I used a scratch coat of cement, lime and sand, then a finish coat of white sand and lime), but getting my scratch coat to stick was a bit of a pain.Originally posted by swripley View Post
Congratulations on your progressLeave a comment:
-
Re: Ready to Role Up My Sleeves
Way to go Sharon,
You are a great role model. Posting photos is easy. In the Options section under Post New Thread, there is Attachment Management. You just browse to find the file you want to post, and click Upload. The only thing to worry about is that the photos have to be less than 100K each. You can use just about any photo application to save them to a smaller size if they are too large.
On the Hardibaker -- my experience is that you can stucco directly on it, and that there is a paint on product that will help the stucco adhere.
What do our masonry experts have to say on that?
JamesLeave a comment:
-
Re: Ready to Role Up My Sleeves
Significant progress has been made! After the snow melted, I conceded that 6 yards of concrete was more than I could handled and hired a crew to take care of it for me. It took almost 3 weeks of begging, pleading and promising to prep the sight to get them so squeeze me in to their packed schedule. But I finally had the site ready to go including a gas line for my future grill and water line and dry well drain for the sink. Thanks to my husband for helping me dig trenches for two weekends.
I added a couple of extra days to the Memorial weekend and got under way. Of course everything took longer than I thought it would, but I am well under way. It took me almost two full days to just get all of the supplies gathered. Then I spent the better part of a day putting post anchors into the slab for a future pergola that will cover the entire kitchen project. The block stacked easily and bright and early Sunday morning I was ready to mix concrete. My sister's "Red Lion" was a life saver. I managed to mix and pour 500 lbs. concrete all by myself in just under three hours. Is was remarkably like mixing cake batter and resulted in a great sense of accomplishment.
Framing in the hearth took the remainder of the day. After redoing it twice, I decided that being a 1/4 inch out of square was a problem I was willing to deal with at a later date. At the end of my very long fourth day, I stood back to admire my work and realized I had a very big problem. At 5'2", there was no way I was going to be able to reach the middle to the stand to trowel the concrete. It was amazing how much larger it looked in person than it did while I was drawing over the last several months!
I swallowed my pride (I was determined to build the oven completely on my own!) and asked my husband (6'3", yes we look like Mutt and Jeff) for his help. He graciously agreed but only after a morning of golf. We got under way at about 2:00 this afternoon and had the structural layer done by 4:30. All and all I think I made a pretty good start!
My husband agreed to help me with the insulating layer tomorrow night. I am tied up with work for the remainder of the week but plan to dive right into fire brick first thing Saturday morning.
Looking forward, I do have one question. I am planning to enclose with HardiBacker and stucco. Will the stucco stick directly to the HardiBacker or will I need to use wire mesh?
Thank you all for your support and suggestions. This is an incredibly exciting project and I know I wouldn't be feeling any where near as confident with out all of you out there for advice.
I've been taking photos as I go, but need to figure out how to get them posted. I will update more next weekend.
SharonLeave a comment:
-
Re: Ready to Role Up My Sleeves
It seems like some of this should end up in building plans -- some of it in the hearth section, and some in the enclosure section.
JamesLeave a comment:
-
Re: Ready to Role Up My Sleeves
Sharon,
The ground has been well covered in this thread. I'd just like to add a vote for Tapcon concrete screws. We use them all the time in construction; they're very reliable and hold well. I, too, would go for the hex heads, rather than the Phillps heads (star shaped). If you buy a box, it will come with the correct drill bit. A hammer drill is best for the holes, and a portable drill with the right sized bit is the way to go for driving the screws.
JimLeave a comment:
-
Re: Ready to Role Up My Sleeves
And remember with a little forsight you can stick hex bolts upside down in the wet concrete and solve the whole problem.Leave a comment:
-
Re: Ready to Role Up My Sleeves
The range of professional expertise we have in the group is excellent and the contribution is so valuable.
Thanks all for these,
JamesLeave a comment:
-
Re: Ready to Role Up My Sleeves
Just to add to Maver's post about the hammer drill or shooting pins into your concrete to hold your steel track. I work with steel studs almost everyday we are constantly anchoring into concrete. In construction, shooting pins is more common because we can move along much faster that way but it can be a little tricky and dangerous if you don't know what you are doing. With your metal track so thin it can be a challenge to correctly set the depth of the pin so that it anchors the track without going through it or to shallow that it doesn't hold. Also if your shot is on somewhat of an angle you can have ricochets. You won't kill anyone but you don't want your neighbor to lose an eye! As Maver pointed out renting or borrowing a hammer drill is your best option. Plastic anchors with matching screws in the corners and every 2-3 feet along your track will be more than enough. It is common in commercial construction to see screws used that are meant just for concrete. Tapcon's are a popular brand name. Just drill your hole and screw it in. They are as or more reliable than plastic anchors IMO! For both options 3/4 or 1 inch screws will hold the track in place just fine.
Good luck, Versachi (still 2 feet of frost so not building yet for me)
Leave a comment:
-
Re: Ready to Roll Up My Sleeves
You got it. Additional mortar or any other noninsulating material designed to give the dome a larger thermal sink. The downside is slowed heat up times. I think for home oven any way to shorten the firing time without sacrificing ability to cook is important. Too much reduction in heat absorbing capacity and you might have trouble with retained heat baking. I'm watching with interest other builder's reports on thinner domes, but I suspect anything in the realms I presented in my earlier post for dome thickness will be fine for retained heat baking. For a home oven, 1-2 batches in a 40+" dome is a huge capacity and hard to use it all.Originally posted by swripley View Post
There is a tool called a rotary hammer or rotary drill. It looks like a regular drill but it hammers while rotating. It can drill through well cured concrete very easily. Place plastic anchors into the holes (readily found at any hardware store) and screw into the anchors. No need to shoot anything. Find a friend with the rotary hammer or rent one for the project, or do DMUM's ebay rental - buy and then sell on ebay after.Originally posted by swripley View PostLeave a comment:
-
Shed roof is fine if the slope is sufficient
[IMG]file:///C:/DOCUME%7E1/Marcel/LOCALS%7E1/Temp/moz-screenshot-196.jpg[/IMG](S) "CanuckJim and Marcel, I hear your warnings about the flat roof, but am not ready to give up on it quite yet. I’m not to concerned about the load as our snow fall isn’t nearly as bad as Ontario’s and there are a lot of flat roof buildings in our community, but I want to be certain I guard against pooling water. I will work on determining the right slope and perhaps incorporating a gutter system to help shed water."
(M) Here is an image of Paul's shed roof from his corner oven, at:

(M) There is another, below it, from the side, at that URL. Paul even grows herbs (some for his pizza) on that roof. There is no requirement to build a peaked roof. It looks like Paul used Durock rather than Hardi-Backer. Durock tends to crumble on the corners. Hardi-Backer is available in quite a thin sheet and is totally impervious to flame.
(M) We're WAY ahead of the process but in case I forget to mention it, be sure to clad your sheet metal stud WALLS BEFORE you attach your roof. If you have any roof overhang it can be very awkward to try to insert screws under that overhang. Also, having pre-clad your walls with Hardi-Backer you will have given those walls additional diagonal bracing that will make the roof installation easier.
(S) Marcel, this may be a silly question,
(M) A "silly" question is an oxymoron. If I were judged by the number of so called silly questions I've asked, I'd be consigned to a mental institution!
but how do you attached the metal framing to the hearth? The plans talk about attaching concrete board to the metal studs but nothing about attaching the bottom plate to the slab. I have seen a tool the shoots nails into concrete, is that what I would use?
(M) You could use such a "gun" but I know of no masonry oven builder who has gone that route. Those guns are typically used to attach a wooden 2x 4 sole plate to an existing slab floor.
(M) If your hearth slab will have refractory concrete as it's top layer, then, as soon as your 2 part hearth slab sets up even for a day, get ready to install your horizontal "sole" plate(s) of sheet metal. I say ASAP because my concrete hearth slab was so hard I could barely get a carbide bit to set the holes for those blue case hardened concrete screws. Note that I used the old plan order of layering, i.e. insulation on the bottom and refractory re-bar reinforced concrete on the top. I plan to do more bread baking than pizza baking so I welcome the extra heat retention of that arrangement.
(M) I believe you can see the 2 concrete layers, from my oven, in the old plan's orientation in the next image:

(M) 1- I cut the horizontal channels to the full length of each side of my slab. 2- I removed the resulting tab so that the next channel could overlap the first. 3- I determined where to drill through the sheet metal channels and used a conventional drill bit to make those holes since a masonry bit won't cut steel very well. 4- I relaid the horizontal channels, changed to a masonry bit and pre-drilled into my top layer of refractory concrete.
(M) If you decide to employ the new orientation, i.e., insulating concrete on top; (I call it Perlcrete or Vermacrete) then there should be no rush to set those channels as that insulating layer is FAR softer. You would need to ask another builder how to proceed if you substituted heat resistant sheet insulation like Insulfrax or Refrax. as I have no experience with that.
(M) I used the hex head type and installed them with a electrical screwdriver with a hex nut driver bit to minimize slipping.
(M) Since my colleagues on this site are probably tired of seeing my repeated images, consider emailing me directly to marcelde@efn.org if you have any specific questions.
(M) Take it Poco a Poco. The trip is the thing.
Ciao,
MarcelLeave a comment:
-
Re: Ready to Role Up My Sleeves
yep Thermal Cermics 2500 blanket for insulating the dome will be a fine sub for Insulfrax (not sure of the new name James is using)Leave a comment:
-
Re: Ready to Roll Up My Sleeves
 Gentlemen, I am overwhelmed! Thank you for your incredibly quick and helpful responses.
Maver, thank you for sending the link to Widespreadpizza?s corner installation that is exactly what I was thinking. The photo really helped solidify it in my minds eye. A question ? when you reference cladding, which you say not to bother with, do you mean additional high heat mortar to the outside of the dome? Cladding is a term I haven?t ran across yet.
CanuckJim and Marcel, I hear your warnings about the flat roof, but am not ready to give up on it quite yet. I?m not to concerned about the load as our snow fall isn?t nearly as bad as Ontario?s and there are a lot of flat roof buildings in our community, but I want to be certain I guard against pooling water. I will work on determining the right slope and perhaps incorporating a gutter system to help shed water.
Marcel, this may be a silly question, but how do you attached the metal framing to the hearth? The plans talk about attaching concrete board to the metal studs but nothing about attaching the bottom plate to the slab. I have seen a tool the shoots nails into concrete, is that what I would use?
All, a question about insulation, I have used a product in the past for fusing glass in a kiln called Ceramic Blanket by Thermal Ceramics listed to 2500 degrees. It looks very much like the Insulfrax in the Forno Bravo plans. Anyone heard of it? Have an opinion whether it will be a good substitute?
Thank you all again!
SharonLeave a comment:
-
Re: Ready to Role Up My Sleeves
Ready to Role Up My Sleeves
<snip>
(M) Hi, Sharon,
(S) ?My initial questions are: 1) I am planning a corner installation. What is the best way to install the fourth block course over the wood storage area? I understand the use of angle iron and cutting out the 3/8 to accommodate its thickness,?
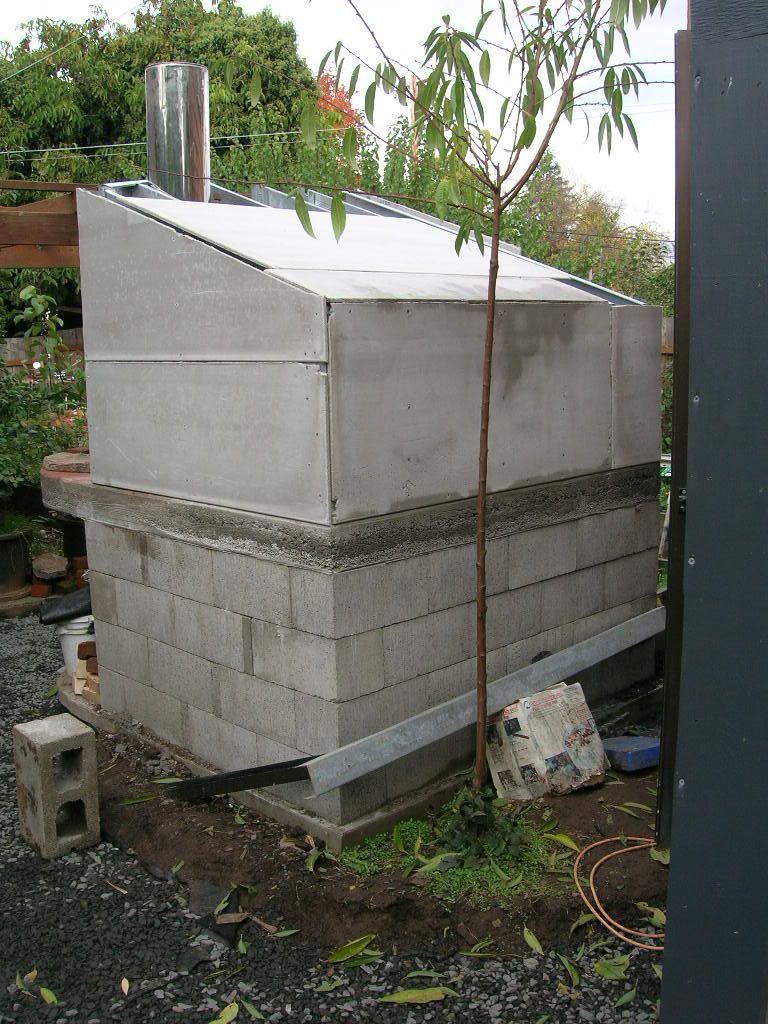
(M) That is the customary method but I tried a different way that may work for you. I used 4 full courses of concrete block, laid a heavy tubular pipe on top of the last course and poured my slab over it. That precluded the necessity of notching and also allowed me greater height access for the wood storage area. Here is an image of that:

(S) ? but how to I handle the void that remains on the side walls by tying into them at an angle??
(M) You may find Paul Ages corner oven a helpful reference on this site. He has hundreds of postings and many good photos on 20 pages. He, too, is a former professional baker. You may need to do some sleuthing but try starting at:
http://i11.photobucket.com/albums/a1...s/DSC01545.jpg
[IMG]file:///C:/DOCUME%7E1/Marcel/LOCALS%7E1/Temp/moz-screenshot-194.jpg[/IMG][IMG]file:///C:/DOCUME%7E1/Marcel/LOCALS%7E1/Temp/moz-screenshot-195.jpg[/IMG]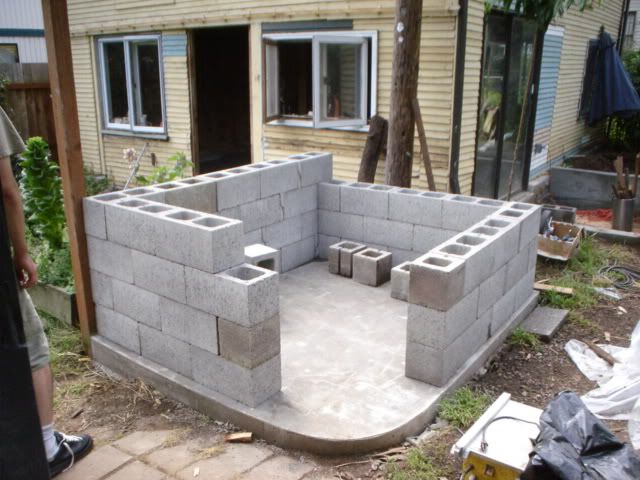
http://www.fornobravo.com/forum/f8/p...today-155.html
(S) ?Should I miter the corner blocks? Should I extend my framing lower and fill in the wedge when I pour the structural concrete layer? Or am I better off no having a row of blocks over the opening (they way gaptogap did on his recently posted photo)? Or is there a better alternative someone can offer??
(M) I think James would say that there is no ?right? way to build your oven but that some methods are arguably easier. Your decisions will depend upon your uses, layout preferences, and baking priority, i.e. are you more interested in pizza baking or bread baking.
(S) ?2) The diagram on page 15 of the plans shows a 62? outside measurement on the 43? oven, what does this reference? Based upon everything I read, I was anticipating a 72? block stand.?
(M) That is the +/- size of my stand and I didn?t need to cut any concrete blocks for it. My oven diameter is 42? and that can easily vary an inch or two and still fit the base.
(S) ?However, the corner installation on page 19, photo 2.3 of the plans looks like it is 80?. What is the best stand size for a 43? corner oven??
(M) I?m sorry to seem like I?m waffling, but again it depends on what other plans and priorities you have. The bigger your hearth area, the greater is your option for extra cladding (should you want that) and insulation on the sides of your dome. But if space is at a premium, you probably need to consider your 72? block stand as a minimum.
(S) ?3) What?s the best way to finish the roof on a corner installation? A gabled roof that will accommodate the front angled wall could get tricky. I am leaning toward enclosing with concrete block and stucco.?
(M) If I understand your roof plans I?d suggest that concrete blocks, because of their width, will take away much of your cladding and insulation space. Most builders constructed a framework of light weight sheet metal studs, over which they screwed some kind of non-flammable mortar board like ?Hardi-Backer?.
(S) I like the roof on the Stucco House on page 49 of the plans but am concerned a flat roof may not be a good choice in my northern climate. Anyone have a recommendation?
(M) I favor a peaked roof for several reasons in addition to helping snow to slide off. Triangular construction is inherently stronger than square or rectangular (A-frame houses exploit that property) plus the peak will provide you with storage space for poured in insulation over your dome where the heat rises. I also like the look of a peaked roof.
(S) 4) Does anyone have a strong opinion to offer on what?s is a better cooking surface ? the four piece pie shape that Forno Bravo carries or fire brick?
(M) Are you going to be primarily baking pizza? If so, than the Forno Bravo is arguably better; if your emphasis is on bread baking, perhaps the thicker fire bricks may retain heat longer. Whatever the difference, it is probably very small.
(S)5) All of the pictures I have seen posted on this site and others, show ovens built yards that are much larger than mine. I will be building in a fairly tight space and the back of the oven will be right up against a 6' privacy fence. Is this going to be a problem?
(M) Not as far as fire danger if you house your oven and insulate it properly.
(S)?I'm not concerned about making it difficult to build, I am on great terms with my neighbor and I know he won't mind if I take boards out temporarily to grant access during the building process, I am more concern about problems that might arise when I use the oven.
(M)I suspect a tall, well constructed chimney will eliminate most of such potential problems
(S) ?I think that?s it for know, no doubt I will have a lot more questions as I progress.
Thank you all,
Sharon?
(M) I have posted over 90 images of my oven build on PhotoBucket. If you check that out you need to know that I abandoned some processes so not all of the chronology will make sense at:
marceld - Photobucket - Video and Image Hosting
Ciao,
Marcel
Leave a comment:
-
Re: Ready to Role Up My Sleeves
Great to see you here Sharon,
I know that feeling of "I can do that" -- and it usually works, except that one time I had the roof off the house in the middle of winter. :-)
FB is just up the road from Dry Creek -- all roads lead to Sonoma.
JamesLeave a comment:
Leave a comment: