Announcement

Collapse
No announcement yet.

Dough Prep Lesson

Collapse
X
 
  • Filter
  • Time
  • Show
Clear All
new posts

  • Dough Prep Lesson

    Paul and Marcel,

    Hope you don't mind, I'm moving the dough conversation over to this forum. Paul, it's great having a pro in the forum.

    I got a lesson the other day from Peter deJong, who is setting up the Forno Bravo cooking school and installing ovens around the wine country. He used to co-own the Village Bakery in Sonoma county, a nice boutique bakery, along with a handful of restaurants and even a pastry shop in NY. Apparently making a wedding cake and building a pizza oven are pretty similar. :-) Luckily, the pizza oven lasts a lot longer.

    He took a look at my typical dough the other day (I was making a ciabatta), and had a lot to offer to my untrained technique:

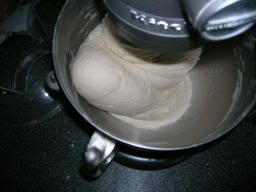
    1. My dough was way too dry. The flour wasn't hydrated enough for the gluton to develop and the dough get really stretchy. He added water -- a lot more than I would I have done, then re-mixed. He ran the mixer slow for 2 minutes, then fast for 5, then slow for 2. The final product was softer and stretchier, and moist to the touch. You couldn't handle it without flour on your hands -- it was a lot nicer than what I had going.

    His view is that the dough should be worked for about 8-9 minutes. Slow, then fast, then slow.

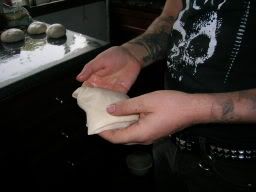
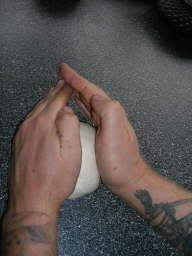
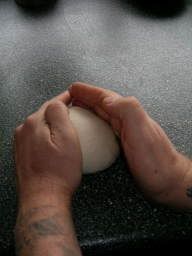
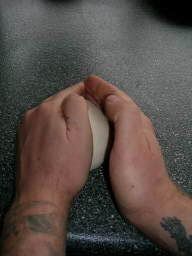
    2. After the bulk vermenation, he took the dough ball out and pushed out all of the air bubbles. I usually just punch the cap down, but don't do much at this point. This is more important than I had thought.

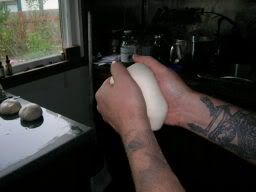
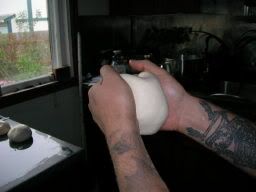
    3. Then, he folded the dough into thirds, and shaped a ball to let it rest.

    4. I said "plastic wrap?" and he said no -- there are living creatures in there whom we want to keep working. I used a damp towel.

    Finally, he shaped the loaf and I left it to rest and cooked the bread on a pizza stone for dinner.

    Nothing like have a pro in the house.

    Still, I think what I learned can be generalized for us home bakers and for pizza dough balls.

    James
    Pizza Ovens
    Outdoor Fireplaces

  • #2
    sounds like a good lesson james. yes, i agree with the plastic wrap, to the extent that you don't want to somother your doughballs. however, fermentation is an anaerobic process (requires no oxygen), and will work just fine even if you completely wrapped it tight. you would, however, blow out your plastic wrap!

    the amount of water and mixing time are two things you are really lucky to have someone show you. neither can really be explained without seeing it done right, and both require learning how to "eye" it right through practice. if you overmix, you get too tough a dough, but if you undermix, it doesn't work the gluten enough. very true about the amount of water as well, though a looser dough makes for tricky handling. you can't allow it to proof quite as long or it becomes to loose and falls apart easily. these are things an experienced baker ends up just knowing by the look and feel of it, but it takes a while to get there.
    -Paul
    overdo it or don't do it at all!

    My 2005 pompeii build

    Comment


    • #3
      Good point on the moister dough and handling.

      It can get tricky when the kids are making pizzas -- they really can't make the moist dough work. Two batches on the "make your own" pizza night?

      I guess the moisture content question is why they call out hydration on the VPN dough spec. Is it true that Italian pizza flour can take on more moisture than American bread flour?

      James
      Pizza Ovens
      Outdoor Fireplaces

      Comment


      • #4
        making doughballs

        this post is for those who aren't fortunate enough to have a professional show them the ropes.

        forming the doughballs:

        all of this should be done with as little flour as possible, without the dough sticking all over your hands. take the piece of dough in your hands, and repeatedly fold the outside edges forward (away from you) and in on itself, using your palms to stretch (the side towards you) outward, and your fingers to push the outside edge in .it's kinda like you are repeatedly trying to turn it inside-out (you are really), rotating all the while, so that you do so evenly. you don't want to overdo this motion, or the dough starts getting rough and you won't have a nice smooth top (this is actually not a problem at all with the italian pizza flour, as it is so beautifully smooth). i usually just fold it over 3 or 4 times. after all of the bubbles are thoroughly crushed and the ball feels tough, you pinch the open end together, closing it off. one method of doing this is to use the pinky end of your hand and pinch the end between your palm and pinky as if you are making a fist. this end goes down, and your fresh round side goes up.

        the trick to a perfectly balanced ball is to completely close it off so that the ball grows as one without a pocket inside, and without opening up on the bottom. one way to do this (this is hard to explain without showing) is to put the doughball pinched-end down on the worktable. cupping the doughball between both hands, you push downward with your cupped hands, and with the outside heel of your hands work the ball in a circle on the table. your hands are moving in a counter-clockwise motion, but the motion is turning the ball clockwise. do this with no flour or oil on the table, and this will completely seal off the bottom and ensure that the ball is tight.

        really, having a perfectly round doughball only matters if you want a perfectly round pizza, but it is very hard to toss a doughball out if it is inbalanced, and this method provides a perfectly symmetrical ball.

        i'll edit in some photos next time i make pizza.
        -Paul
        overdo it or don't do it at all!

        My 2005 pompeii build

        Comment


        • #5
          I think there is a dough preparation DVD in our future.

          Paul, will you post photos?

          James
          Pizza Ovens
          Outdoor Fireplaces

          Comment


          • #6
            certainly, but my oven is in mid vent-construction, so no pizzas for a bit...
            -Paul
            overdo it or don't do it at all!

            My 2005 pompeii build

            Comment


            • #7
              Ahhh!
              Mmmmmmmm...
              Pizza, pizza

              Comment


              • #8
                doughball prep photos

                here's a picture of my dough mixing, showing about how much sticks on the bottom of the bowl. this is towards the end of it's mixing cycle.
                -Paul
                overdo it or don't do it at all!

                My 2005 pompeii build

                Comment


                • #9
                  here are some step-by-step photos of how i form my doughballs:

                  holding piece of dough in hands,


                  stretch the outward (as if turning a sock inside out), and pinch the front edges together. rotate, and repeat procedure, until all airbubbles from previous fermentation are crushed, and the dough is smooth and tight.
                  -Paul
                  overdo it or don't do it at all!

                  My 2005 pompeii build

                  Comment


                  • #10
                    if you have pressed the ball together well, the next step isn't absolutely neccesary, but it does help close the ball off well, and gives you one more chance to push any airbubbles out.

                    putting the doughball pinched end down on a non-floured, non-oiled surface, the doughball is worked in a circle with the outside heels of both hands cupped around it, always keeping the same end down. this sticks the pinched end together, so that it won't open back up if it was too dry when balling it.


                    (the motion of my hands in the photos is counter-clockwise, turning the doughball clockwise)
                    Last edited by paulages; 11-21-2005, 03:25 AM.
                    -Paul
                    overdo it or don't do it at all!

                    My 2005 pompeii build

                    Comment


                    • #11
                      Great dough forming photos!

                      #65

                      (M) Thanks, Paul for the great dough ball forming shots, and the important one of dough in the mixer giving us Newbies an idea of how wet the dough should be.

                      (M) You wrote, in part:


                      (P) "(the motion of my hands in the photos is counter-clockwide, turning the doughball clockwise)"

                      (M) Is that a "typo"; if I move my hands counter-clockwise against a ball of dough it appears to also turn counter-clockwise. Am I missing something?

                      Ciao,

                      Marcel
                      "Everything should be made as simple as possible, ...
                      but no simpler!" (Albert Einstein)

                      Comment


                      • #12
                        it's not a typo. the motion of the hands is actually more of an up and down movement (away from you and back), with a slight circular pattern.

                        in the first motion, the forward pressure is mostly on your left hand, and the right hand is pushing leftward (so you are actually going in kind of a diagonal to the upper left) and so the forward motion moves it clockwise. then the pressure reverses. you are next pushing downward (back towards yourself) with the pinky part of the heel of your right hand, and pushing rightward with the left hand. the right hand is continuing the clockwise motion of the doughball, by pulling the right side of it down. the total motion of your hands is more of a counter-clockwise oval, rather than a circle.

                        this is really an over-explanation of something that takes about 5 seconds max. to do, and becomes second nature after you figure it out.
                        -Paul
                        overdo it or don't do it at all!

                        My 2005 pompeii build

                        Comment


                        • #13
                          I *did* miss something and you clarified it. Thanks.

                          (M) After reading your explanation I understand that the dough ball indeed moves in a clockwise pattern. I'm sure that learning the motion well only takes a few minutes of finger intelligence. Grazia, and

                          Ciao,

                          Marcel
                          "Everything should be made as simple as possible, ...
                          but no simpler!" (Albert Einstein)

                          Comment


                          • #14
                            Pizza Dough Photos

                            Paul,

                            Thanks for the photos. Eccelente. I recognize that mixer. :-) I think we even have the same color.

                            The photo of the moist dough ball in the mixer is telling for how far you want to hydrate your flour. Nice.

                            From the point that you have formed your dough balls, how long do you let them rest (and the gluton relax) before you throw your pizzas?

                            Do you (when, and for how long) put them in the refrigerator, and/or do you use a dough storage tray?

                            Inquiring minds...

                            James
                            Pizza Ovens
                            Outdoor Fireplaces

                            Comment


                            • #15
                              right now, i shoot for an 8 hour total make/proof period. i made these for a party on friday:

                              (that's three batches in the mixer)

                              i got a late start, around 11-noon, so i set the dough a little warmer than usual (105deg F or so for the water). i started cooking the first pizzas around 4:30, and they were turning out a little flat. i had a gig to go to at 7, so i had no choice but to go at it. by 5 or 5:30, they were starting to rise nicely and get bubbly on the crusts. i posted a picture on another thread of one of these, i believe: http://www.fornobravo.com/forum/show...=1742#post1742

                              i think 6 hours would have been a more realistic "quick dough." this recipe (pretty much the official V.P.N. recipe) doesn't seem to respond well to refrigeration. the dough becomes tougher, even if it was proofed well before. i need to develop a more flexible dough regimen with this recipe, especially if i'm working towards a commercial routine. a viable alternative to refrigeration might be balling in hourly intervals. i think the initial fermentation is more flexible than the proofing of the formed doughballs.
                              -Paul
                              overdo it or don't do it at all!

                              My 2005 pompeii build

                              Comment

                              Working...
                              X