Announcement

Collapse
No announcement yet.

It begins

Collapse
X
 
  • Filter
  • Time
  • Show
Clear All
new posts

  • It begins

    Project oven has started and here comes the avalanche of questions, lol.
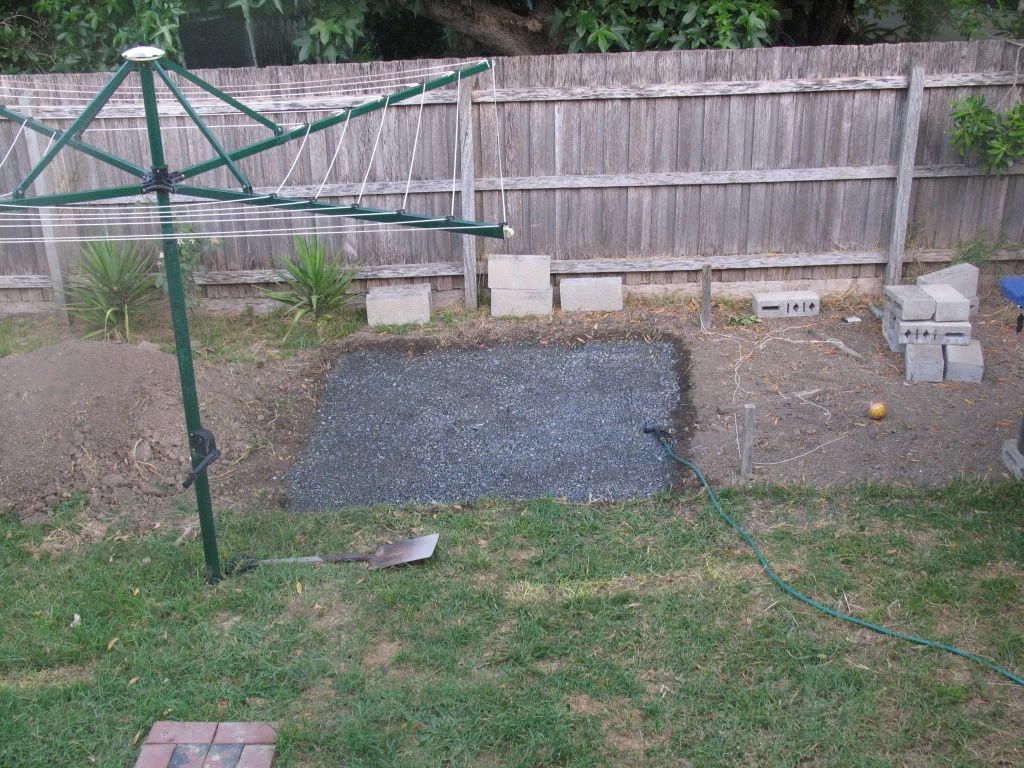
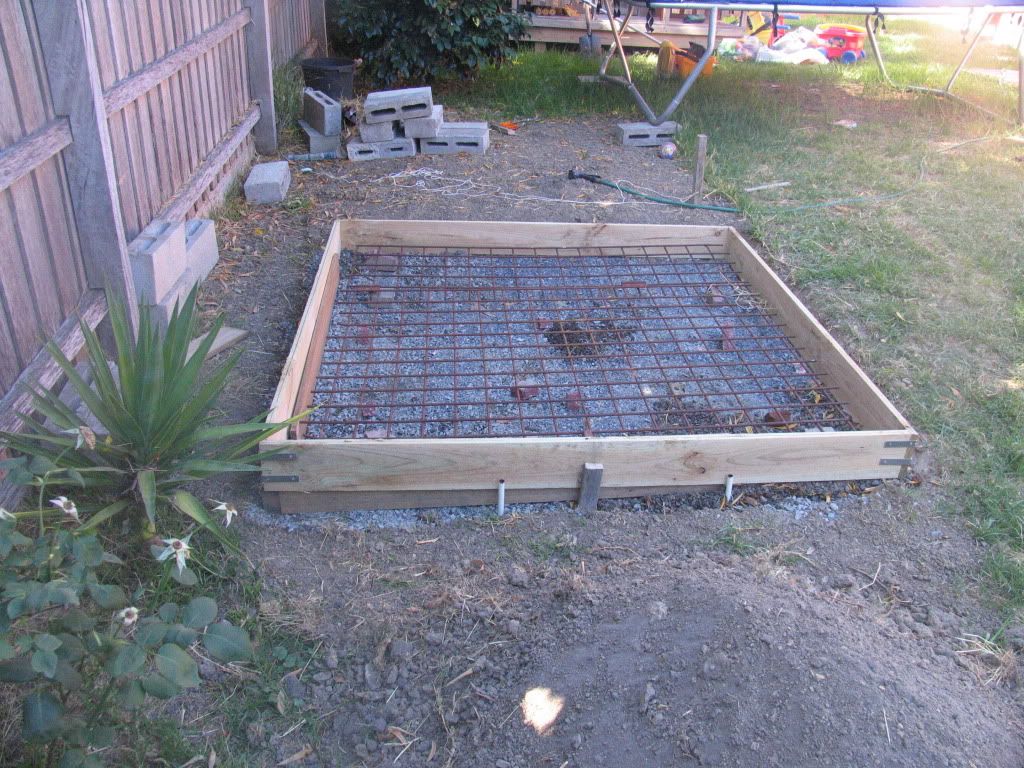
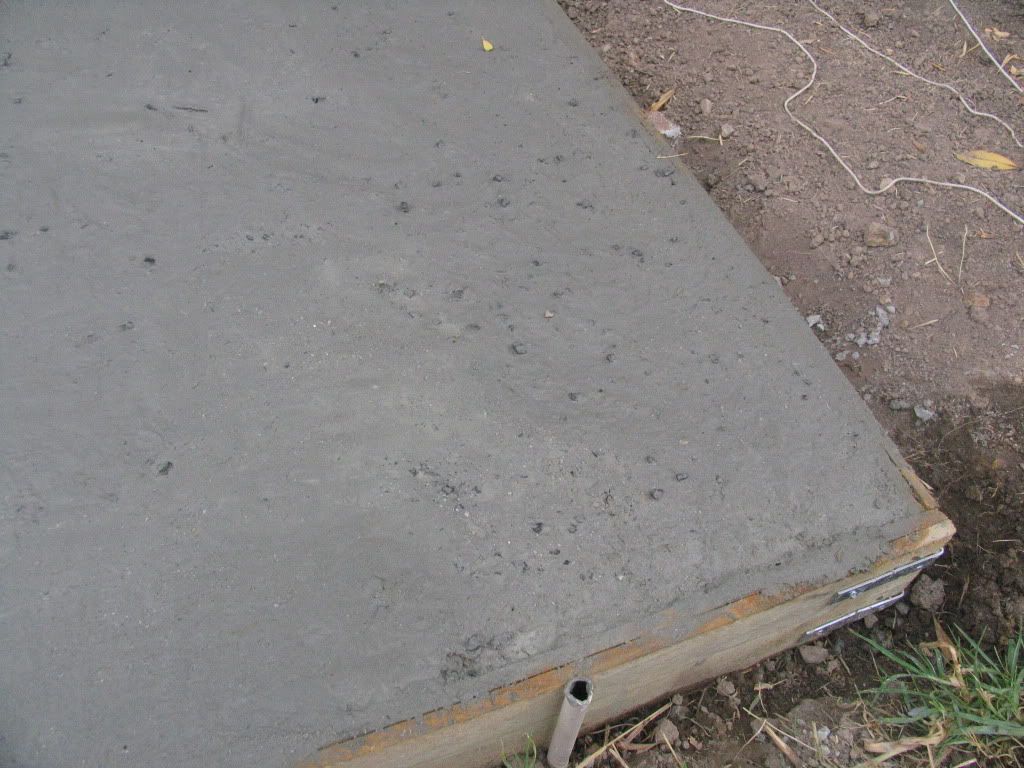
    I've got the foundation dug out and due to a slight fall in the land, one side had to be dug deeper than the other. There is a fall from left to right and also from front to back. I've filled it with crushed rock and have leveled it out best I can. What I would like to know is how do I compact it. I have stomped all over it and will continue doing so for the next few days. I have also got it nice and wet to help settle it. Is this enough? I realise I can go and hire a machine from bunnings etc but would like to avoid this if necessary as it's a pain. What did you guys do. Also when it's time to lay concrete is a plastic sheet needed and if so can I get away with a plastic drop sheet that the painters use.
    Thanks in advance.

  • #2
    Re: It begins

    As you stomp you have to go bvvvvvvvvvvp with your mouth, this vibration noise helps to compact the ground..
    The English language was invented by people who couldnt spell.

    My Build.

    Books.

    Comment


    • #3
      Re: It begins

      a length of 4x2 hardwood with a 6" square of ply tacked on the end works quite well as a tamper, but it's fairly hefty work.
      Kindled with zeal and fired with passion.

      Comment


      • #4
        Re: It begins

        A 6" square piece of 1" thick steel welded to a 1" solid steel shaft would do the job better!

        I've filled it with crushed rock and have leveled it out best I can.
        Why do this? Just fill it with concrete and then you don't need to compact it nor worry about it 'settling' after your oven build.
        If you 'need to fill and level your slab' (not needed for your beam foundation), I would use recycled (crushed up ) concrete or road base as these go down just like concrete, especially if you wet them when compacting.

        is a plastic sheet needed and if so can I get away with a plastic drop sheet that the painters use.
        Fortecon (that orange thick plastic film used under house slabs) or thick agricultural black plastic is not needed for an oven base unless you are building it indoors. This is a water proofing membrane to stop water from seeping into the flooring slabs and remaining not only cold but also damp.
        I put it under mine only because I could and I like to do things right. It also helped prevent moisture from running over the clay bed that my foundations are sitting in as it is built into a retaining wall and not on a stand!

        Cheers.

        Neill
        Prevention is better than cure, - do it right the first time!

        The more I learn, the more I realise how little I know


        Neill’s Pompeiii #1
        http://www.fornobravo.com/forum/f8/n...-1-a-2005.html
        Neill’s kitchen underway
        http://www.fornobravo.com/forum/f35/...rway-4591.html

        Comment


        • #5
          Re: It begins

          Thanks for the reply guys. The crushed rock seems to have settled a bit this morning after the soaking I gave it yesterday. I will compact it as best I can tonight and start the pour tomorrow morning. I will use the black plastic which I purchased today for $5 so it was cheap insurance to use rather than not.
          I'll take pics and show you all my progress and hopefully nobody spots any mistakes.
          Any advise on what time frame the pour needs to be done in.
          Last edited by OscarA; 01-06-2011, 10:14 PM.

          Comment


          • #6
            Re: It begins

            I've been at it 1.5 hrs and just under half way. I'm using a concrete mix that garden supply places sell and adding cement. It's 31c here in Melbourne and I feel like I'm about to drop from heat exhaustion. Just taking a breather then back to it.
            I'm guessing it'll take me close to 4 hrs before I'm finished so hopefully the concrete wont go off.
            This is bloody hard work especially since I have to move the concrete 130 feet from the front of the house to the back due to the mixer being to large to fit through the side gap. To make it even worse this second hand mixer I bought was advertised as sometimes slipping to spockets being a little worn but the bloody thing constantly slips and I'm finding myself having to continually monitor it and manually helping it turn. Serves me right for being a tight ass.

            Comment


            • #7
              Re: It begins

              Originally posted by OscarA View Post
              I've been at it 1.5 hrs and just under half way. I'm using a concrete mix that garden supply places sell and adding cement. It's 31c here in Melbourne and I feel like I'm about to drop from heat exhaustion. Just taking a breather then back to it.
              I'm guessing it'll take me close to 4 hrs before I'm finished so hopefully the concrete wont go off.
              This is bloody hard work especially since I have to move the concrete 130 feet from the front of the house to the back due to the mixer being to large to fit through the side gap. To make it even worse this second hand mixer I bought was advertised as sometimes slipping to spockets being a little worn but the bloody thing constantly slips and I'm finding myself having to continually monitor it and manually helping it turn. Serves me right for being a tight ass.
              Sounds like you are doing well!

              Don't overdo it. We want you to be there to enjoy the oven when it gets done

              A cement finisher can work concrete that is pretty hard to the touch, so take your time and use water to keep it working. Finishers use a trowel to actually slap down hard on the surface to get the wetter components back up to the surface and keep it working. HTH

              Good luck
              Lee B.
              DFW area, Texas, USA

              If you are thinking about building a brick oven, my advice is Here.

              I try to learn from my mistakes, and from yours when you give me a heads up.

              Comment


              • #8
                Re: It begins

                What a day yesterday was, I finally got it finished but it took 6hrs and as a result it's not the smoothest slab in some places but overall I'm happy with the result. I'm just hoping when the form work is removed I'll still be happy.
                I ended up using roughly .5 of a cubic meter of cement mix 5.5 bags of cement and had to rush to Bunnings for 15 bags of ready mix as I ran out 4/5th of the way through. I figured all I needed was 10 bags but bought extra just in case and sure enough 15 bags was used.
                The slab thickness is 6 inches (front right) 8 inches (front left) 9-10 (back left)
                and 7-8 (back right).

                Here are some pics.

                A lego design of my stand


                Crushed rock base


                Ready for the pour and yes I forgot to use the plastic

                Comment


                • #9
                  Re: It begins

                  Pics of the finished job with a close up of a bad area.

                  After it had dried a bit I went over it with a hard bristle broom to help remove loose stones and give it a neater appearance (photo was before doing the broom) but no matter most will be out of view and I might even tile the exposed bits to give it a nice finish. The first layer of blocks for the stand will most likely need mortaring to make it level but that was likely to happen anyway.

                  Finished slab


                  Close up of the bad spot

                  Comment


                  • #10
                    Re: It begins

                    Dear Oscar
                    bloody hard work the old concreting you must be pleased to get this first PORE done.
                    Well you done it hard getting that down the side of the house to the final slab.
                    Could I sugest a few things to help you with the next Pore the suspended slab you'll need to pore.
                    Mixing cement First sand and gravel... throw it in with the cemnt mixer Get it running first use the same shovel to next chuck in the cement powder...let it mix.
                    get a bucket and fill it with water then use a dipper ( trust me not the wifes tupperware) and add the water slowly it will go sloppy suddenly so add it SLOWLEY it will be a little sloppier than you expect ..its got to flow remember.
                    When you get the mix in the form work use you shovel up and down to get it to pack tight in the corners. remember its to be a sloppy mix so it flows into the corners and follows the shape of the form. Skreed it ....a longer plank than the wide of the form work get someone on the outside a nd a back and forth motion will will flatten the lot. find a low spot chuck some more mix in that spot.
                    Now let it sit for an hour be patient the cemmical reaction is starting to take place not drying out like ya think. Now its time to trowl the surface wooden trowel is easy steels better but a lot harder to use. The surface will be harder now and as you run the trowel over the surface you will find you bring the CREME to the surface (a mix of fine sand and cement) it also pushes the larger stones below the surface and the final surface will be harder and better wearing. You don't want a shiney surface thats alright a final brush with a fine Yes fine broom will give you the roughness to key the next coat.
                    want that round edge that dosnt break off? get yourself a edging trowel and run it around the edge does the same think as the trowel brings the Creme to the edge so it doesn't crack.
                    The slabs now a very Diffinite Green colour right. If its hot drying it outs under a hot suns.... not good ... the chemical reaction has to take place in slow time (days) cover it and wet it down... the slower it drys the harder it will become. Days later it turns real white Yep thats it, the cement has finally cured
                    Hope this helps
                    Trust me raised a sweat just thinking about this
                    Regards Dave
                    Measure twice
                    Cut once
                    Fit in position with largest hammer

                    My Build
                    http://www.fornobravo.com/forum/f51/...ild-14444.html
                    My Door
                    http://www.fornobravo.com/forum/f28/...ock-17190.html

                    Comment


                    • #11
                      Re: It begins

                      Oscar, a whole circus of elephants could dance on that slab when it cures and all will be well

                      Glad you made it without a heart attack

                      Rent or borrow or buy cement float or a finish trowel if you are worried about looks....Most of your small defects will be covered or out of sight....It will be fine.

                      Lee B.
                      DFW area, Texas, USA

                      If you are thinking about building a brick oven, my advice is Here.

                      I try to learn from my mistakes, and from yours when you give me a heads up.

                      Comment


                      • #12
                        Re: It begins

                        Originally posted by cobblerdave View Post
                        Now let it sit for an hour be patient the cemmical reaction is starting to take place not drying out like ya think.
                        Only if retardant has been added, without retardant and the correct water ratio the concrete should be untrowelable after about half an hour.
                        Last edited by brickie in oz; 01-09-2011, 02:34 PM.
                        The English language was invented by people who couldnt spell.

                        My Build.

                        Books.

                        Comment


                        • #13
                          Re: It begins

                          Hi guys thanks for the encouraging words and tips.
                          The floating slab should be easier to pour as it's only 1/2 the size. This time I will wait until the the weather is fine. The problem with Saturday was I thought I could have it finished by 12 or 1 before the heat really kicks in but boy did I underestimate the job and the amount of concrete needed.
                          Finding this site before my build is a blessing, I don't think I would have even bothered attempting this without the guidance this site provides through everyones helpful input.

                          Comment


                          • #14
                            Re: It begins

                            Dear Oscar
                            Lburor is right you could park a bunch of elephants on that slab without a worry. I'm sorry for my rather long winded naritive I should not have written a bloody thing as I had been at a neighbours drinking beer and solving the problems of the world. Should have said a thing and I'm glad you didn't seem to take offence...
                            Regards Dave
                            Measure twice
                            Cut once
                            Fit in position with largest hammer

                            My Build
                            http://www.fornobravo.com/forum/f51/...ild-14444.html
                            My Door
                            http://www.fornobravo.com/forum/f28/...ock-17190.html

                            Comment


                            • #15
                              Re: It begins

                              No offense taken Dave. I appreciate the advise and take everything on board. I have very little experience with concrete and made quite a few mistakes the other day that wont be repeated next time.

                              Comment

                              Working...
                              X