Announcement

Collapse
No announcement yet.

bread video

Collapse
X
 
  • Filter
  • Time
  • Show
Clear All
new posts

  • #31
    I think Dmum's idea of a plastic container lightly oiled makes some sense. It's going to stick anyway you do it. I just didn't like how much dough I lost on the heavily floured towel, with plastic you could get it all out with a spatula. I agree enameled cast iron is overkill, but it's the only thing I had. I may just pick up a few cast iron dutch ovens at our hardware store.

    James, the dutch oven certainly gave a better shape than my other experiences with high hydration. I guess I've just decided that's not the type of bread I like. I want a fairly thick crust.

    Comment


    • #32
      No Knead

      James, et al,

      Apologies for not have more to say on this subject, but I've been up to my ears laying stone before the snow begins here. Customers have this strange desire to get their jobs finished and not wait until spring.

      I haven't actually made this recipe yet, but I do have a few, possibly helpful, observations on high hydration doughs. Pain a l'ancienne is one of my most popular breads, and you can achieve good oven spring (see pics), but you have to work fast and not overhandle the dough. Shape is less important than speed. You must not let the loaves sit on the peel very long or they will flatten out simply because of their weight. You can dock these breads using kitchen shears opened wide and held almost flat to the dough, and you end up with points, not slashes, that look like the tops of meringue. Still, sometimes it works, sometimes it don't. You can use the same technique with ciabatta.

      Part of the learning curve with high hydration doughs has to do with gravity as mentioned above. These doughs want to spread out rather than rise during the fermentation of the "shaped" dough (second rise). In order to counteract this, for breads like Pugliese, I do the bulk rise in a straight sided container, then shape and let rest while preparing proofing bowls. You don't need the French ones, either. I have a series of wicker baskets of different sizes that I got at buck stores. Size depends on the weight of the loaf; 1lb, 2lb. I mist and flour old linen table napkins (yard sale), drape them over the baskets, then place the shaped boule into them, seam side up, for the second rise, folding the flaps over the dough that's showing. The shape of the basket encourages the dough to rise upward, rather than spread outward. It would be impossible to release a wet dough from a basket without the cloth. Invert onto the peel, remove cloth, slash, bake. You'll get more volume this way as long as your oven is at the right temp and you have good steam.

      Releasing wet doughs from bulk fermentation bowls is another issue entirely. I always mist the bowls with spray oil, then cover tightly with plastic wrap. When it's ready, I have a bowl of cold water on the bench, and I repeately dip a plastic dough scraper into it while very gently easing the dough out of the bowl. The edge of the container is resting on the bench top the whole time to prevent the dough from falling out and deflating. For dividing, I use a stainless dough knife, also repeatedly dipped in water. Sever, don't saw, with the dough knife, kind of pinch it off with each cut. Then I let the pieces rest about 5 minutes before loading on the peel.

      A word about the bench: I know what the NYT article says, but I prepare a fairly substantial bed of flour on which to turn out wet dough. I also sprinkle the top of the dough with flour using a fine meshed stainless steel sieve (Italian, too). Once the pieces are divided, I very gently roll the cut sides in the flour to prevent sticking on the peel. I dust the peel with the sieve using brown rice flour, which does not burn as easily as other things I've tried.

      I'm not at all sure these methods will work with the no-knead bread, but I will by trying them, and others, to see what works best. High hydration certainly contributes greatly to an open crumb, but my experience is that proper handling is just as important.

      A word on yeasts. For recipes that call for instant dry yeast, I've been using SAF Gold Instant. I find that it yields the best rise and is the most consistent, maybe because there are more active yeast cells per capita than other instants I've used. Better, even, than SAF Red Star. I get it on line at www.kingarthurflour.com. Store all commercial yeasts in the freezer. Generally speaking, instant dry (IDY) and active dry (ADY) yeasts are not interchangeable without doing the math on how much of the other one to use instead. There are charts on this. And ADY must be hydrated before being added to the mix. Yeasts in foil packets or glass jars are ferociously expensive; buy in larger, bulk sizes; much cheaper, and they'll keep a year in the freezer.

      You can, of course, develop a "spiked" formula that uses both IDY and wild yeast starter, but the hydration level has to be adjusted to account for the wetness of the starter.

      It would appear that the Dutch oven method is the only way to fly for this particular recipe. Certainly, the baker would not have done it if it wasn't necessary, because he's got more clean up on his hands with this method. But, it may be, that wood-firing will make a difference and it can be baked right on the hearth. The baker did say, I think, that you need 70% steam for a good set, so the enclosed container would make this much easier to achieve. It seems to me that the cooking times are far too long for a wood-fired oven. My kilo boule cook in 22 minutes flat to an interior temp of at least 205F; baguette: 12 minutes. This will take some time to figure out, but, generally, I cut bake times roughly in half if they've been developed for kithcen ovens or gas decks.

      I've got a large order for the end of the week, and I'll be trying it then as an experiment. I've got a smallish cast iron, German pot with a very heavy lid that's roughly oblong. It might be possible to shape the loaf as an oblong and bake in it (buck store for oval bread basket). Don't know yet. I've certainly got enamel over cast iron, round, in the pantry, but they might be too large. Don't know yet. Breads have been baked in lidded clay bakers, too, Romertopf, La Cloche, even flower pots.

      Developments like this don't come up very often, so it's exciting and worth pursuing. I'll post what I find out, and I hope everyone else will, too.

      Jim
      "Made are tools, and born are hands"--William Blake, 1757-1827

      Comment


      • #33
        This is pretty good

        We just finished eating the first test loaf, and I'm really pleased. I think the technique really has a lot going for it, and I wish I had thought of it myself (or something like it). The developers should be proud. It's a hydrated dough, not overworked (or really worked at all). The folding gets the gluten to line up; and the big, covered pan creates a lot of steam. I'm hooked. This might be the best bread you can make without a real brick oven-- and I am looking forward to testing it when my oven is up and running.
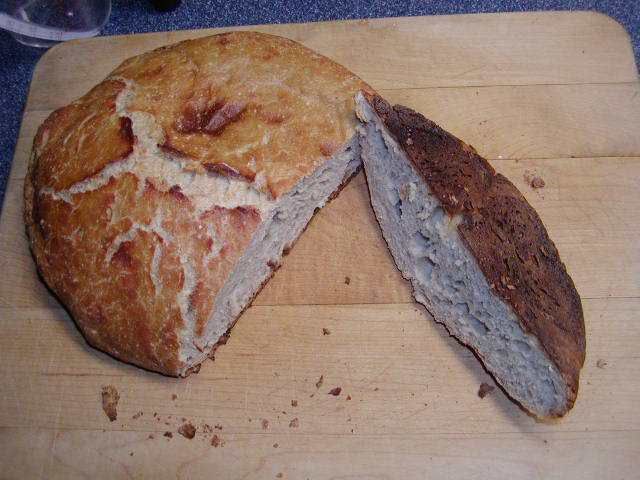
        This is my first attempt. I made a basic 40% hydration dough, but with only about 1/4 tsp of yeast. In this case a fresh brewer's yeast, using very basic general purpose flour. I mixed it with a spoon and let it sit all day.

        Three hours before dinner, I did two traditional three-folds, being very gentle. I let it rest for 15-30 minutes, then did two more three-folds and tucked it into a ball.

        I put it on a floured cookie tray, and covered it with a towel. After one hour, I preheated the oven to 450?F, and put in my big anodized aluminum pan. After another hour (two for the dough), I dumped the dough ball into the hot pan. I tried even tried to slash the top of the loaf. 30 minutes cooking with the lid on, and 20 mintues with the lid off, and it was great. It didn't stick and it just popped out.

        The crust was well formed, and was dark brown, but not burned. Lots of carmelized crust, and the hole structured as very good. I got two thumbs up from the kids. It's not a lightweight bread.

        Working with the hydrated dough can be trickly, and I used wet hands, flour dusting and a pastry knife to do it. I never used a towel, but instead used the proofing on a wooden board, and then my cookie sheet.

        I have batch #2 in the refrigerator, so I'm going to keep trying.

        Here are the photos.
        James
        Pizza Ovens
        Outdoor Fireplaces

        Comment


        • #34
          Yikes

          James,

          Super, super results. What a find. Not sure who first came up with this idea, but as I said earlier I think it might have been Dan Lepard.

          This is a fine candidate for the Bread Baking section, if we can all pool our experiences.

          Wonder what would happen with 75 per cent bread or AP flour and 25 per cent stone ground wheat? Hummm.

          Jim
          "Made are tools, and born are hands"--William Blake, 1757-1827

          Comment


          • #35
            This is limited to our local flour supply, but my second batch (ice water and all) is 50% general purpose Tipo 00 and 50% strong manitoba. My hopes are running high, though of course it's still in the fridge.

            Think about where to put all of this in the FB Bread Baking pages.
            James
            Pizza Ovens
            Outdoor Fireplaces

            Comment


            • #36
              whole wheat variety

              I changed four things tonight: I know, you're supposed to change one thing at a time.

              First of all, I switched to half whole wheat, King Arthur white whole wheat flour.

              I moved the pot up one shelf notch, so it's not right on the bottom.

              I lowered the temperature 25 degrees to 475

              I did my second rise in a lightly oiled plastic container.

              The plastic container was successful, I dumped the dough right into the hot pot.

              The loaf didn't burn, but it did stick, I had to wait till it cooled to pry it out.

              The bad news was that the bread was just no good. Instead of having a crackling crust, it had a tough skin. I didn't have the oven spring, so it was heavy and tough inside. Instead of the toasty whole wheat flavor it had a nasty rye like flavor.

              All purpose flour seems to be the key to success here.

              My geodesic oven project: part 1, part 2

              Comment


              • #37
                David,
                This could make intuitive sense. If we are making a high hydration bread, without a lot of density or crumb development, it would makes sense that the lighter flour would work better. I've never seen a whole wheat ciabatta.

                My second attempt is half all purpose and half a heavy bread flour. We'll see if it's better, or worse, than my first attempt.
                James
                Pizza Ovens
                Outdoor Fireplaces

                Comment


                • #38
                  Round 2

                  Like David I made a handful of changes the second time around. So much for the scientific method. The outcome was still very good. Big oven spring, and I got an "awesome" from a daughter, so I guess that's pretty good. My second attempt was more dense, and chewy; fewer holes. Very satisfying, with room for improvement.

                  It can't say if it was better; it was just different. A different style.

                  My changes are long (bad science):

                  1. 50% AP flour and 50% strong bread flour.
                  2. Ice water, with 24 hours in the refrigerator, then 8 hours at room temp.
                  3. I did the long proofing (two hours) in an oiled mixing bowl -- it didn't stick.
                  4. I used an 3 qt enameled cast iron pan.
                  5. I pre-heated to 475F for one hour (with the pan inside the whole time). Long and hotter.

                  The upside:
                  Good crust and a more dense crumb.
                  My new Ikea pan didn't stick at all.

                  The downside:
                  Not great holes and the crumb wasn't quite done. Either the cast iron pan was hotter than the anodized aluminum pan, or the extra 25?F really mattered. I will cook a little cooler next time to balance the crust browning and the crumb cooking through.

                  The next experiments:
                  I am going to try a terracotta pan and I am going to use my infrared to see what my pans are doing with the heat from the oven.
                  Work in some whole wheat.

                  All good. I think this is a keeper.
                  James
                  Last edited by james; 11-12-2006, 03:15 PM.
                  Pizza Ovens
                  Outdoor Fireplaces

                  Comment


                  • #39
                    forgiving bread

                    This is a really forgiving bread. Got mine in at 5:30 this morning - and rushed it.

                    3 cups of all purpose flour; 1 1/2 tsp salt; 1/2 cup sour cream (dont' ask me why, it was 5:30 and it was in the fridge); 3/8 tsp of fast yeast (all I had and put in a bit extra as I wanted it tonight); and over a cup of warm water.

                    What I got was really really wet mess. I added some more flour untill it pulled a bit vs just falling off the spoon.

                    About 3 pm you can see the messy dough pic in the bowl. I put some flour in a sieve and dusted the top and rolled it out on to a floured board with a bowl scraper. I lightly floured that surface and folded as best I could. It barely held shape.

                    I dusted the outside again and put in a covered bowl vs. the cotton cloth. I was pressed for time and we had company coming to help us film an educational video. But I digress.... I was also pretty sure this was a disaster.

                    At 5:45pm guests had left and it was ready for the oven. 475 degrees and a big old enamel pot was the target. Dough was still very sticky, and I dusted again with flour and rolled it around in the bowl until all edges were coated and it rolled easily.

                    Dumped it into the pot and stuck it in the oven for 30 mins. It looked done after 30 mins. I left it in another 10 with the top on. I pulled it out again and it the crust seemed hard as a brickbat. Put it back in without the lid for another 10. After 5 mins I could not stand it and pulled it out!!!

                    I like the taste. The crust is hard but not tooth breaking hard - crunchy. The bubbles are not consistent - I looked at it earlier in the day and it had risen to the top of the bowl - I set it down on the counter a bit rough and the dough dropped and inch! Not sure but I think it could have baked longer - did not have the crumb I would have liked.

                    Plain, with butter, with olive oil and pepper - we liked it very much. Can't taste much of the sour cream but it has a bit of sour or sourdough taste to it.

                    Enjoy!!!

                    Christo
                    Last edited by christo; 11-12-2006, 06:29 PM.
                    My oven progress -
                    http://www.fornobravo.com/forum/f8/c...cina-1227.html
                    sigpic

                    Comment


                    • #40
                      No-Knead Bread

                      As I said earlier, I haven't tried this method yet, but I do have a few, maybe helpful, observations. I will be trying it later in the coming week.

                      I think the original recipe calls for far too long cooking times at the heat of a wood-fired oven. My general rule when adapting a home or gas fire deck oven to a wood fired oven is to reduce baking times by roughly one half.

                      No one has said what the interior temp of the breads was. It should be above 205 F, but not all that higher, say 208.

                      It MAY be that problems encountered have something to do with baking for too long.

                      Just a few thoughts.

                      Jim
                      Last edited by CanuckJim; 11-12-2006, 07:13 PM. Reason: Spelling
                      "Made are tools, and born are hands"--William Blake, 1757-1827

                      Comment


                      • #41
                        cooking times

                        Jim, I baked my loaves in the brick oven at 500 degrees - one on the hearth and one in the enameled cast iron dutch oven. They took longer than I expected, I didn't time it precisely but right about 40 minutes to internal temp of 205. I could have started them at a higher temp. I think I might try again with all purpose or bread flour without the whole wheat, especially with Christo's crust description.

                        Comment


                        • #42
                          Round 3

                          I like this technique a lot. It's minimal mess, and minimal time, and the bread is consistently good. For a one-shot loaf and day-to-day bread, this is a keeper.

                          In my third attempt, I went for long fermentation. First, cold water and mixing, then left over night in the fridge. Then a multiple hour room temperture fermentation to let it rise, then back in the refrigertor overnight. About 40 hours. But, I mixed it and proofed it in the same stainless mixing bowl, so it was easy. I did the folding on a chopping board.

                          I also cut back the hydration to 70% (from 80%), and the loaf sprang very nicely in the oven. This one is 3/4 GP flour and 1/4 bread flour. I am still using the 3 qt enamel cast iron pot, and the bread never sticks. I preheat the pot for at least 30 minutes (it gets hot) and bake at 450F for 30 minutes covered and 15 more uncovered.

                          Thanks David for the find.

                          I hope my picture captures that the loaf is taller and better shaped.
                          James
                          Last edited by james; 11-15-2006, 08:24 AM.
                          Pizza Ovens
                          Outdoor Fireplaces

                          Comment


                          • #43
                            The following pictures are not of bread, focaccia indeed.

                            However, even this focaccia was heavily topped with tomato sauce, buffalo mozzarela, chopped onions, sliced tomatoes, lots of EVOO and oregano, the dough was almost not mixed and folded two or three times.
                            It is easy to see what the dough looks.
                            I could post the recipe if required.

                            Sorry, not to good shots at all!

                            Comment


                            • #44
                              More pictures

                              Comment


                              • #45
                                Originally posted by james
                                I also cut back the hydration to 70% (from 80%), and the loaf sprang very nicely in the oven. This one is 3/4 GP flour and 1/4 bread flour. I am still using the 3 qt enamel cast iron pot, and the bread never sticks. I preheat the pot for at least 30 minutes (it gets hot) and bake at 450F for 30 minutes covered and 15 more uncovered.

                                Thanks David for the find.

                                I hope my picture captures that the loaf is taller and better shaped.
                                James
                                That looks more like what I am interested in James, much better shape. I repeated the recipe last night for my second bake, again two loaves, this time only all purpose flour, same flour/water ratio but used cold water initially and 1/2 the yeast (1/8tsp) per loaf and let it rise 24hours combined (22 hours "bulk rise" and 2 hours as a formed loaf). 30 minutes covered and about 20min uncovered to an internal temp over 205F. Had much better taste without the whole wheat, fantastic crust and crumb, lots of eyes in the crumb. Still pretty flat loaf though. I'm going to drop the water content for my next attempt. It was 360 grams flour and 350mL water per loaf.

                                Comment

                                Working...
                                X