Re: Brick Oven Photos
Very NICE Jim Bob. I love the night time shot. Gorgeous oven.


-
Re: Brick Oven Photos
Still trying to figure out how to upload the full run of photos from start to finish. In the meantime here are the last five shots including the completed oven attached as thumbnails.
I am in the fifth day of curing and temps got to 600 degrees last nite with NO splits or cracks in ceiling yet. Soot in very top of dome starting to burn off. That oven really throws off some heat out front!
Jim BobLeave a comment:
-
Re: Brick Oven Photos
Hey Stryke,
Nice to hear from you. Have you cooked anything special recently?
JamesLeave a comment:
-
Re: Brick Oven Photos
Hi David,
Glad to see you made your oven, and that it's working well despite its smaller size. Is smaller really better?
Here's a link to a traditional Argentine oven I built with a friend in Las Vegas. Happy cooking!
Argentinean Campo Oven - A Masterpiece
WaltLeave a comment:
-
Re: Brick Oven Photos
/Users/david/Desktop/IMG_0102.JPG/Users/david/Desktop/IMG_0101.JPG
This is my first oven It is about as small as I dared go 500 mm diam. Works really well though. It'll still be over 200 C at midnight. Has 2 1/2 inch walls and 3" fibreglass insulation.
DavidLeave a comment:
-
Re: Brick Oven Photos
/Users/david/Desktop/IMG_0102.JPG/Users/david/Desktop/IMG_0101.JPGLeave a comment:
-
Re: Brick Oven Photos
Thanks for joining the group Del. There are great resources and a lot of very helpful people here to help.
JamesLeave a comment:
-
Re: Brick Oven Photos
I am new to this forum and I am very excited to see pic of brick ovens here before I make mine. have a great day to every bodyLeave a comment:
-
Re: Brick Oven Photos
Good ideas in this series of pictures - and the construction shots also demonstrate what I meant when I said I prefer well-timed snaps to a YouTube video...:-)
Cheers,
CariocaLeave a comment:
-
Re: Brick Oven Photos
Hello Marcel!
I don't recall seeing an answer re sleeping soldiers - my supplier wants full flat tapered bricks to be used on their side for the first course...
I was considering putting down a course of 11 (in my case for the 39in dome) full UNtapered bricks for the first course, sitting straight on the SuperIsol. (I have thought up a kind of insulated 'well' filled with perlite cement mix to take the outward thrust of the dome...)
BTW, my supplier recommends a one-inch thick sheet of SuperIsol - anything thicker than that would be a waste of dough, they stated. Is that acceptable? Or should I put a bed of perlite/cement mix onder the SuperIsol as well?
Thanks in advance for any pointers on these subjects!
Rgds,
CariocaLeave a comment:
-
Argentine "horno de campo" oven
Although these ovens are called "mud ovens" in Argentina, many are made of fire brick and refractory mortar, like this one I built with a friend in Las Vegas. The entire process from breaking ground to our first pizza is documented photographically at: http://nervegna.blogspot.com/Leave a comment:
-
Oven light?
I'll say it is fun. Wow! lots of good pictures there. I love the shape of the oven and everything about it. That is really cool. Were you there Cristo? Does the light really go out when you shut the door?Originally posted by christo
ChadLeave a comment:
-
Masonry heater association oven
This is a fun photo journal of a weekend oven project.
They talk about an oven light - castable refractory frame with a ceramic glass window with electric light behind it.
Anyone got one of those in their oven?
ChristoLeave a comment:
-
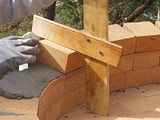
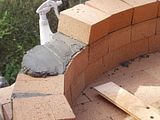
WAY KOOL, Davy !
(M) Wow, Davy, that sure looks like you're havin' a BALL ! I think that's an important innovation but perhaps I should reserve judgement until the last course is laid and hear back from you if there were any unforseen problems.
(M) In your 2nd image it shows the angle iron supported bricks. That's where I had some trouble. My angle was far more off than yours. I'm not sure how to work around that; it seems to be unavoidable because the angle iron is straight and you're trying to navigate a needed curve. Not that it really matters since you'll likely be covering the igloo with Perlcrete &/or a "house". It will get more difficult, even with the ball since the gaps between bricks get larger. Take your time; you have all spring.
(M) Keep up the good work and congratulations. I'm impressed!
Ciao,
MarcelLeave a comment:
-
Maybe this time
Here's another attempt to post some images. Just 4 this time.
Davy


Leave a comment:


Leave a comment: