Re: Another UK oven started
Wlodek
All these proportions are by volume - by measuring, usually in a plastic tub because they're usually to hand in the garage. The sodium silicate (waterglass) is supplied as a liquid - same sort of consistency as maple syrup. The supplier I used for it is listed on my blog - the name escapes me right now.
My insulation mix seems to be holding up fine - just had the oven up to 450C last night, trying to dry the structure out. I tried it without the fireclay and it wasn't sticky or cohesive enough for my liking.


-
Re: Another UK oven started
Wife and family are now excited, waiting for the first food! The oven's still very damp though, due to all the mortar and render used. I'm having a series of small fires first before I start cooking to dry it all out first.
Now I need to build a path so everyone can get to it...Leave a comment:
-
Re: Another UK oven started
Carl. Simply outstanding. I loved watching your build. It turned out very very nice. Congrats! What does your wife and family think now????
Leave a comment:
-
Re: Another UK oven started
The flint block wall was fiddly, but after about three days of work I ended up with this:
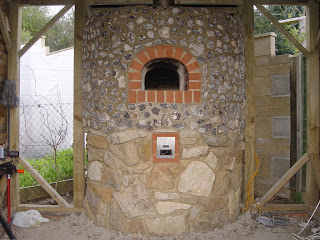
Total cost was pretty minimal, thanks to the availability of the flints. I'm pleased with this look, and it'll look nicer still when I clean the surfaces of the split flints off.
I've added a 'costs' section to my blog - and so far my net cost on this build has been around ?200, thanks to freecycle, ebay and generous neighbours.Leave a comment:
-
Re: Another UK oven started
Too much building, not enough posting...
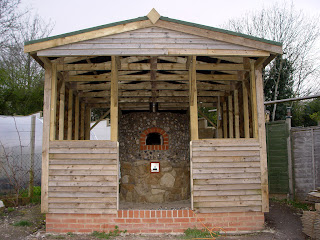
Well, I finished off the walls with insulating blocks, using the cheap damaged ones I bought. This made the front look like a patchwork quilt, but no matter, it'll all be hidden soon.
I rendered the back of the oven with a lime/cement/sharp sand mix - this bit won't be seen either when it's finished.
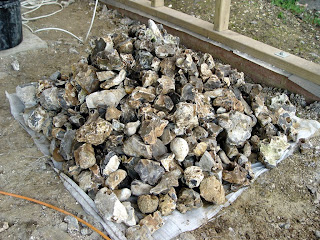
I decided to cover the front of the oven with flint block walling, since I got this large pile of flints free from my own garden. It's a traditional building style round here - the chalky soil is full of flints, and many of the old cottages round here use these in the walls in just this way.
I used a 1:1:4 cement:lime:grit sand mix to mortar the flints in, using screws in the thermalite blocks to bond the mortar to blocks.
Leave a comment:
-
Re: Another UK oven started
I love the Temperature display it's fantastic!Leave a comment:
-
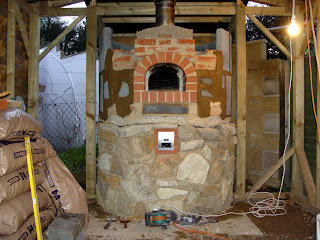
Re: Another UK oven started
Time to start finishing off the oven walls, so I'm using more of the AAC (Thermalite) blocks. I bought these very cheap because they're all damaged (corners chipped off, some snapped in half), but I can still work them into the structure.

I'm having a 6" loose fill of vermiculite around the dome (minimum - this is at the base, and higher up there will probably be several feet worth) then the 4" thick outer wall of AAC block. I'll render over the outside surface when I'm done.
Getting closer to finishing now - must have another fire at the weekend...
Leave a comment:
-
Re: Another UK oven started
The day after the fire I checked the cracks - and they'd gone! Well, they'd closed back up to being tiny hairline ones, from being big enough that you could just get a fingernail in them.
There's no sign of the cracks on the inside, but interestingly the outside cracks appear to match up with the 'courses' of clay blobs that are visible inside the dome. I guess this is just the weakest part of the dome, so it cracks here. They don't seem to be a problem, so I shall leave them right now. More small fires on the way...Leave a comment:
-
Re: Another UK oven started
Thanks Acoma - curing torch received . Tonight was the first fire - a small one, with a couple of handfulls of wood scraps. It burned for about an hour and a half it total before I left the embers to cool.

These pictures were taken after about an hour - at this point the thermocouple inside the dome was reading 230C, the one 1 inch into the dome was reading 180C, and hearth one about 70-80C (again, 1 inch inside the brick - no doubt the surface was much hotter). I had some small cracks on the outside of the dome at the back - but only hairline (nothing on the inside), and no smoke leaked out. I'll have a proper look at these tomorrow - I don't think they'll be a problem. I'll keep doing these small fires to dry it out over the next week or so.
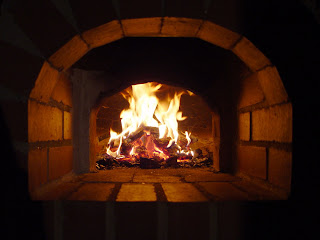
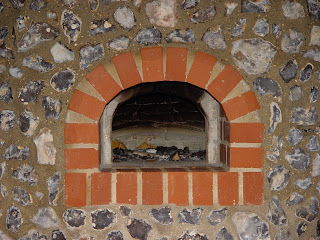
I'm really pleased with the chimney - the smoke went straight up - nothing out the front arch at all.Leave a comment:
-
Re: Another UK oven started
It's Cure time Wow, like the Olympic torch, I now pas it to you Carl What fun it will be.
Leave a comment:
-
Re: Another UK oven started
Ha! I love it Carl! Looks like science lab!
Great job on the oven. Is the family still shaking their heads and muttering behind your back now??? I bet they're starting to believe in you a bit more.Leave a comment:
-
Re: Another UK oven started
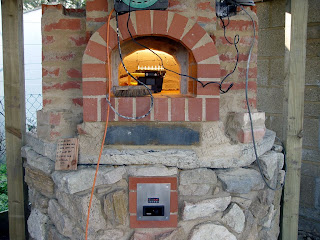
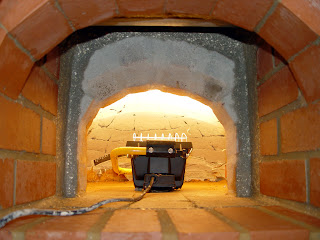
Hooray - found my extensive thermocouple placement notes...
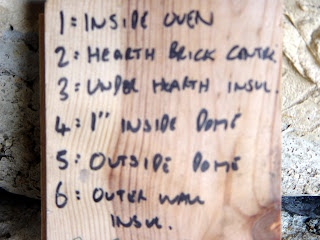
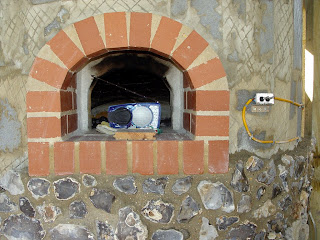
... so decided to install the thermometer today. I'm using a PID temperature controller (close as I'll get to pyrometer on my budget) from Auberins - ?20 for the thermometer module, plus ?4 a go for thermocouples rated to 1000C. I also picked up a rotary thermocouple selector off ebay for ?5, so this lets me select where I read from.
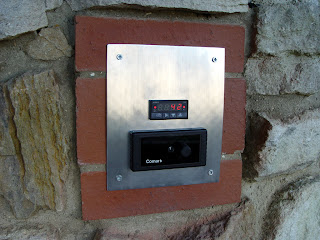
So this is telling me it's 42C in the dome (thermocouple placed just sticking out of the surface - number 1), while outside in the walls...
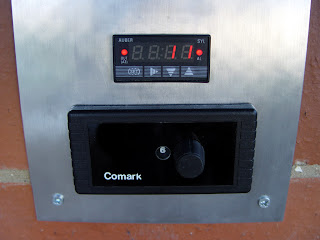
... it's 11C. Not a bad setup for the money, and closes off that little brick hole on the front of the oven that everyone keeps asking me about ('is that where you make the fire'?)
Leave a comment:
-
Re: Another UK oven started
Update: a day later and my insulation mix appears dry. It's dried to a colour similar to the mortar, and feels spongy like cork, yet solid. It's got some tiny hairline cracks in the bit above the oven entry - I'm guessing this bit dried too quickly due to the heat from the halogen light. The rest seems to dried well with no cracks.
I will leave it another day while I build my thermometer set up, then I'm going to start playing with fire....Leave a comment:
-
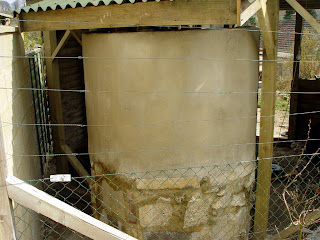
Re: Another UK oven started
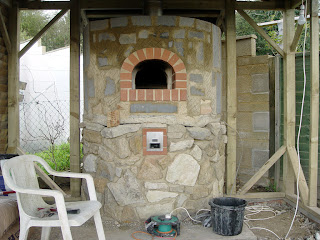
The whole gap filling exercise took about an hour, and I'm pretty pleased with the finished look. I'd been wondering for ages how I was going to sort this bit out...
Leave a comment:
Leave a comment: