
Re: Casa90 Build
Some more pictures....





-
Re: Casa90 Build
Hi All,
I wanted to update everyone on my build since it has been so long since my last post. I got held up by a lot of rain and random event that come up during the summer. I was able to get the sides on, start the roof, and get everything ready for stucco. Thing have moved a little slower but it is really starting to look like a finished product. I order the flashing for the chimney and should be able to finish the stucco over the next couple of days.
I may creat a couple of posts just so I can fit all the pictures. Let me know what you think and if you have any questions.
CdubsLeave a comment:
-
Re: Casa90 Build
Hi Cdubs,
You actually want some side to side movement in the frame so you can fit the perfectly dimensioned cement board to a less than perfect frame. Plumb a stud at the right or left edge of the frame and put up the cement board. Put in a screw at the corner and then push the frame right or left to align the edge of the cement board to a far stud. You will probably need someone to help. Place a few more screws to hold everything in place. You will be surprised at how ridged the structure becomes after a few boards go on.
Can you get the green colored Hardy cement board screws? They self-tap, self-countersink, hold strongly and are coated to prevent corrosion from damp conditions. I placed them every 10 inches. Try to avoid placing a screw too close to the edge of cement board. Install another piece of metal stud if you need to so the screw has something to bite into.
A strong light above the entrance will cast a shadow into the oven. Find an outdoor rated goose neck lamp.
Consider placing some screws either side of the vertical joint above the key stone. Install a piece of stud there if you have to. Also, consider packing some 5:1 vermicrete around the void behind the arch and cement board joint. Maybe you will find that helpful when applying stucco or thin-set over the front if that is the finish method you choose. Also, tape your joints with the nylon mesh sold on rolls. It will keep cracking to a minimum or prevent it.
Cheers,Leave a comment:
-
Re: Casa90 Build
I've deleted my "structural comments" here and bowed to azpizzanut's (Bob's) wisdom & experience in the post below (#85).
One thought on your lighting. I was truly amazed at how dark it was in my oven if I didn't have an active fire going (late evening fire starts for next day bakes). I ended up buying a battery powered, flexible neck (20") barbeque light that I can move down and face into the oven when I need light inside. (Initially, I tried a standard light fixture above the oven landing at head height and found that it just blazed itself into my retinas when I flipped the switch. It didn't give me light were I needed it most--on the landing and in the oven.) It would be interesting to see if you could get a flexible neck/LED fixture to allow you to get some light into the oven rather than into your eyes... Just something to think about down the road. (There's always something else...)Last edited by SableSprings; 05-08-2011, 10:17 PM.Leave a comment:
-
Re: Casa90 Build
Here is a view of the electrical work I did to get the lights hooked up. Digging the trench was the worst part, but being able to cook at night and showcase the oven is all worth it.
First picture shows part of the trench where I connected to the conduit. If you go through my pictures you can see that I put in the conduit when I poured my foundation. Finding it was harder the I thought (I should have drawn a map).
Second picture shows the switch that I put in. Im happy I decided to keep it on the side rather then moving it to the back where no one would see it. This makes it more accesible and who really cares if you can see it.
The last picture is a view of the future location of two fixtures. I put in a cheap light until I pick out the permanent ones...probably something small with about 40 watts each.Leave a comment:
-
Re: Casa90 Build
Thank you so much for your comments Mike and Bob. The two of you have been a tremendous help over the last month and could not imagine what I would have done without your help.
I started the enclosure and feel like I have made some pretty good progress. The hardest part by far was figuring out how to cut the front cement board to go around my "unique" arch. As you can see I decided to keep the tan arch and work my colors around that. Even though I feel red brick is classic, I really like the way mine came out.
After completing the majority of the steel frame, I am trying to figure out a way to get more horizontal stregnth. I know the structure will be more rigid once I put all the sides on, but it seems way to flimsy front to back (if that makes sense). Has anyone tried using an X beem to give the structure some more support? Im almost positive that is not the technical term, but I mean crossing a support between two studs.Leave a comment:
-
Re: Casa90 Build
Hi Cdubs,
A lot of people do their arches in red brick but, yours looks unique. Whatever you do, it will be YOUR oven, so make it different. I like the look of the arch. You will have a story to tell about it to anyone who sees it and asks questions about the building process.
I may start something with this next statement, but I was told by a highly regarded oriental arts practitioner that "ovens with tan arches cook the best pizza". I don't know for sure if that is true or not but I'd take it as a good omen that you chose tan brick for the arch in the first place. Maybe it is cosmic Karma.....
Cheers,Leave a comment:
-
Re: Casa90 Build
It seems to me that all of our entry dome brickwork is aimed at somehow setting the entry off visually from the rest of the oven. I think your uniquely designed tan arch looks great and is going to do exactly that...from my point of view it's an enhancement to your oven not a "clash of colors". That said, if YOU look at it and say "I wish I would have done it in red brick..." change it now!
You need to look at this oven with pride...not regret. Make a decision, accept it, and then relax!
p.s. I agree with using red brick for the main enclosure...after all, a brick oven should look like a brick oven. A tan arch on a red brick oven sounds pretty classy to me!Last edited by SableSprings; 05-05-2011, 01:31 PM.Leave a comment:
-
Re: Casa90 Build
Thanks for all the great responses guys. I have been doing a lot of thinking the last couple days (I know that can be very dangerous) and I think I am taking this oven in a different direction. I was planning on using a grey brick to match the new patio, but after a lot of thought I think I am going to do it in red brick. For some reason, when I think of a pizza oven I just see it in red brick. The one thing that is bothering me is that I just spent a whole day making an arch out of tan block...do you think that is too many colors?
Gray patio - red oven - tan arch. I am contemplating taking down the arch but I really like the way it came out. What do you guys think?Last edited by Cdubs; 05-04-2011, 06:48 PM.Leave a comment:
-
Re: Casa90 Build
Hi Cdubs,
The chimney parts screw together same as you put it on the base. You could make a chimney out of 1' pieces if you wanted, just put one on top of the others, etc. I used 6" double wall, stainless, pipe.
Both of my ovens have the same pitch. For every one foot of run there is 5" rise. On oven number two I wanted the ridge to be about ten inches above the dome so I could pour vermiculite to a depth of 4-6" over the oven with a little room to spare. The height of the side walls affected the angle of pitch. After all was done it turned out very close to the pitch of oven number one. I think a lot of oven builders find that circumstance dictates design when they do an enclosure.
I envy those that start with a design and set of plans. All that made my head hurt thinking about it so I went with whatever seemed appropriate at the time. The goal was to enclose the base and oven with metal studs and cement board. After the siding went on there was no turning back to re-do something. By that time though we were rounding second base and headed for third. Not much actual fabrication left to do, just metal roofing, stucco and paint. Each one of those tasks required separate consideration and a new set of much easier "design" challenges.
Be sure to provide openings or another method to ventilate the inside of the enclosure. I made sure the roof panels (cement board) maintained an even gap along the peak so that air could escape. I put circular vent plugs along the side walls near the top so that fresh air could get in and circulate out from under the ridge cap. There are other ways to do it too.
As for a ridge cap we cut a piece of metal roofing 14" wide, enough to cover both sides of the peak and bent it over a piece of wood to give it shape, then screwed it in place over the peak. The only caveat is if you have to conform to local code. Then you have to do whatever they specify. In many locations outdoor ovens are not regulated by code so you may have some latitude to decide on a suitable pitch.
Cheers,Last edited by azpizzanut; 05-02-2011, 09:35 PM.Leave a comment:
-
Re: Casa90 Build
For every 3 feet of horizontal run, the roof goes down 1 foot. It's just a ratio of run/rise.Originally posted by Cdubs View Post
here's a pic - maybe more easy to understand:
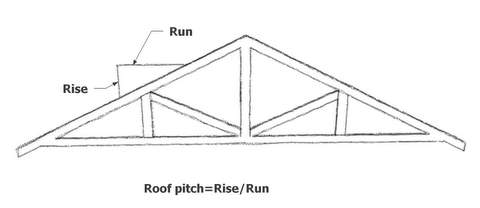
Here's a pic of a drip edge:

The ridge piece is just to make certain the rain / elements don't get passed where your two roof slopes meet at the top:

Leave a comment:
-
Re: Casa90 Build
Cheesesteak - that is what I thought but it's hard to get sarcasm in writing. Two questions..what is 3/1 slope, and what is a drip edge and ridge?Leave a comment:
-
Re: Casa90 Build
Cdubs -Originally posted by Cdubs View Post
It's weatherproof - no water gets in. I was being a bit sarcastic and tongue-in-cheek about it being "watertight." If I tossed it in the pool - it would take on water . . .
I went with a 3/1 slope on my roof. I built mini-trusses with metal studs, attached some plywood, applied roofing paper, and attached the metal roof. I flashed my chimney and did it in stucco. Put the appropriate drip edge and ridge - and viola - no water intrusion and it even looks like I knew what I was doing . . .Leave a comment:
-
Re: Casa90 Build
Thanks Bob, that is a lot of great info. If I buy an extension, would the two pei es just fit together or is there another piece I would have to buy?
In regards to my keystone, I do not have a means to cut brick and have been doing all of my work with a hammer and chisel. The arch is not completely done, I will be filling in the gaps to make it a true arch.
Your tip on marking the side of the stand for finding the center of each stud is absolutely genius!!! It is a very simple tip but you just saved me at least an hour. Hopefully a lot of people pick up on that.
For those of you who have built a "house" enclosure, what degree slope have you used for your roof?Leave a comment:
-
Re: Casa90 Build
Hey Cdubs,
Go here for your chimney parts: http://www.northlineexpress.com/sear...order=featured Way cheaper than some other places. Uh-huh !!
That's an interesting "keystone". If it were mine, I'd take it out and place thin brick either side of it and then cut a wedge shaped keystone. Do you have a way to cut a brick thinner to place either side of the key? It certainly looks "rustic" the way it is though. I am suggesting this without knowing what you have planned to finish the arch.
Your steel studs look at least as nice as mine (not saying that mine were great or anything). You might find it helpful to mark the edge of the slab with the center line of the stud for future reference. It makes finding the stud easier when drilling screws to hold the siding. Guess how I know that.
It looks like you will have extensive space around the oven to fill with loose vermiculite or perlite insulation. Make plans now to block some of that "wasted" space so you don't have to fill it with expensive insulation. I used aluminum window screen held down to the slab with Tapcon screws and lath and held in place with black iron wire so it wouldn't bulge. I have about 4-5 inches perlite around oven #1 and same of vermiculite around oven #2. Others have used pieces of cement board wedged in place to keep the fill uniform around the oven without wasting space. Be sure to seal the bottom up good so the insulation doesn't find a place to leak out. "Like sands through the hour glass....."
Cheers,Leave a comment:


Leave a comment: