Announcement

Collapse
No announcement yet.

Ben's Brick Oven in Berwick

Collapse
X
 
  • Filter
  • Time
  • Show
Clear All
new posts

  • #46
    Re: Ben's Brick Oven in Berwick

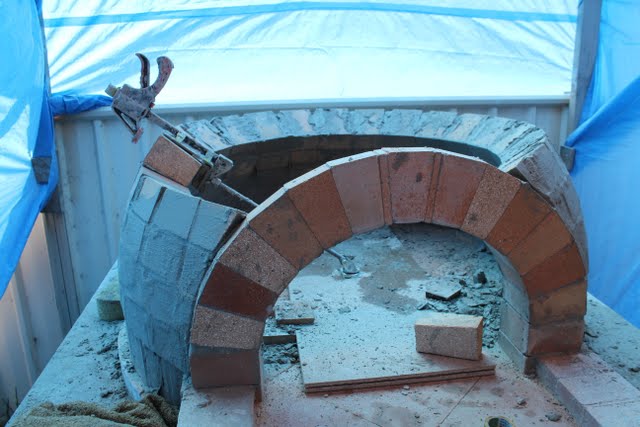
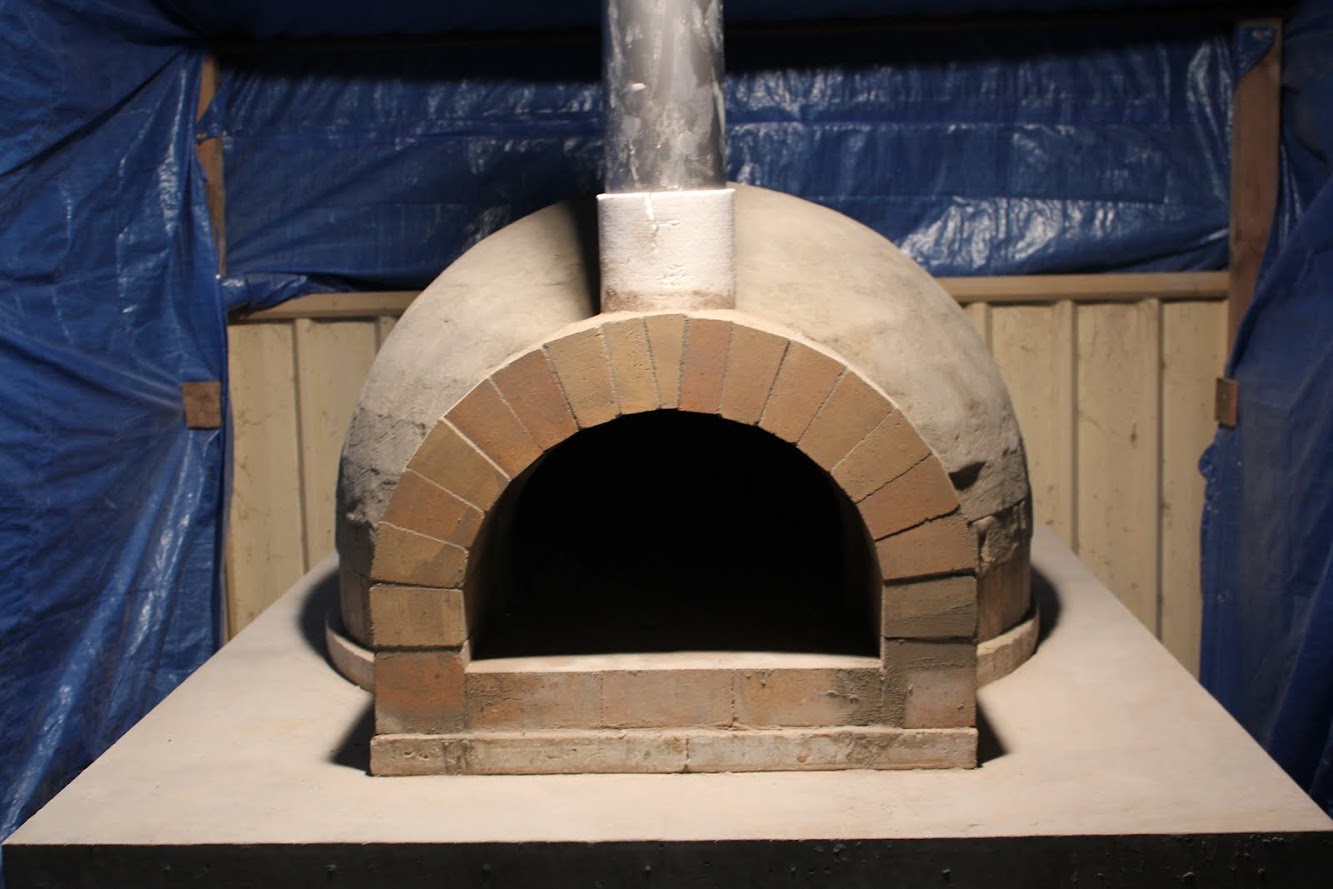
    Next step was the entry arch. I must give ALL CREDIT to Karangi_Dude, that man knows how to build a good entry arch. His is much more complicated than mine (as many of you will attest to) but I have 'borrowed' the idea of cutting a chamfer into the back face of the entry arch to allow for smooth integration into the dome.


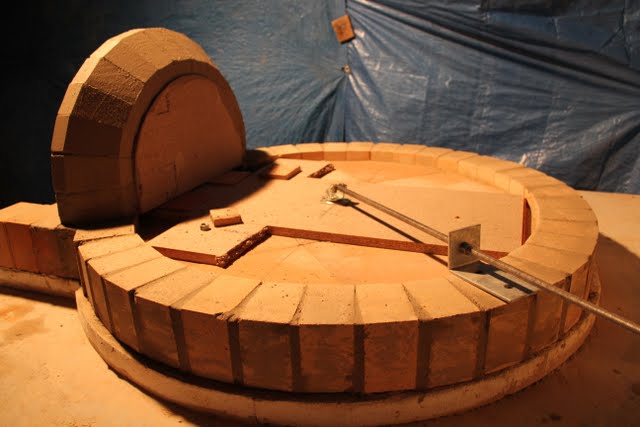
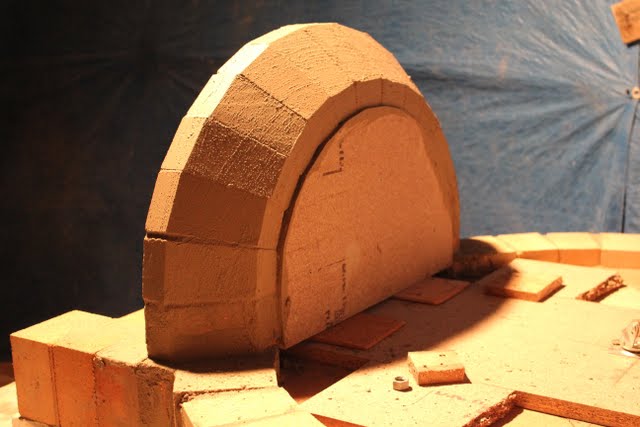
    I was pretty chuffed with my first bit of real masonry!
    The Melbourne Fire Brick Company

    Comment


    • #47
      Re: Ben's Brick Oven in Berwick

      I stripped the arch form the very next day (I do not think it should be said that I am a patient soul...) The joints are a bit uneven, but I am pretty happy with it given it was my first real attempt at an arch!


      The Melbourne Fire Brick Company

      Comment


      • #48
        Re: Ben's Brick Oven in Berwick

        I put together an indispensable tool having carefully read through the variety of different designs that people have come up with on FB. Settled on a very cheap and I believe quite effective design, just a castor wheel with the wheel removed, and a hole drilled through a piece of all-thread to allow it to pivot vertically. I don't have access to a welder so I borrowed another FB member's tip of covering the bolt/nut that protrudes through the angle iron with a piece of wood.


        The only part that I wasn't impressed with was the clamp - it was the cheapest one I could find, and now I know why! It basically stopped clamping after the third brick or so, but thankfully I didn't really need it.
        The Melbourne Fire Brick Company

        Comment


        • #49
          Re: Ben's Brick Oven in Berwick

          Ben,
          Great-looking build so far, and I gotta say you got one masterfully-constructed inner arch! Has to be the nicest one I've seen. Can't wait to see the oven progress.
          John

          Comment


          • #50
            Re: Ben's Brick Oven in Berwick

            Hi John, thank you so much for your kind words, I really have to give all credit to Karangi Dude for the arch idea, it was still tricky to tie the dome in, but I dread to think of what it would have been like without cutting the chamfer into the back of the arch!

            The fact that I was using tapered bricks definitely helped as well...
            The Melbourne Fire Brick Company

            Comment


            • #51
              Re: Ben's Brick Oven in Berwick

              Now we must fast forward by two full days, I pleaded with my wife to take some photos of the progress but alas, she was not as taken with the idea as I was. And as I was up to my wrists in mortar I wasn't going to touch the camera...

              Got the first few courses in, and by this stage I had learned a valuable lesson - wear waterproof gloves when using the mortar. Because I had all of the bricks sitting in a tub of water prior to laying, I would pick them out of the tub with my mortar-caked glove to lay them. Eventually, this water became HEAVILY basic (rather than acidic) and the skin on my hands started to peel, leaving open sores! Not cool.


              I used arch bricks for the walls of the dome and the vent, this meant that although I still had gaps between each adjacent brick in a ring, there was a minimal gap between each successive ring.


              I came back and filled in the gaps with mortar, don't worry!
              Last edited by benguilford; 08-08-2013, 03:22 AM.
              The Melbourne Fire Brick Company

              Comment


              • #52
                Re: Ben's Brick Oven in Berwick

                Got up to the eight chain and had to start using sticks to prop everything up as the mortar set.


                After that I decided it was all taking too long (keep in mind the real-estate agent is calling me every other day to see if we're ready to sell yet - long story, basically our neighbours have an identical unit and are also selling, so by getting our house on the market at the same time we benefit from all of their advertising! Thus the pressure to get this thing completed). So it was time to make a form, again using a mixture of ideas gleaned from this AWESOME forum, I cut a piece of ply into a circle and then in half (so it could be removed through the entry once the dome was closed in), propped it up to the existing chain and used polystyrene as the formwork.


                The problem I have with this form is that unlike when using the tool, you sometimes don't notice that a brick has shifted slightly. this meant the internal surface of my roof is slightly rougher than I would like, but hey, I'm selling the house right?! Get over yourself Ben.
                The Melbourne Fire Brick Company

                Comment


                • #53
                  Re: Ben's Brick Oven in Berwick

                  I wish I had more time when I was doing my build to post photos in the forum, but alas, I was under the pump and had to get it finished! Now I am posting retrospectively, to share the fun I had more than anything else.


                  Closed in the dome and removed the formwork, a couple of bricks had shifted unbeknownst to me, but unless you're on your back with your head in the oven (which is TRICKY let me give you the tip) you won't see them. You can really tell the difference between the bricks laid with the IT and the ones using the form eh?!


                  Then it was time for my vent. Not having a lot of time up my sleeve, and having almost run out of plywood to make the arch form, I decided to use the same form that I had made for the entry arch, but add a layer of polystyrene to increase the diameter of the arch, thus ensuring I had a reveal to push the oven door up against.


                  The Melbourne Fire Brick Company

                  Comment


                  • #54
                    Re: Ben's Brick Oven in Berwick

                    My little flue gallery;


                    In hindsight (which I tell you is a beautiful, winsome thing) I would have made my flue gallery one brick wider on each side. Now that it's finished it still draws like nobody's business, but I do get a little smoke out the front on occasion, particularly when it's heating up.

                    The Melbourne Fire Brick Company

                    Comment


                    • #55
                      Re: Ben's Brick Oven in Berwick

                      OK, so it's been a LONG time since I last posted, I got quite sidetracked with selling the house and other things. My bad. The build did get finished in the end, see the photos below!


                      The Melbourne Fire Brick Company

                      Comment


                      • #56
                        Re: Ben's Brick Oven in Berwick

                        The Melbourne Fire Brick Company

                        Comment


                        • #57
                          Re: Ben's Brick Oven in Berwick

                          The finished product!

                          The Melbourne Fire Brick Company

                          Comment


                          • #58
                            Re: Ben's Brick Oven in Berwick

                            Fire raging (yes I know I'm over-firing it, but I really don't care, there's something about flames roaring up the chimney...)

                            The Melbourne Fire Brick Company

                            Comment


                            • #59
                              Re: Ben's Brick Oven in Berwick

                              Some more gratuitous bonfire-within-my-oven shots


                              The Melbourne Fire Brick Company

                              Comment

                              Working...
                              X