If this is your first visit, be sure to
check out the FAQ by clicking the
link above. You may have to register
before you can post: click the register link above to proceed. To start viewing messages,
select the forum that you want to visit from the selection below.
First we need to back up a step. Are you planning to cast the vent out of Castable refractory? The reference to using rebar leads me to think you were planning to cast it from standard concrete which would be a bad idea.
I recently did my first casting using KS-4V plus and stainless needles. In appropriate thickness(probably 1.5" thick walls) I think it would span 20 inches no problem. If you want to see my walkthrough PM me, it's included in the build log of my new oven which I am documenting on a different website. It takes you from where to get the materials to the end.
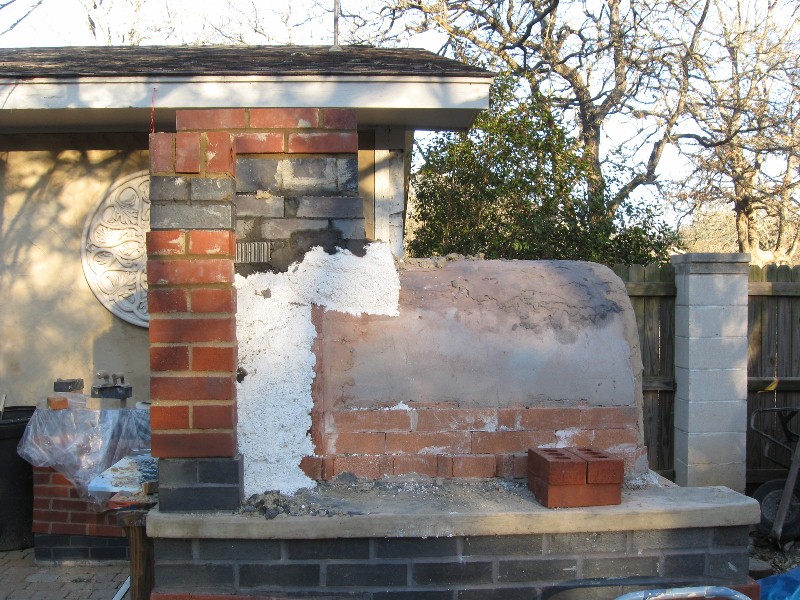
I was planning to cast it out of castable refractory and ss needles but wasn't sure if it would span the 24 inches (just checked the measurement). The vent walls will be 2" thick so I guess it should span it no problem (?). I've never worked with this stuff but was planning to carve a styrofoam inner form to transition from the rectangular vent to the circular flue. Think this will work? Is there any reason I shouldn't cast the vent around the flue to make them integral?
For my second and third ovens, I cast the flue gallery directly around a 0.9mm stainless steel flue pipe. The expanding steel flue pipe cracked the castable refractory in both cases, presumably because the steel got hotter first and expanded before the refractory had time to get hot and expand. A solution is to wrap some cardboard around the pipe, cast up to it, then remove it when the casting is hard leaving a slightly loose fit to accommodate the expansion. Perhaps this would not be so much of problem with a lighter weight flue pipe, say 0.55mm. I would doubt whether casting up against a terra-cotta pipe or flue tile would produce this problem because they have very similar thermal conductivity.
Having just aquired 800 very nice new brick for 30 cents apiece, I've changed my design yet again.
But not having ever worked with brick, I'm not sure how to build the chimney. In this view you can see the castable refractory vent sitting on firebricks and the chimney just hovering above. How do I support it?
I've probably bitten off more than I can chew here but my wife REALLY likes this design so I'm going to try to build it.
I just Googled a lintel and from what I can tell it can be a piece of metal or other structure to support a load over a span. So do I go find a big piece of angle iron and span between the two side walls? Is there a better way? Is my ignorance showing?
You can also cast a support structure out of reinforced concrete, much as you did your support stand. You will need some side supports to transfer the weight down to the structure, instead of putting the weight on the oven. You can look at the second link in my signature, to see how a supported a VERY large chimney independent of the oven.
I used perlcrete to support my chimney. The loads I calculated were very low for a 24" brick chimney, and there has been no movement or cracking since, nor do I anticipate any.
I've started to dig the hole for the oven but ran into a little snag: My wife's prize winter squash plant that has one squash already 3.5 feet long and several others approaching 3 feet. We can't pick them until the first frost in late October. Arrgghh! Guess I'll be building this thing in the snow. And I'd hoped to have it built by the time our tomatoes ripened (seen in the background on the 12 foot tall stakes. My wife has to use a step ladder to tie them up. Had my first BLT yesterday. Incredibly good).
At least the wait gives me some time to aquire more free materials. Picked up the CMU blocks two days ago, for freeeeee. So far I'm in this thing $325 (220 firebricks and 800 face bricks), $25 over my budget. But my wife is forgiving knowing that great pizza and fresh bread are waiting.
Had a few minutes at work playing around in Photoshop. Here's where the design is at the moment. Still haven't found any free roofing materials so don't know what it will look like yet.
I just read a thread about using or not using an angle iron to help support the hearth span at the wood storage. I can get a 3" x 4" x 4' x 1/4" thick angle for $15 and think it would help strengthen the hearth slab. Would this be a good thing to do?
I would definitely go for the angle iron if your not picky about looks. The added support across the span will be worth the fifteen bucks. In your photo it looks like you've planned on filling every core and placing rebar -have you thought about just filling every other core as described in the FB plans?
I have to admit I'm a little jealous about how much you're saving doing it the prudent way. I'm getting up there with the cost and I still have to buy the insulation, and hearth materials, and then there's finishing expenses!
I've been reading about dry stacking the CMU blocks and don't understand how this works when covering it in face brick? Here are my questions:
1. When laying brick over a dry stacked CMU wall, how do you deal with the CMU module getting off by lack of a mortar joint? Cut bricks or leave gaps in the CMU?
2. How does the brick adhere to the CMU? The methods I found on the web show a 1" air space between the brick and CMU and some kind of metal tie holding the two together. Is this what I need to do or are there better methods?
3. My Google searches came up with a whole lot of info I didn't understand or didn't think was relevent to a brick oven. Do you know where I can read up on how to build a dry stacked CMU wall covered in brick?
 Tweet
Tweet


Comment