Announcement

Collapse
No announcement yet.

Apagios's 42" Pompeii

Collapse
X
 
  • Filter
  • Time
  • Show
Clear All
new posts

  • Apagios's 42" Pompeii

    Hello Everyone!

    I must confess, I finished up my oven just before Thanksgiving last winter, and was a bit lazy about uploading my build. I intended to have a build thread along the way, but time just got away from me. To be honest, between my real job and working on the oven I had very little free time, so I am afraid my "build thread" turned out to be a "it's done" thread.

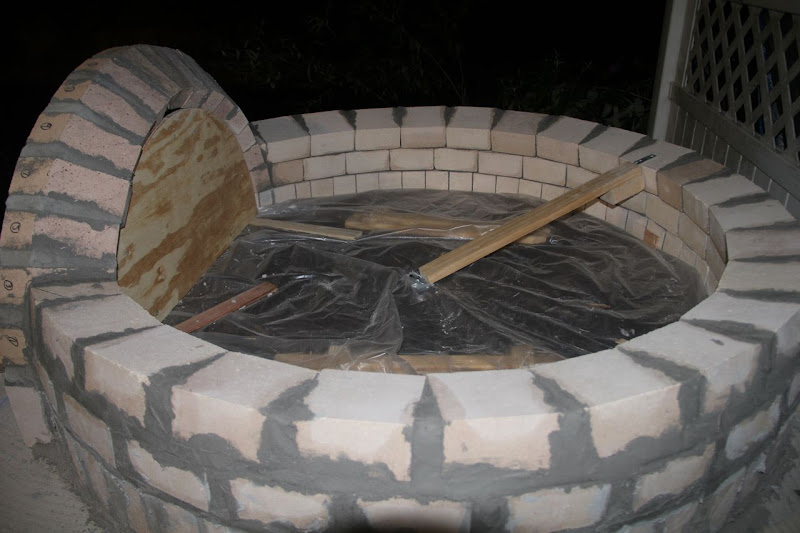
    I broke ground on July 1st, and laid the final brick on November 12th of 2011. My Dad was extremely helpful, he volunteered 75 hours of his time to help with big days like foundation and hearth pours. I am an aerospace engineer by trade, so out of a nerdy fascination I kept a log of man hours and raw materials. All told my oven was completed in 375 hours of work, and consumed 12,200 lbs of raw materials! 10,000 lbs of those materials were brought home with my little Ford Focus SVT hatchback; towing 1,000 lbs at a time on a 4x8' flatbed trailer!

    So I thought I'd post up a link to my Picasa album of my construction. I printed out these pics and made a small photo album for friends to look through while we cook pizza! It's a great way to share the story of it's construction with friends. Also hopefully it can contribute some to a future oven builder, and if anyone has questions, feel free to PM me, I'll be happy to share my lessons learned!

    I also wanted to convey my sincere thanks to James for providing such a wealth of information and supporting this forum. And also to everyone on this forum from which I got so much good info and advice!

    I had wanted a wood fired brick oven for a long time, and always just presumed it was out of my price range to contract a builder, and not "do-able" as a first masonry project! I gained the knowledge and confidence I needed to do this project from Jame's ebooks and this forum! So thank you so much James!

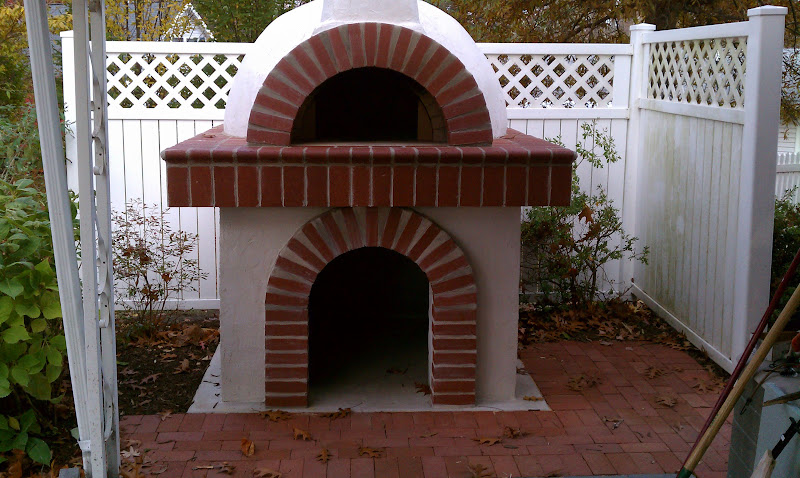
    Often I find it is very rare for a project to be completed and end up looking like what you had in mind. So often in the course of any project, issues arise and plans change. I am extremely proud to say my oven has been the exception to this rule! The picture below is how it sits now and is identical to what I envisioned back in May-June of 2011 when I found this site and began to seriously plan my project!

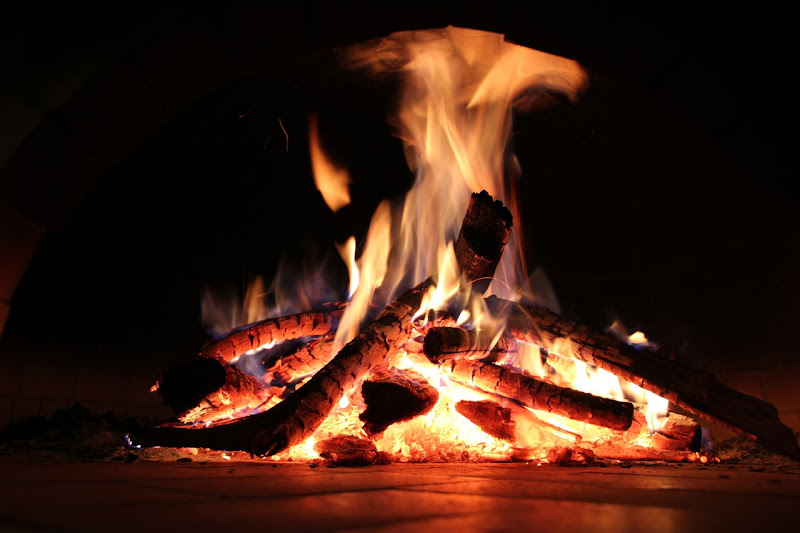
    Here are just a couple highlights from my album. I am really proud of the octagonal prism keystone! I budgeted myself 2 hours to get that cut, figuring it would take lots of trial and error to get it right. Turns out it took less then 10 minutes to cut and it fit perfect the first time! I could not believe it! It was a perfect finish to the dome construction!

    My Picasa Album

    Blue Skies,
    Dave


  • #2
    Re: Apagios's 42" Pompeii

    Also, you can see in the first picture I have 2 bricks cut to fit the arch.

    The story behind this is that for my first pizza fire I had trouble getting the oven temp up past 675-700 *F. After some thought I realized that because I used a basic arch opening with a 13" radius (I wanted to be able to get a turkey in there!) resulted in a 26" wide opening at the bottom.

    The hot air exiting through the top of the arch to the vent/chimney will simply flow faster to adjust for the rate of air coming in through the base of the arch. I remembered my basic differential equations from college, Rate in = Rate out.

    Rate Out is governed by the cold air in plus energy & mass added from combustion of wood, but the hot exhaust gasses were energized and would simply flow faster to match whatever my rate of cold air in was!

    So basically my rate of exhaust gasses out would always adjust itself to attain a balance with the rate of cold air in. To better control my oven I needed to control the rate of the cold air going in.

    I took 2 fire bricks and cut them to fit snugly against the side of the arch. I made cardboard templates and traced out the exact shape needed to match the arch. Then simply placed them in on either side. No mortar, they are simply in place to reduce the influx of cold air.

    It worked perfectly! I have made many a pizza and have had no problems whatsoever in maintaining 750-800*F and up if I want to. I really like how this worked out as I got the structural strength from the true arch, and the thermal control is now adjustable. For instance if I want to roast a turkey (or anything else) at closer to 600*F I can simply remove the side bricks.

    This was just one little trick I learned that I thought might be useful for anyone with over-sized arch issues.

    The side bricks are visible in place and working here:

    Comment


    • #3
      Re: Apagios's 42" Pompeii

      dave, nice job on the build. I have been lurking here for a while and studying many of the builds here. Tons of good info and helpful folks. Thanks for the pic album. What size is your oven and what is the finished ht. at the O.D. of dome.
      I noticed your stand is 5 block high.
      My build will be a 39" igloo style, and I am hampered by a small yard and local building code placement issues to property line, therefore finished ht. is critical in my planning. May use a rounded back side of stand or "octo design like Giannifoccacia" used to be able to tuck it into the corner further, but will have to really watch the ht.
      Not really concerned about chim ht as I will probably use a "flexible ht. design "with class a pipe.

      Thanks, Bill

      Comment


      • #4
        Re: Apagios's 42" Pompeii

        Bill,

        I was initially concerned I made it too tall, but once I leveled the ground and put the brick patio extension in, I found it is the absolute perfect height for me(i am 5'9"), no bending over at all, and not too tall (I use a small stool to get inside my oven and build up kindling to start the fire). Also 5 blocks lets me easily crawl into wood storage space to reach the back.

        My oven is 42" ID, I did the Tuscan style with a hemisphere dome, so from the surface of my hearth pad I get the following approximate height:

        2.5" (thickness of standard fire brick cooking floor)
        21" (interior oven height)
        4.5" (thickness of dome wall for 1/2 fire brick squares)
        3" (ceramic blanket insulation)
        ~0.5" (Surface Bond Cement "stucco" shell)
        ----------
        = 31.5"

        So for your 39" igloo, I would subtract the difference in radii, (my 21" minus your 39/2 = 19.5" radius). So knocking off 1.5" from my height, 30" seems a good estimate of your external height if you use the same 3 layers of ceramic blanket insulation.

        If total height is a serious concern for you to the effect that every inch mattters, I'd suggest going with 4 blocks instead of my 5 block for the stand. You could also consider a lower dome height if you intend on mainly pizza baking.

        Also I used the 4" layer of vermiculite/portland mix for an insulating hearth. The plans call for ~3.5" of structural/rebar reinforced concrete for hearth, if you got FB Board for insulation you could knock another 1-3" off your height. I'd suggest looking up the recommended thickness of FB Board for under the cooking floor, but if you did say 3.5-4" thick structural pad with 1 layer of FB board insulation (~1" thick? I think, check that), your hearth would be closer to 5" total thickness, where as mine is 7.5" thick. But I didn't look into the FB Board much, so check out what thickness you need to keep your structural pad cool enough!

        Good luck!

        Comment


        • #5
          Re: Apagios's 42" Pompeii

          Very nice build. I just started and after mixing and pouring 38 bags of 80lb concrete for my slab....I am jealous that I am no where near done yet

          I enjoyed reviewing your build. I especially like how you transitioned your arch into the dome. Was there any magic involved with the cuts? or did you go with the angle of the first bottom brick and follow that all the way up each brick for the arch/ I want to do the same but was planning to build the dome and arch at the same time as I go up. You made it look easy with the precut bricks and pre built arch.

          Thanks for sharing your build!

          Dave
          Album https://plus.google.com/photos/10154...CKP9op6ilID7eA

          Comment


          • #6
            Re: Apagios's 42" Pompeii

            Hi Dave,

            So yeah I didn't exactly capture every step! I did start with all standard 4.5"x9"x2.5" firebricks. There was no magic really to figuring out the cuts, I originally was thinking something much more complex, but ended up laying it out so that the angle on the top of the arch would roughly match the angle of the course of bricks at that height. Basically the first full course of bricks above the arch would sit on the arch and load it evenly.
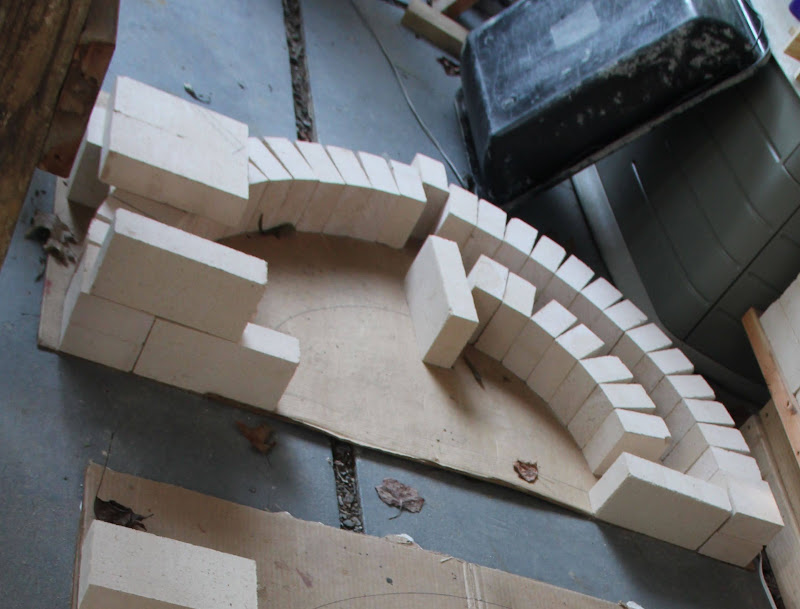
            This is not the best picture because I only happened to catch it in the background of another shot. But you can see I laid out a sample arch representing my dome. Then I laid out a smaller arch representing my 13" arch doorway inside. If you look close in the pic you will see a pencil mark on the brick with a diagonal cut line that approximately matches the angle of the dome bricks:


            I was originally thinking I'd have to match the angle at each level up, but it turns out you can cut the last bricks in each dome course to fit in the slot between the arch and the rest of the course. There will be some dihedral angles to cut there, but once you have a whole course done except for that last brick it's easy to see the shape you need and custom cut it.

            Incidentally that diagonal cut on the arch bricks should be a length approximately equal to 4.5" since that's the size size of the 1/2 bricks used to build up the dome. That way the first course of brick sitting on your arch is entirely supported by the arch!

            I would HIGHLY recommend building the doorway arch right after your soldier course is done, and before you do the 1st course on the dome. That way as you get higher you simply cut the last brick in each course to match the door arch, and since the door arch will already be set you have a nice visual reference.

            Plus building arches you will come to find is easy, once you build the form you just mud the bricks and slap them up and the form holds them, It's good practice

            I did spend some time laying out that bricks as you see in the pic and just trying to visualize in my head the 3-D shaping of the entire oven. It helps a lot. But if you cut that angle on the arch bricks like I mentioned, the first full course of dome bricks above the arch will sit on the arch, it makes for a very strong build IMHO.

            If you look right next to my arch in this pic you can see the two smaller "keystone" bricks I cut to fit into the space between the arch and the 1/2 bricks of the rest of the course:


            One other nice part about the arch being done and set up before building your dome, is that once you put those little custom cut bricks in, your course is now self supporting. It let me build pretty high before needing a form since the courses "lock" in to the arch, once that smaller brick is wedged in it's physically impossible for any of your other course bricks to slide down before the mortar sets.

            And best of luck with your build! Just wait till your dome and chimney are done and you are doing curing fires. You'll feel like your done but there's still a ton of work to insulate and build the shell/weatherproof enclosure! I am thrilled with how mine turned out, but was definitely tough to get back to laying brick for the red brick bar top and bullnose bricks! I was mainly motivated by the impending frost, and my refusal to not get it done before winter!
            Last edited by apagios; 03-30-2012, 02:12 PM.

            Comment


            • #7
              Re: Apagios's 42" Pompeii

              Oh and I started each course of bricks for the dome at alternating sides of the arch trying not to get mortar lines lining up. You can see from my interior pics there are some disturbingly close mortar lines going up the courses. Luckily Heat Stop 50 appears to be a far better mortar than I am a mason!

              If I were to build another oven I would start each next course in the middle of the back wall and work around both sides to reach the doorway arch. It'll result in a few more custom cuts but should help reduce the number of close mortar lines. A few times I would cut a brick smaller to try and re-stagger the mortar lines, and they always had a habit of realigning!

              Comment


              • #8
                Re: Apagios's 42" Pompeii

                Also as I got higher on the dome, I cut the bricks to fit each course. IIRC I starting cutting bricks to fit the course on the 4th course.

                I used shims under the brick and between the brick and the square edge on the sliding saw table.

                What this did was cock the brick up at and angle vertically and push the brick at an angle to the saw blade. The result is a trapezoidal prism brick, where 1 face of the trapezoid is smaller and the other face is a slightly larger trapezoid. You end up with the interior face and exterior face respectively.

                Each course of bricks I added a small piece of shim stock and used a staple gun to attach it to the previous shim. So each course of bricks got progressively larger angle on the trapezoidal faces, allowing the bricks to better line up in the course as your dome begins to transition. After the first time you do this it becomes a very logical incremental increase in your shims as you build higher and higher on the dome.

                To estimate the shims you need:
                If you hold 2 square bricks on the completed course, you can see the triangles formed between the 2 brick halves from above looking down and from the outside of the dome looking into the gap between the bricks (the corners touch at the top but the lower corners have a gap, it will make much more sense when you try it, I wish I had a pic). I used the indispensable tool to keep the bricks at the proper angle when estimating my shim size.

                Anyway, the width of those triangles you see is exactly double what your shims need to be to cut the bricks. Since when you cut the bricks into trapezoids each brick will have a section removed equaling half of the triangular gap.

                I checked my gaps with square bricks before each course, and adjusted shims to match so that I could make repeatable and regular trapezoidal prism bricks to finish the course.

                Comment


                • #9
                  Re: Apagios's 42" Pompeii

                  Thanks for the response Dave, I will be going with the FB board for under the hearth and a 4 course block stand. What material did you use to seal the outer dome , over the insulation blanket?

                  Bill

                  Comment


                  • #10
                    Re: Apagios's 42" Pompeii

                    Bill,

                    I used the Quikcrete SBC:

                    QUIKRETE? - QUIKWALL? Surface Bonding Cement

                    I added the acrylic modifier to it to add to it's waterproof-ness. If you can find a gallon jug I recommend that. IIRC Qwikcrete calls for 1/2 gallon of the acrylic modifier per 50 lb bag and my local Lowes & Home Depot only sold it in quart bottles, so it was a tad more expensive then if I could get a gallon.

                    I added the modifier to the SBC first and then used just enough water to get it to a good consistency, so the acrylic modifier takes the place of some of the water used in the mix.

                    The spec sheets for the SBC mention that the acrylic modifier can be used to build a water storage tank! We had a mild winter in MD, but the SBC held up great, no cracks and my oven is bone dry!

                    I did run a bead of silicone caulk between the red brick arch facade and the SBC shell to seal it. It never gets hot enough there to cause an issue for the silicone.

                    Comment


                    • #11
                      Re: Apagios's 42" Pompeii

                      Apagios
                      Nice build - well finished off with that octagon.
                      I would HIGHLY recommend building the doorway arch right after your soldier course is done, and before you do the 1st course on the dome.
                      I agree that building the arch should be he first thing. I laid out the soldier course dry then built the arch. If you get the arch right everything else just follows naturally.

                      Is your arch a perfect semicircle - in a hemispherical dome?

                      btw nice simple idea using those two bricks to reduce the opening size - I will try that also - since I have a few left over. How good is that quickcrete finish. Wonder would it survive Irish rain?
                      Last edited by Amac; 04-03-2012, 08:42 AM.
                      Amac
                      Link to my WFO build

                      Comment


                      • #12
                        Re: Apagios's 42" Pompeii

                        I mortared my soldier course in before my arch, but that's cause my arch sits on it:


                        And yes, my arch is a regular semi-circle, in a hemispherical dome. I hesitate to say "perfect" as I think saying "my perfect arch" sounds a little presumptuous But hindsight being 20/20, I can look back at my arch and see ways I could have made it a little cleaner, gotten my cuts to line up better. Though as my Dad kept telling me, and has rung true, none of my friends have ever noticed the "flaws" that I can see. And honestly in the past 6 months, the "flaws" i saw during construction have all but faded in my eyes.

                        I honestly prefer my oven with those bricks to a smaller opening, or having them mortared in. I like that the arch is entirely load bearing (stronger then vertical sides with a modified arch top), and the flexibility of being able to remove those side bricks. I have yet to try a turkey in my oven, but without those side bricks a small fire will keep the oven at right around 650*F, which is very close to what we roast Turkey's at on a Weber grill. So I prefer the flexibility of using my bricks as an add-on option, rather then having a smaller opening an no way to run lower temps with a fire inside.

                        The Quikcrete SBC with the scrylic modifier should be fine for an Irish rain. I would definitely add that acrylic modifier/fortifier to make it more waterproof. I found a .pdf file somewhere online from Quickrete, which showed a water storage "tank" made by a drystacked block wall, and the walls and floor inside coated with SBC! I figure if the product is designed to make a water storage vessel similar to a pool, it's probably good for a heavy rain!

                        Oh I also keep a small plywood "door" in my red brick facade arch, just to keep out splashing and wind blown rain. ON the inner arch doorway to the dome I have a piece of styrofoam with a brick sealing the dome from weather. I found even with chimney cap, some moisture or rain can drip black soot onto the fire brick landing under my vent arch, so I just leave a piece of foil between the doors when it's sealed up to keep my cooking floor cleaner.

                        Next I need to make a good insulated door to the oven and a nice door for the outer arch to seal everything up!
                        Last edited by apagios; 04-02-2012, 11:02 AM.

                        Comment


                        • #13
                          Re: Apagios's 42" Pompeii

                          Thanks for that quick reply. I am just at the stage where I have cut the vent arch bricks and dry stacked them. I actually went to the trouble of tapering the firebricks this time so I hate the thought of not seeing them - even though I feel that they will absorb rain like a sponge. What do you think?

                          Next I need to make a good insulated door to the oven and a nice door for the outer arch to seal everything up!
                          You should have a look at jcg31's doors - he has actually made two - the one for the outer door is glass with adjustable air control - both impressive pieces.

                          I mortared my soldier course in before my arch, but that's cause my arch sits on it:
                          I see - I just used arch bricks where you have those three soldiers at either side of the door. I cut three and sliced one in half. One and a half either side to the top of the soldiers. Interesting to see the similarities and variations

                          And yes, my arch is a regular semi-circle, in a hemispherical dome. I hesitate to say "perfect" as I think saying "my perfect arch" sounds a little presumptuous
                          I agree with the concept of the "perfect" semicircle in a hemispherical arch and the resultant feeling that it adds strength in comparison with straight sided - or angle iron lintelled doors. This to the extent that I think FB should incorporate it to their plans.
                          Last edited by Amac; 04-02-2012, 12:15 PM.
                          Amac
                          Link to my WFO build

                          Comment


                          • #14
                            Re: Apagios's 42" Pompeii

                            I know what you mean about not wanting to hide your vent arch, I was quite please with how mine turned out. But I would be extremely leery of firebrick exposed to rain, especially right at a point where it transitions to your dome.

                            Even if you don't get direct rain on your dome, if your vent arch is exposed some moisture is going to seep through to other bricks. If you get a wet vent arch hot, I'd be very concerned about it cracking, let alone having some moisture travel through the bricks to the dome bricks near the vent arch.

                            As much as it sucks to have to cover up some nicely tapered vent arch bricks, it would suck much more to have them crack due to some moisture in them!

                            We go through the process of "curing" to cook out the last bit's of moisture from the bricks after construction. Even before the 1st curing fire your bricks should feel "dry" to the touch. What I think you are describing would mean you'd basically have to "re-cure" your vent arch after every rain!

                            The vent arch is a section of high thermal transition too. the top of your arch leading into your vent has all the hot exhaust gasses, and the higher velocity promotes heat transfer by convection. I did 3" of insulation on my dome, but only 1" on vent arch and chimney, with 2" in the section of transition from dome to vent/chimney. My SBC on the outside hits about 100*F. It's warmer then I would have liked but certainly nothing to worry about.

                            The point I want to get across is that if this area of your oven is moist, the high convection heating is going cause a lot of thermal changes pretty quickly. It will dry out even faster, and IMHO make cracking more likely due to changes in temp occurring faster.

                            I even got a gallon of Qwikcrete masonry sealer to waterproof my red brick arch and the entire "bar top" around my oven, just to try and prevent water from absorbing into the red brick facade arch.

                            I certainly don't want to presume to be an authority, just giving you my entire thought process and opinions on the matter of fire bricks getting rained on and how much water could possibly seep into your dome/transition area. Just seems like something I personally didn't want to take a chance on.

                            And thanks for the door suggestion, I'll definitely search jcg31's doors out on the forum! I was planning to try and work a double paned glass door for the inner door so I can see bread baking!

                            Oh and I agree on the suggested edits for Jame's eBook, the "true" arch doorway I think is the way to go!

                            Comment


                            • #15
                              Re: Apagios's 42" Pompeii

                              OH I just searched jcg31 & "door" and found he was the one I had read about last year! I plan to get the neoceram glass cut from the same supplier he provided!
                              Last edited by apagios; 04-02-2012, 12:40 PM.

                              Comment

                              Working...
                              X