 Tweet
Tweet
Ss swarf is a possibility but it may have a tendency to clump together and not mix randomly and evenly like the needles do. You may also have to wash out the oil contained in it. Just handle the mix carefully. I always get stuck once or twice when placing the mix, but they never seem to go very deep.


-
Kindled with zeal and fired with passion. -
PM me if you want to see a similar build done with a sand mold, it turned out pretty decent. Experimental casting, saving you all the hours you have put in already. Personally I think you are making too small of pieces, but that is just a hunch. Hope it turns out well.The cost of living continues to skyrocket, and yet it remains a popular choice.
Comment
-
Hi dakzaas, thank you for your interest. you may well be right but I have done a fair bit of research. Yes building this mould is very time consuming (& expensive) but I have built numerous fiberglass moulds over a 40 years period ( I trained as a boat builder) I believe I have the skills necessary to successfully complete the mould.
My design will allow the cast to be filled in multiple ways including a one piece dome or in three rings or two, three or four segments. Everything comes apart and goes back together & should last for many castings.
I have probably gone well over the top with its construction, spending far to much time being obsessed with a uniform thickness and perfectly matching curves!
However I like the idea of being able to cast the dome in segments or even as one piece set in place. The main benefits that I see come from being able to vibrate the cement & add S/S pins.
I especially like the idea of three rings as this will allow for movement & (hopefully) not even require bonding together.
Anyway with some luck & nice weather, I hope to have it complete by next weekend, at that stage I can show you how it works......
edit .. I have worked out that I have spent around 100 hours & around Ł400 so far. This is something I obviously want to do rather than the most sensible way ;0Comment
-
I have finally finished building the mould! I had a bit of trouble with life getting in the way but found a few spare evening to get it done
Sorry no pictures today - however the plan is to cast the first dome on Monday, so I will be sure to take a few pictures then.
I have never cast cement in a fiberglass mould before, I am not sure what the best release agent will be? I have started applying 'mirror glaze' release wax as I would for releasing fiberglass against fiberglass.
I hope this will work?
I am also unsure about how to vibrate the cement, the instructions are to add 3 litres of water to 25kg of cement. That does not sound like much? I can hire a vibrating poker for the day but I thought about using a vibrating sander against the outer mould? .... exciting stuff!Comment
-
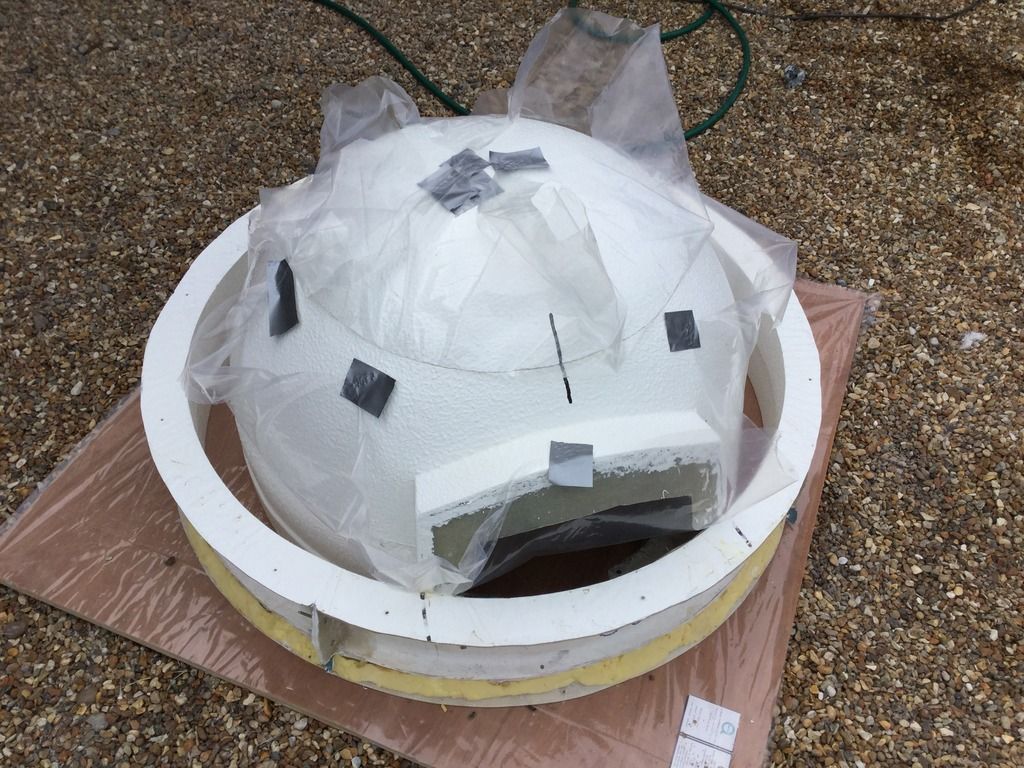
First one cast, not without issues though!
Firstly I did not realise how unfriendly refectory cement with SS needle can be, it sets so fast for one thing and is not very malleable due to the dry mix and needles!
I decided to use my sander to vibrate the mix, it worked really well for 10 mins then burnt out! In my panic I then used my hammer drill fitted with a wooden dowel in the chuck. That also worked well for 10 mins before the chuck collapsed!
By then I was up to the top layer, I commissioned my brothers hammer drill & just about filled the mould before I ruined his drill too.
Anyway a few lessons learnt... first one is to get a proper vibrating poker & second is to get some help mixing & filling.
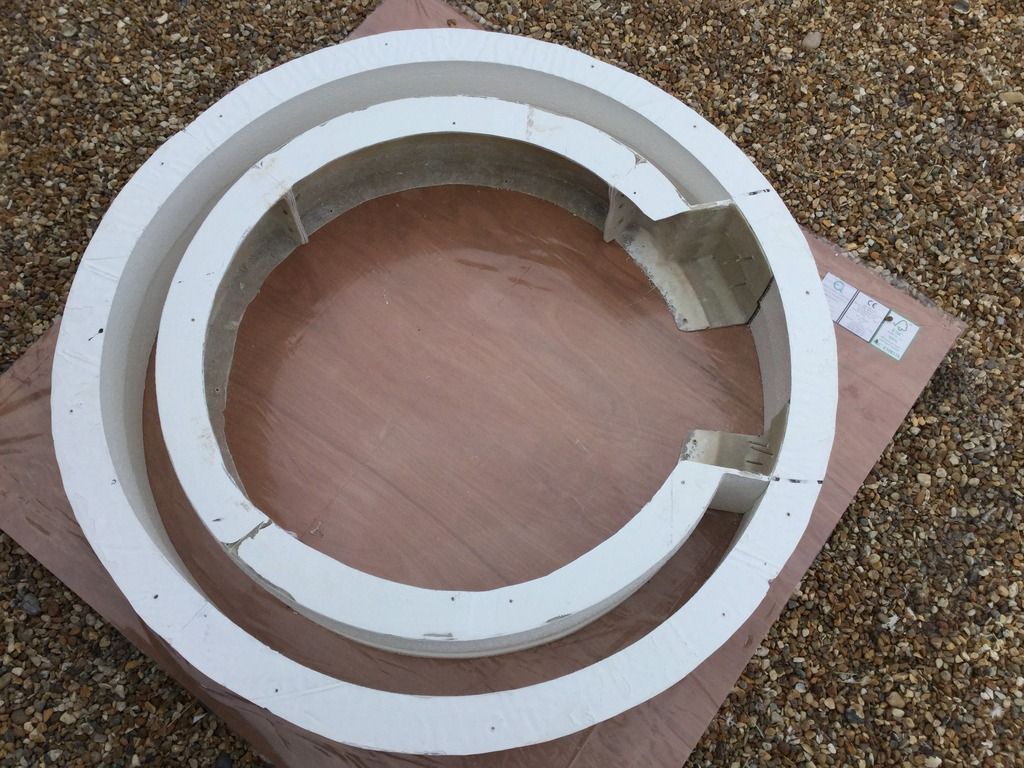
This is is what I did,,, screwed the fist two rings onto a polythene covered board, you can see the rings are made up from four sections each.
Next I built up the inner mould sections with polythene in between each ring. I filled and vibrated the first ring before adding the next outer ring making use of the polythene to separate the rings.
I don't know how long I need to leave the cement in the mould but I guess a couple of days?
Comment
-
I've found the recommended amount of water always leaves the mix way too dry. Just add enough to make it nicely workable. If the mix is too dry you end up with more voids. If the mix is too wet it increases the volume leaving you with a weaker casting. My supplier tells me it's not as crucial as the recommendations say. In practice when they gun the stuff on the water content varies considerably. For release agent I use 50/50 motor oil and kerosene, covering the mould really well but keeping the coating very thin. You don't want an oily surface on your casting which can create problems applying anything on to it later. Calcium aluminate cements achieve full strength in 24 hrs so you can give it 48 hrs before remoulding. If using homebrew wait a week.Last edited by david s; 06-05-2017, 01:48 PM.Kindled with zeal and fired with passion.Comment
-
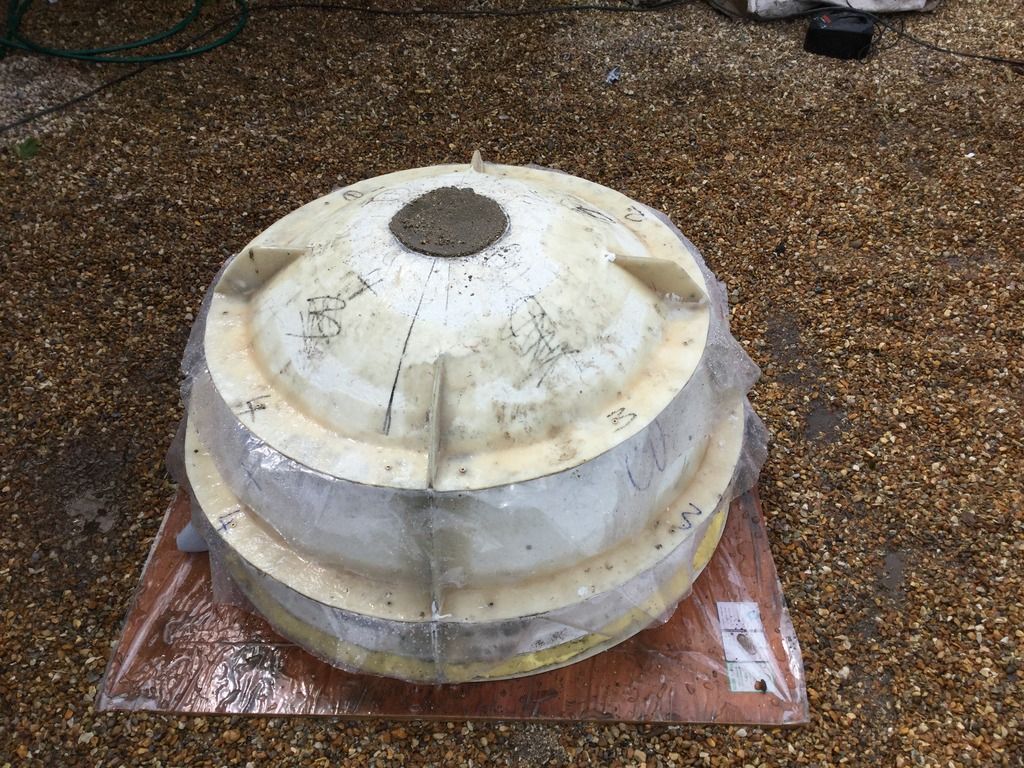
The dome came out fine, no problem getting the mould apart although there is some cement sticking on the sides in places. There are a few air pockets around the outer casing but very smooth inside.
I have now got the dome assembled on my plinth, do I go ahead and fit the fire blanket & insulation or do I wait for the cement to completely dry first?
I have two more domes to cast but I want to get on with my own oven ASAP... I will try some oil mixture for the next one...Last edited by fox; 06-06-2017, 07:01 AM.Comment
-
To fill any voids you can take a little castable and sieve out the coarse aggregate. This makes a more workable and richer mix. Mix a little water with it to a peanut butter paste and fill any voids with it. You need to do this operation around a day after remoulding so the casting will still be moist.
T he first casting from a new mould is always the most difficult to remove. Subsequent castings will release a bit easierLast edited by david s; 06-06-2017, 01:42 PM.Kindled with zeal and fired with passion.Comment
-
Thanks David, it is only the very top section on the outside but I will do as you suggest.
I am a little bit confused as to the drying proses, I think I read it is best to complete the oven before attempting to heat it up with small fires?
Can you please explain what is the reason behind this. I would of thought it would dry & cure the cement more efficiently without anything covering the outside?
Another question I have is about sticking the rings together, they fit quite snuggly but I can see tiny areas of light between the sections, does this matter?
Thanks you Fox.Comment
-
I think it's best to st allow space for the moisture to escape.do the drying fires with the insulation layers on (or at least one layer of blanket), which evens out the heat. Once all the water has been driven out you can do the outer shell. If building an enclosure just leave some space for the moisture to escape.
if you can see some light through the cracks just plug them from the outside. Better to leave the joints alone on the inside as you don't want any bits falling on your food.Kindled with zeal and fired with passion.Comment
-
OK thanks David.
I almost had a fit this afternoon when my friend came around to see how "his" dome was coming along & said .. 'that is a small opening, can I have a bigger one!!'
However I can see a way to do that by fitting 2" fillets between the joins and sitting the dome on top of the fire brick base instead of the dome surrounding the bricks... more work....
I also bought some mould release oil from a local building merchant.
For the next one I think it will be better to cast one ring at time. Maybe leave a day between, I think this might help close the joint up even tighter because the cement must shrink a tad as it dry's ....Last edited by fox; 06-07-2017, 08:40 AM.Comment
-
Yes you could do that.Kindled with zeal and fired with passion.Comment
-
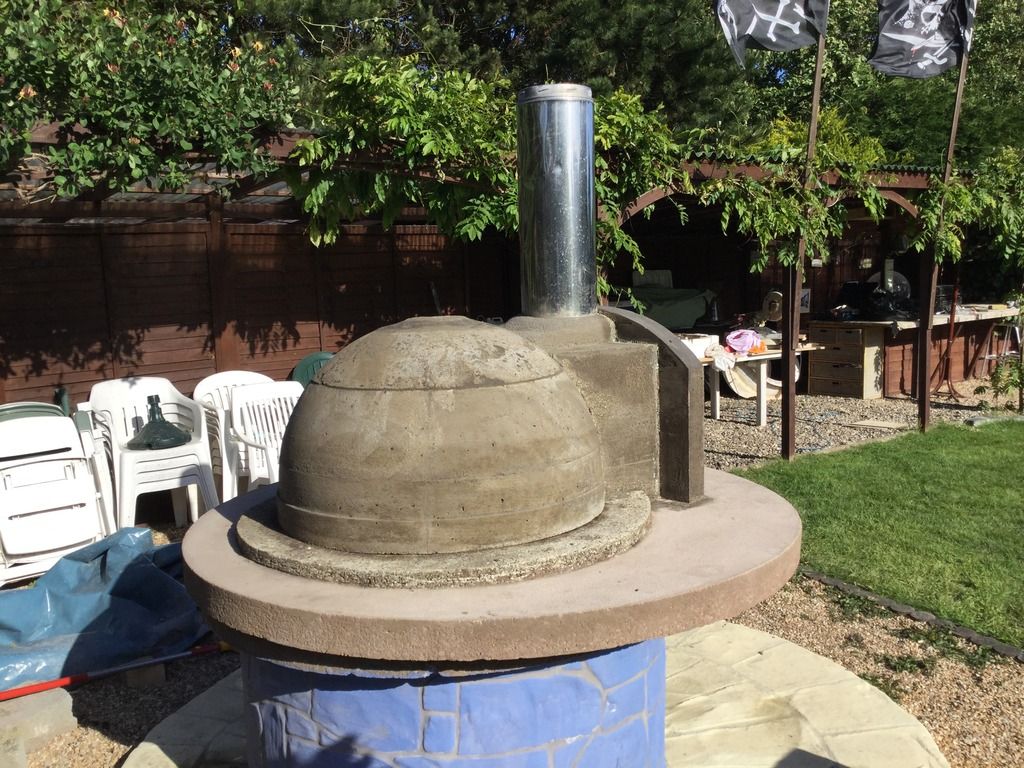
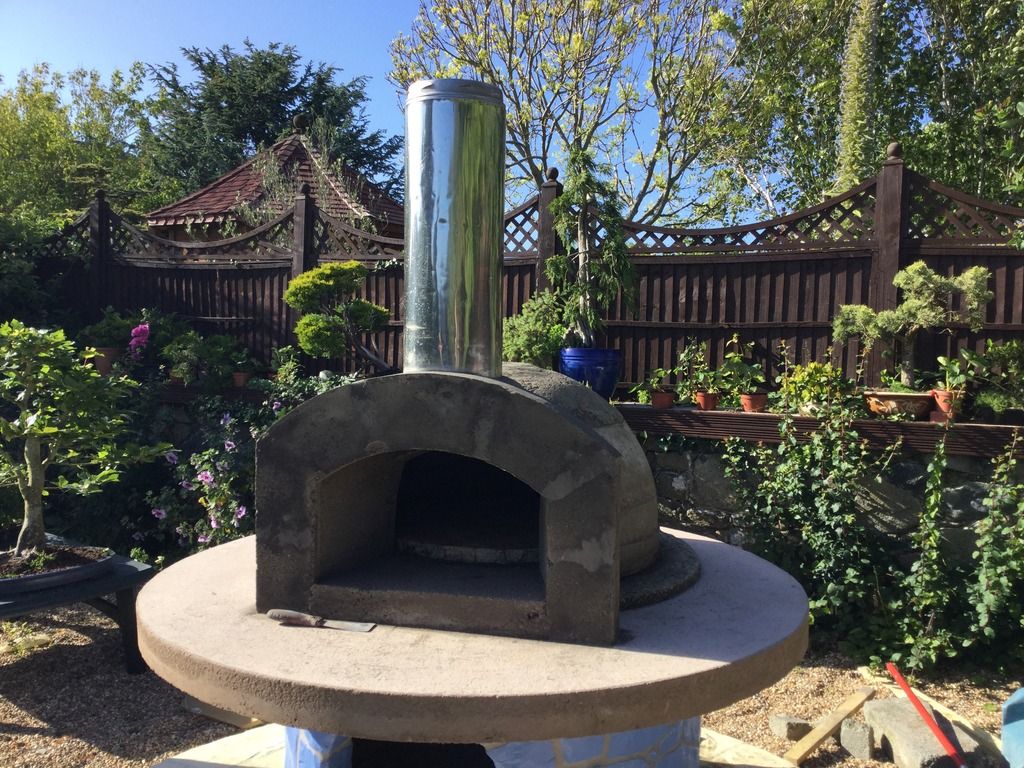
David, I know you prefer a short gallery, I have built mine as tight as possible. The chimney is tight to the dome, I have used a insulated 7" (10" OSD) stainless flue so my gallery is about 11" deep.
My question is .. I would like to build a moulded façade arch, do I need to use refractory cement or can I use standard Portland for this feature?
PS I can hardly believe how hard the dome has set in only a few days! It rings like a bell....Comment
-
The entry has been cast in one piece & is in place.....
Comment
-
Nice work. For my build I cast the front decorative arch using Portland cement , although I do it in two layers, the inner one using someperlite / vermiculite in the mix to make it more insulative. In addition I have a 10 mm gap between it and the flue gallery which also helps to reduce temperature. I think you should get away with using Portland cement for it in your build though. Mine never gets really hot. If you plan on tiling the front of the arch then seal it before tiling.
Regarding the flue being tight in the flue gallery casting, I did my second and third ovens that way and both got cracks in the flue gallery casting. I deduced that the much more conductive ss expanding against the surrounding refractory was the cause, so I now make it a slightly loose fit to avoid that stress. For those two ovens I used 0.9 mm stainless which is around double that of the standard flue thickness so this would have a more powerful effect when expanding so you may not have the same problem I did.Kindled with zeal and fired with passion.Comment


Comment