 Tweet
Tweet
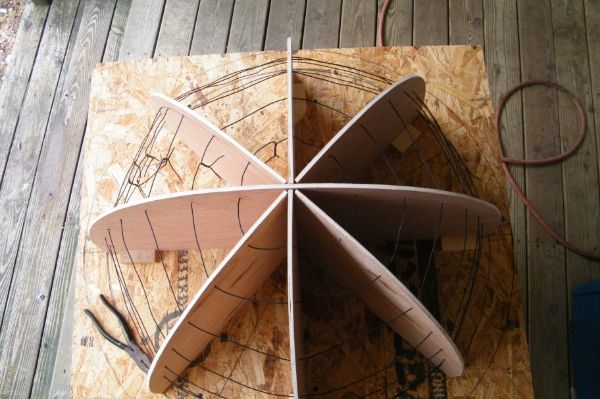
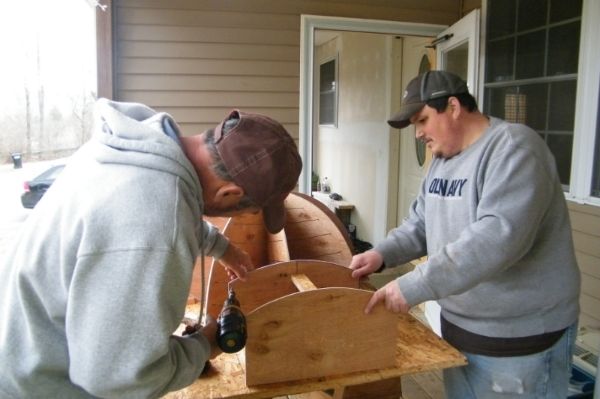
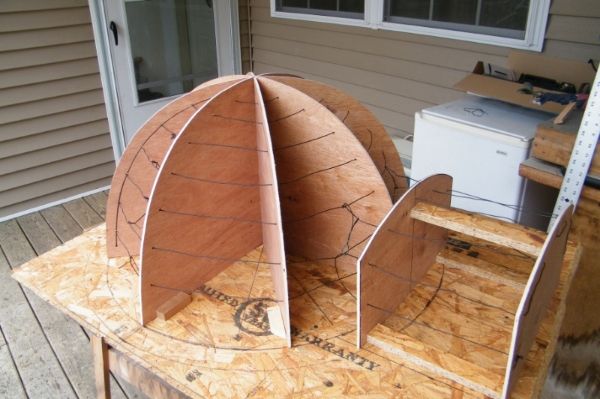
Today we started our modular oven build. I have been reading a lot of posts on the forum and getting ideas. We have decided on a 30" oven. After seeing Ironpony's thread on his build, I have decided to make a form and cast my own pieces. My dad and I started making the interior form today. We cut pieces for inside the dome and the oven opening. We assembled them and ran some rebar wire to support the wire lath that will be covered with plaster. This will serve as the inside form.


-
-
Re: NH Oven Build
Not sure to how post pics other than using photobucket.

-
Re: NH Oven Build
Do you have a reason for making the entry so deep?
I think that the shallower the entry is the better. Working past a deep entry means tools with longer handles and more difficulty reaching into the back and sides. Don't forget that the top of the entry gets deeper because it joins the dome further back giving you more room. If you are casting the entry you are not constrained by the size of brick units.
Also you will find that removal from the mould is made easier if you go a little less than a full half hemisphere.Nothing worse after spending lots of time on a mould to find the casting won't release.Last edited by david s; 04-14-2013, 01:52 PM.Kindled with zeal and fired with passion.Comment
-
Re: NH Oven Build
Thanks David-After looking at the pics, the entry is a little deeper than I want. I will be shortening it up. Thanks for the insight.Comment
-
Re: NH Oven Build
By the look of it you could probably halve it.Kindled with zeal and fired with passion.Comment
-
Re: NH Oven Build
I did exactly that-cut it in half. I will post up more pics when I get the plaster set.Comment
-
Re: NH Oven Build
Can't wait to see more pics!Comment
-
Re: NH Oven Build
My daughter, Coli, and I got a chance to work on the outdoor kitchen area this weekend. We have an existing foundation for the oven base. We poured two auxiliary slabs for a counter to the right of the oven, and our under the counter smoker to the left of the oven. Our gas grill will also go to the left of the smoker/countertop and oven.Comment
-
Re: NH Oven Build
Last night my wife and I finished putting plaster on the mold. It needs to be sanded an a skim coat applied to take care of any imperfections. Today my daughter and I built our block stand and filled the cavities with cement. We then went back to Home Cheapo and picked up the rest of our blocks for the counters and smoker. Had an awesome weekend working with my daughter. She really surprised me how she got right in there and mixed the cement and moved the blocks. It has really been a family affair.Comment
-
Re: NH Oven Build
The kid and I have been working on the outdoor kitchen project mostly on the weekends. This weekend we got the blocks laid and cores filled for the smoker to the left of the oven and the countertop over wood storage area to the right of the oven. Then Sunday we got the structural hearth poured. Fun busy weekend for me and my daughter.Comment
-
Re: NH Oven Build
More pics from the weekend.Comment
-
Re: NH Oven Build
Starting look good. i am really impressed by finding that you are inspired by the this forums. by seeing its clear that you have a good hand of working. Nice work hope so you will finish it in good way.i found a new kitchenaid double oven its awesome.Comment
-
Re: NH Oven Build
Hi Benny,
It looks great do you have any photos of the next stage actually putting the refractory cement on top did you use wood templates for the sections?
many thanks rickComment
-
Re: NH Oven Build
Rick-I have yet to put refractory cement on the mold. The picture is of the inside mold with plaster. I still need to smooth it out, then build a form to "quarter" the mold off. That won't happen for a couple weekends due to prior obligations. I will post up my progress as it happens.Originally posted by Greenparka69 View PostComment
-
Re: NH Oven Build
We got to work on the oven this weekend. After the forms were set, I mixed my first ever batch of homebrew refractory. Used the 3:1:1:1 recipe. I applied it to the mold and found I needed to support it to keep it from slumping. I mixed it really dry with not too much water, but it needed some support til it set up. That was Saturday afternoon. Sunday morning I got up and mixed up another batch, and applied it to another 1/4 of the dome. By the afternoon, it had set up enough for me to get another batch for the back 1/4 of the dome. I mixed some polypropylene fibers with all my batches. I am pretty happy with the progress so far.Comment


Comment