Announcement

Collapse
No announcement yet.

Dry Stack WFO: Pavers or Bricks?

Collapse
X
 
  • Filter
  • Time
  • Show
Clear All
new posts

  • Dry Stack WFO: Pavers or Bricks?

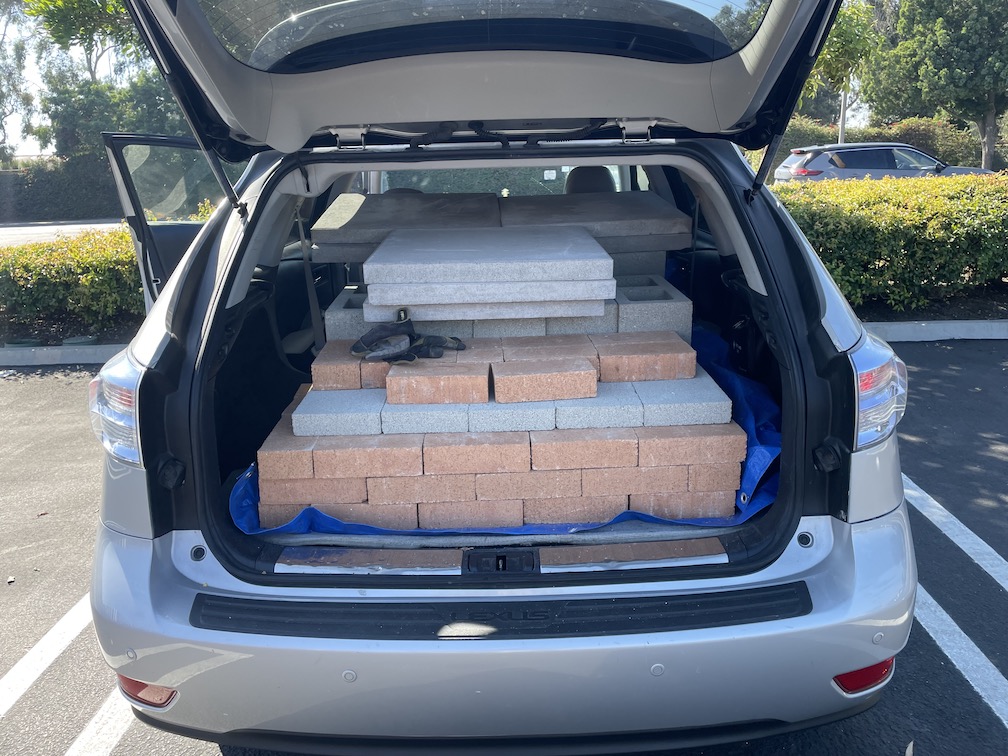
    After watching Nate From The Internet, I went to Home Depot, went a little nuts, and bought a literal ton of bricks*:


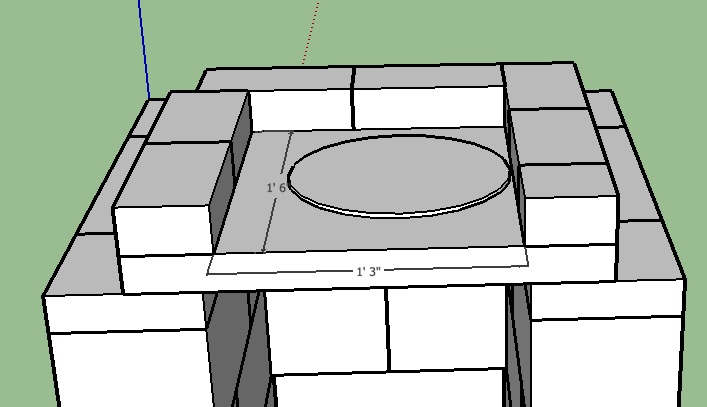
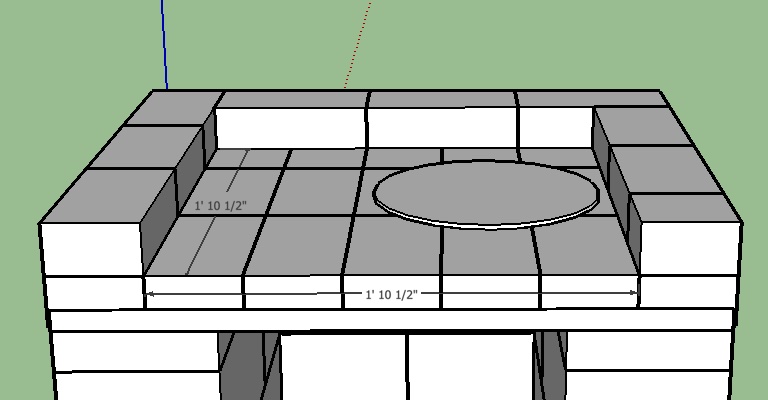
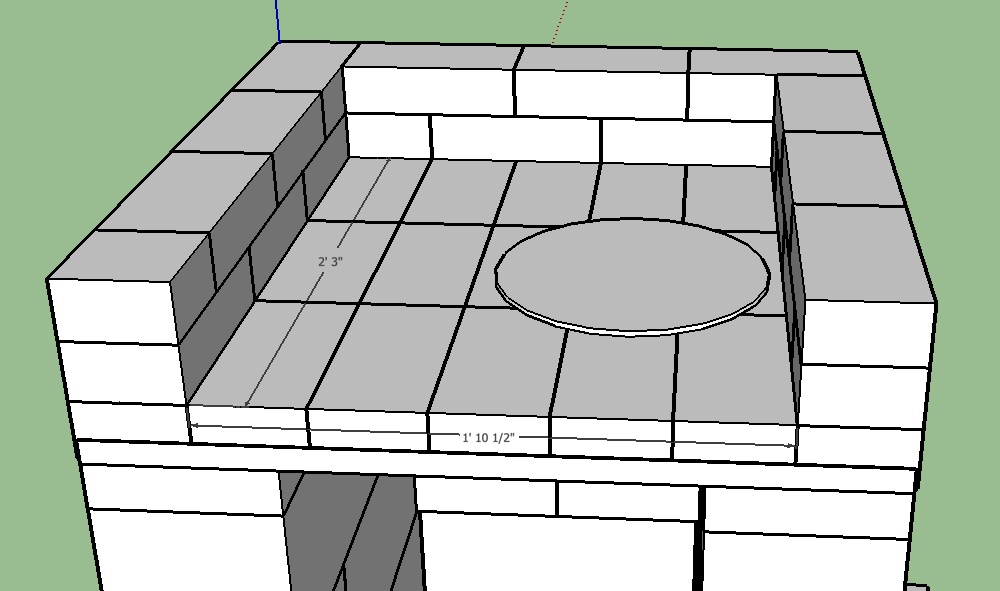
    I like Nate's idea of having the firebox open to one side and the cooking area open to a different side. I'm never going to weld anything, so I bought pavers, but then I do have a angle grinder and an old mattress frame, so I thought of two designs, one with pavers and one with all bricks and some angle iron (viewable/editable in SketchUp Free):

    Click image for larger version

Name:	DryStackWFOPavers.gif
Views:	178
Size:	64.3 KB
ID:	455774

    Click image for larger version

Name:	DryStackWFOAllBricks.gif
Views:	142
Size:	75.4 KB
ID:	455775

    The middle angle irons are facing down to minimize the gaps between bricks.

    Suggestions/feedback/critiques?

    * yes, I was over my vehicle's nominal payload rating by 80+%, but I got it all home, and I never have to do it again.

  • #2
    As long as there is no commercial hyperlinks on YouTube thread they are allowed (any commercial links are not allowed on the blog). In briefly looking at the YT vid. there are many design flaws in the build, no floor or dome insulation is one, fire chamber config. is another but maybe this works if you are only going to make a onsie twosie pizza only. I would suggest you download the free or cheap eplans from the Forno Bravo retail store site and read them carefully before you proceed further. It is a great design and construction baseline. There are some good YT vids but there are also a lot of BAD vids as well.
    Russell
    Google Photo Album [https://photos.google.com/share/AF1Q...JneXVXc3hVNHd3/]

    Comment


    • #3
      Thanks! I downloaded the Pompeii plans and read the whole thing, plus the linked thread about the geodesic oven. Amazing and inspiring! But wayyyy too much for me to take on at this point.

      Right now I'm looking for a temporary, dry-stack design to implement so I can see if this is something I'm willing to commit real money and space to. If I build a respectable dry-stack oven and use it enough, then I would buy a "real" oven.

      Does anyone know why the dry-stackers went with a two-chamber design instead of a single chamber like a traditional WFO?

      Comment


      • #4
        I can't answer as to "why", but I suspect they went that way because it made working with a dry stack design easier. I don't see the paving slabs lasting all that long or well and, with your proposed angle iron brick supporting floors, remember that steel will start to lose strength and you may see some deformation occur from around 1100F (600C) and upwards. I do realize that there are many "experts" on youtube and some are not that expert at what they do at all. One recent example is the cast iron bath tub pizza oven.

        Obviously, this proposed structure of yours is a temporary structure, so, no doubt, you'll get some good pizzas from it, but not for long. From a dome style pizza oven starting point, I see several design "flaws" that will lessen the experience. Some of those will be lack of flue and dome, thereby limiting heat retention in the top of the oven. Also, no insulation, so fast cooling and no or little ability to do retained heat cooking. And, of course, limited ability to use in wet weather.

        Should you decide to bite the bullet and build a Pompeii style oven, then you'll find there are lots of members who can offer advice and encouragement.
        Building an oven need not be an expensive exercise and your bricks already purchased may prove handy for some parts of that oven.

        Good luck!
        Last edited by MarkJerling; 10-01-2023, 06:17 PM.
        My 42" build: https://community.fornobravo.com/for...ld-new-zealand
        My oven drawings: My oven drawings - Forno Bravo Forum: The Wood-Fired Oven Community

        Comment


        • #5
          Originally posted by TheWaterbug View Post
          Does anyone know why the dry-stackers went with a two-chamber design instead of a single chamber like a traditional WFO?
          Ah, I stacked the concrete block base yesterday, and then started playing with my "heavy Legos™" , and now it's apparent why they went with two chambers. If the bricks are stacked at the edges of a 24" paver, the chamber's only 15" x 18", and there would be no room for a fire and a pizza. The disc in this image is 12" in diameter:


          If I use the same size platform and arrange bricks to cover the whole top, the interior is now 22.5" x 22.5", which still seems pretty small, but workable, especially if my pizzas are smaller than the 12" shown here:


          Comment


          • #6
            Actually I can increase the front-to-rear dimension by another half brick, and still fit atop my base, which now makes the interior dimension 22.5" wide by 27" deep, which is starting to look pretty workable:

            Comment


            • #7
              Maybe something like this:

              Comment


              • #8
                Looks good, the reason this design works so well is because pizza is best cooked from both sides so have the fire underneath cooks from the bottom while the hot air entering the cooking chamber cooks from the top.

                Cheap, simple and very effective. Just a suggestion though, a chimney is not required with this design, they work just as well with just letting the smoke out the front.

                Love the CAD work too, should have some nice pies very soon.

                Comment


                • #9
                  Originally posted by Pizzarotic View Post
                  Looks good, the reason this design works so well is because pizza is best cooked from both sides so have the fire underneath cooks from the bottom while the hot air entering the cooking chamber cooks from the top.

                  Cheap, simple and very effective. Just a suggestion though, a chimney is not required with this design, they work just as well with just letting the smoke out the front.

                  Love the CAD work too, should have some nice pies very soon.
                  My latest GIF is of a single-chamber design. I wonder if I actually need the chimney, as it's going to draft up through the gaps in the bricks below and out through the gaps in the bricks above.

                  These fire bricks are quite square, and they fit together pretty well, but they're by no means airtight or even close to it.

                  I guess I'm more worried about hot embers wiggling through the gaps and igniting my wood storage, below.

                  Comment


                  • #10
                    Mortar between brick joints fills up any gaps, so without it, in combination with no insulation and an updraft flue, it leaves you with a pretty inefficient set up that will be heavy on fuel consumption.
                    A good starter to get you going though. I’m almost certain that you’ll want to rebuild it after trying it out a few times.
                    Last edited by david s; 10-05-2023, 02:53 PM.
                    Kindled with zeal and fired with passion.

                    Comment


                    • #11
                      Late followup to this: I built it! I made 1-2 pizzas each of the previous weekends while I figured out to use it, and after 4-5 mediocre pizzas, I'm finally making good pizzas. Not great, but good.

                      https://www.youtube.com/watch?v=n3WiS_hVGDQ

                      My tenant was walking by and distracted me, causing some slight burning, but it was still perfectly edible.

                      Also, last week Seek Thermal had an amazing sale on their iOS plugin camera. Here's what my oven looks like in the infrared:

                      https://www.youtube.com/watch?v=bXFF3pRukHI

                      https://www.youtube.com/watch?v=0-azvg0ckT4

                      As you can see, from a thermal engineering perspective it's not good. There's heat leaking out everywhere. But it gets hot, and it makes pizza, and I have plenty of wood.

                      Today I pushed the all the wood to the left, so the right side of the oven was completely clean from front to back. I think this works best, as it allows me to launch and turn without worrying about getting to close to the burning coals, and it allows me more control over which sides of the pizza are exposed to great heat. Today we made 3 pizzas in rapid succession, then waited 30 minutes for more guests to arrive (during which time I added more wood), and then baked 2 more pizzas. They all turned out very well, and everyone was happy!

                      I'm using a nice rack of 4 bamboo pizza peels that I bought from amazon, and a set of aluminum peels and tools. I'm waiting for a kindling splitter, and swinging an axe in the meantime.
                      Last edited by TheWaterbug; 11-12-2023, 09:36 PM.

                      Comment


                      • #12
                        Originally posted by david s View Post
                        Mortar between brick joints fills up any gaps, so without it, in combination with no insulation and an updraft flue, it leaves you with a pretty inefficient set up that will be heavy on fuel consumption.
                        A good starter to get you going though. I’m almost certain that you’ll want to rebuild it after trying it out a few times.
                        Boy, you're not kidding! I'm going through wood like it's going out of style. But I have tons of wood, so I'm not going to run out any time this decade.

                        Comment

                        Working...
                        X