Announcement

Collapse
No announcement yet.

36" Pompeii Build, West Lafayette, IN

Collapse
X
 
  • Filter
  • Time
  • Show
Clear All
new posts

  • 36" Pompeii Build, West Lafayette, IN

    Well, I've finalized some plans, finished my BoM and began picking up some materials.

    I owe my brother-in-law a shout out for pushing me to do this. I'm sure I'll be cursing his name a few times during the build.

    Hopefully I'll update regularly and take plenty of pictures as I go along.

    My intro thread is in the newbie forum, if you care to see any back history.

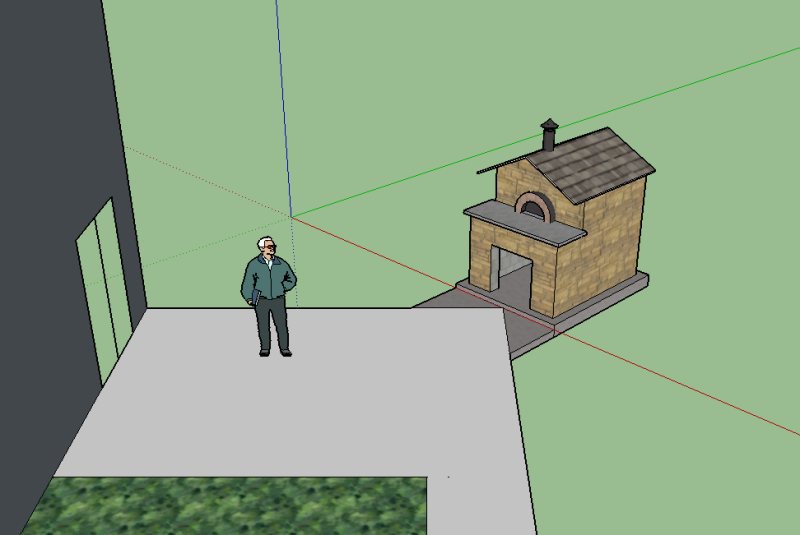
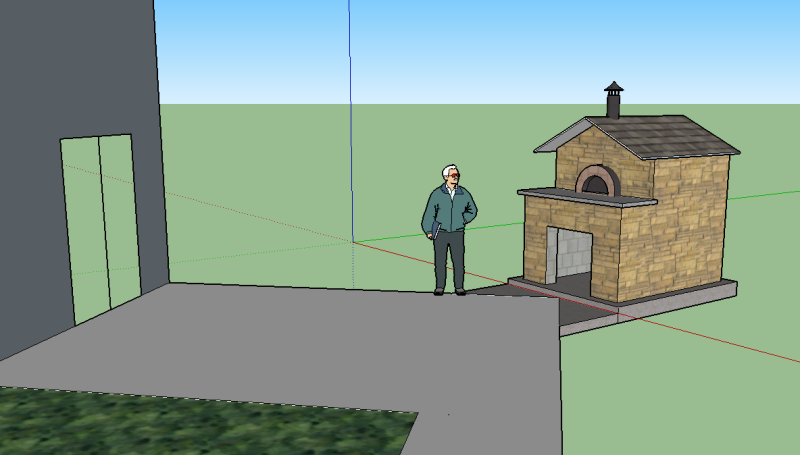
    Plan is to build a 36" Pompeii, finished with stucco for a short period of time until I can frame up a gabled roof and gather materials for finishing (Still undecided on siding and finish).

    Oven will be added to the far corner of our patio (Patio is 18' x 14'), by my calculations, the center of the oven with be 21 1/2' from the house. The corner is most suitable because the lot (faces due west) backs up to farmland (house sits at a strange angle on the lot) and we do not want to block the view.

    Here are a couple Sketchups of layout and final ideas:

    Overhead Spatial layout


    Here is the first phase of the completed oven: White Stucco. Landing of poured concrete counter-top.


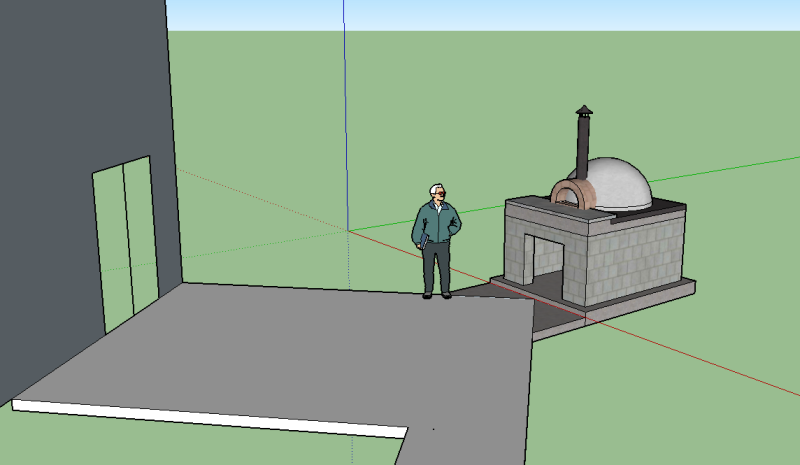
    And what we plan on for the finished product. I may add two small directional lights in the eaves of the roof to light the counter-top.


    Our patio has not moved or cracked in 8 years, and the 3' sidewalk from the patio to the back of the 3rd bay in the garage has not moved or cracked either. I had originally planned on pouring 40" deep sonotubes, but after talking with some of my Civil contractors at work, they assured me that an 8"heavily reinforced floating pad, on 4-5" crushed stone will be just fine. This is how I will proceed. Top of pad will be 3" above grade.
    Last edited by Cubslover; 03-05-2015, 05:50 PM.
    "Half of the lies the tell about me aren't true!"

    My 36" Pompeii Build

  • #2
    Re: 36" Pompeii Build, West Lafayette, IN

    Picked up the concrete block today.
    At 38lbs each, the wife's SUV (yes, I stuck them in it) was loaded. 2000 lbs loaded.


    Also, the dog, who does not understand the meaning of "NO" on said block...
    Last edited by Cubslover; 03-19-2015, 05:17 AM.
    "Half of the lies the tell about me aren't true!"

    My 36" Pompeii Build

    Comment


    • #3
      Re: 36" Pompeii Build, West Lafayette, IN

      Good luck with your build CL. I don't see anything of concern with your layout. I agree that a slab on grade should be just fine. Most of the houses in Lafayette are SOG. In actuality if you do the math, 5 inches of concrete over crushed rock will carry the load.

      The reason I always recommend a footer is to protect myself from frost heave situation possible in a cold year like this year. I simply can't take the chance of a customer asking for a rebuild because their oven is out of level by a half inch. My current oven does not have a footer, so I did the same as you.

      I am curious about the fairly large landing in front of the oven. I have to say I cannot imagine that much real estate in front of the opening. I guess it all depends on what you're used to. I will suggest a slot inside the outer arch to dump ash. It could be as simple as a removable firebrick and a hole to funnel the ash into a bucket below instead of having to drag the ash across your landing area. If this area has a really nice finish, you might not want to be dragging too much stuff across the top.

      I hope you have your brother in law contracted to help with the concrete. Just bribe him with the many many meals he will enjoy at family gatherings.
      The cost of living continues to skyrocket, and yet it remains a popular choice.

      Comment


      • #4
        Re: 36" Pompeii Build, West Lafayette, IN

        Hi there Cubslover. Welcome to the best Forum on the web for WFO builders and enthusiasts. I want to just mention a couple of things. Firstly, that was a good decision to forgo the Sonotubes. They are of no use when it comes to frost heave. I would recommend making the edges of your slab as deep as you are willing and able to go, particularly on the north and west sides. I would also plan to bring the backfill up as high as you can later, after you pull the forms off your base slab. Secondly, when you prep your base slab, plan for your concrete to (most likely) crack in the middle where your existing pad protrudes into it. With proper planning, you can either eliminate or disguise it by using a control joint (not an expansion joint...they are two totally different things). Otherwise, if and when it does crack, it may bother you to look at it all the time. With proper reinforcement, it will only be aesthetic. Personally, if it were me, I'd plan on some type of control joint there, running back to where your future wood storage area intersects w/it. Then if and when it does crack, it looks much better. My 2?. Best of luck w/your Build.
        My Build:
        http://www.fornobravo.com/forum/f8/s...ina-20363.html

        "Believe that you can and you're halfway there".

        Comment


        • #5
          Re: 36" Pompeii Build, West Lafayette, IN

          The landing in front is 18" on the drawing I believe.

          I think I've decided on cutting it to 12", but we are also tossing up a flush opening layout since we are eventually planning a granite counter to one side as well.

          My brother-in-law (he's in Louisville) called me last night and mentioned he'd be up for a few weekends during the build to assist.

          The "ash-dump" slot is a great idea, one I will definitely consider. I'll have to be sure to lay out the hearth pour fully to keep that opening there.

          Thanks.
          "Half of the lies the tell about me aren't true!"

          My 36" Pompeii Build

          Comment


          • #6
            Re: 36" Pompeii Build, West Lafayette, IN

            Originally posted by NCMan View Post
            Secondly, when you prep your base slab, plan for your concrete to (most likely) crack in the middle where your existing pad protrudes into it. With proper planning, you can either eliminate or disguise it by using a control joint (not an expansion joint...they are two totally different things). Otherwise, if and when it does crack, it may bother you to look at it all the time. With proper reinforcement, it will only be aesthetic. Personally, if it were me, I'd plan on some type of control joint there, running back to where your future wood storage area intersects w/it. Then if and when it does crack, it looks much better. My 2?. Best of luck w/your Build.
            Thanks for the reply and the suggestions. I will consider thickening the pad on side of the slab. 1' perimeter at 12" thick (or thicker?)

            I considered the fact that it may crack and I believe I will pour the rectangle (base slab) separate from the two triangular pads that will tie it into the main patio. These triangular pad will be level with the patio grade and I plan on using a rubberized seam to seam all pads.

            I was hoping this would keep the main slab from cracking due to the strange shape of the pour.
            "Half of the lies the tell about me aren't true!"

            My 36" Pompeii Build

            Comment


            • #7
              Re: 36" Pompeii Build, West Lafayette, IN

              Yes, pouring the perimeter like that will help safeguard against frost heave. It doesn't guarantee it, but sure lessens the likelihood of it happening. I personally would not pour your slabs separately. If that is done that way, it will likely be more problematic. I would thicken the "points", reinforce properly and incorporate a control joint. If you do decide to proceed that way, I recommend using concrete dowel bars to keep the slabs even w/each other. Not rebar, but concrete dowel bars. I think separating the slabs just creates more possible issues, though.
              Last edited by NCMan; 03-06-2015, 07:23 AM.
              My Build:
              http://www.fornobravo.com/forum/f8/s...ina-20363.html

              "Believe that you can and you're halfway there".

              Comment


              • #8
                Re: 36" Pompeii Build, West Lafayette, IN

                That all looks like some good prep.

                Personally, I would suggest forgoing the igloo -> housing transition and just build the housing. It takes a day or two to frame up and roof a housing. It will take you as long or longer to stucco a dome correctly - well enough to last through a winter.

                As for the ash slot - personal preference there. But I find a big ol' aluminum shop dustpan works great. Never takes more than 2 loads to empty the oven. Versus trying to get the ash down a slot, into a bucket that you have to hang in your wood area. I find it to be over thinking a pretty simple problem.
                My build progress
                My WFO Journal on Facebook
                My dome spreadsheet calculator

                Comment


                • #9
                  Re: 36" Pompeii Build, West Lafayette, IN

                  Originally posted by deejayoh View Post
                  That all looks like some good prep.

                  Personally, I would suggest forgoing the igloo -> housing transition and just build the housing. It takes a day or two to frame up and roof a housing. It will take you as long or longer to stucco a dome correctly - well enough to last through a winter.

                  As for the ash slot - personal preference there. But I find a big ol' aluminum shop dustpan works great. Never takes more than 2 loads to empty the oven. Versus trying to get the ash down a slot, into a bucket that you have to hang in your wood area. I find it to be over thinking a pretty simple problem.
                  All good advice, for sure. I also was planning on incorporating an ash slot, right up to the time I started. I even had a plan in mind of how I was going to do it. However, once I got lots of advice from folks on here and weighed the pros and cons, even did some research, I decided to forgo it and have had no regrets whatsoever since. Cleaning the oven out is quite easy and hardly has to be done much at all. However, it truly is a personal preference and there is no right or wrong way to do it.
                  My Build:
                  http://www.fornobravo.com/forum/f8/s...ina-20363.html

                  "Believe that you can and you're halfway there".

                  Comment


                  • #10
                    Re: 36" Pompeii Build, West Lafayette, IN

                    If you eliminate the 18" landing then I agree with eliminating the ash dump. Do the math. 18" landing + 12" depth from outer arch face to inside of oven +36" to back of oven is 66".

                    That means you are trying to clean up ash 66" away. Even if you sweep them to the front of the outer arch, the pile is still 18" away. Big dust pan, long handled broom, it can be a stretch especially if you really work the concrete to a glass finish and don't want to scratch it. Or if you have an insulated door that you want to close the oven off, again do the math. It is a stretch.

                    I think it all depends on what kind of finish you want. If your a nut about cracks and scratches then the less traffic over the landing the better. Or just eliminate the landing and have a counter top off to the side, which in my opinion is much more user friendly and then you can forget about the ash dump. Or leave it in, they are super handy at clean out time.
                    The cost of living continues to skyrocket, and yet it remains a popular choice.

                    Comment


                    • #11
                      Re: 36" Pompeii Build, West Lafayette, IN

                      Originally posted by NCMan View Post
                      Yes, pouring the perimeter like that will help safeguard against frost heave. It doesn't guarantee it, but sure lessens the likelihood of it happening. I personally would not pour your slabs separately. If that is done that way, it will likely be more problematic. I would thicken the "points", reinforce properly and incorporate a control joint. If you do decide to proceed that way, I recommend using concrete dowel bars to keep the slabs even w/each other. Not rebar, but concrete dowel bars. I think separating the slabs just creates more possible issues, though.
                      All good points, thanks for helping me see both side.

                      Originally posted by deejayoh View Post
                      That all looks like some good prep.

                      Personally, I would suggest forgoing the igloo -> housing transition and just build the housing. It takes a day or two to frame up and roof a housing. It will take you as long or longer to stucco a dome correctly - well enough to last through a winter.
                      The only real factor here is price. The stone veneer we like is quite pricey, so I was going to forego the "house" until the play-money bank had returned.

                      Now that you mention it, I may block in the rest of the way (factoring in price and time), and put the roof over the block, minus the veneer.
                      "Half of the lies the tell about me aren't true!"

                      My 36" Pompeii Build

                      Comment


                      • #12
                        Re: 36" Pompeii Build, West Lafayette, IN

                        Originally posted by Cubslover View Post
                        All good points, thanks for helping me see both side.


                        The only real factor here is price. The stone veneer we like is quite pricey, so I was going to forego the "house" until the play-money bank had returned.

                        Now that you mention it, I may block in the rest of the way (factoring in price and time), and put the roof over the block, minus the veneer.
                        I hear you on that one loud and clear!

                        FWIW, I built my doghouse out of steel studs with hardieboard over it (I think that is a bit more forgiving construction approach than concrete block). I got the HB on and the roof/flashing done, then left the finishing for the next summer. It was fine without the final coat on it. Kept the oven nice and dry.

                        Doing a stucco dome right requires some thoughtful prep and time. Plus the waterproof coatings are usually not cheap. So while you may save a bit of money in the short term, you'll still have to spend the same $ that you saved again later. So net net, you're paying more and doing twice as much work!
                        My build progress
                        My WFO Journal on Facebook
                        My dome spreadsheet calculator

                        Comment


                        • #13
                          Re: 36" Pompeii Build, West Lafayette, IN

                          I would take DJs advice on the steel/hardi solution. That is what i did as well and finished it with stucco. Mine is a bit more protected from the weather, but the stucco is very hardy to the weather, pick your color, and fairly easy to self teach the install. Also, this method is very sturdy and will be a breeze to mount the roof to, easier for any wiring you may need. The 8" block exterior will require a much larger footprint as well.

                          FWIW

                          Texman
                          Texman Kitchen
                          http://www.fornobravo.com/forum/f8/t...ild-17324.html

                          Comment


                          • #14
                            Re: 36" Pompeii Build, West Lafayette, IN

                            Originally posted by texman View Post
                            I would take DJs advice on the steel/hardi solution. That is what i did as well and finished it with stucco. Mine is a bit more protected from the weather, but the stucco is very hardy to the weather, pick your color, and fairly easy to self teach the install. Also, this method is very sturdy and will be a breeze to mount the roof to, easier for any wiring you may need. The 8" block exterior will require a much larger footprint as well.

                            FWIW

                            Texman
                            Very valid points, I had considered 4" block for the "house", but Metal studs and Hardibacker is the easier (read: more beginner friendly) option.
                            "Half of the lies the tell about me aren't true!"

                            My 36" Pompeii Build

                            Comment


                            • #15
                              Re: 36" Pompeii Build, West Lafayette, IN

                              You don't want to learn how to lay 4" block. Lots of options to dry in your oven. The stucco is really not that hard. The big thing with stucco is getting it flat. Since you are applying stucco to a dome, the flat part is pretty subjective. I can get a scratch coat of stucco on in less than thirty minutes and that usually includes 2-3 passes over the whole thing.
                              I think you will be surprised by how much you like the Igloo look.
                              The cost of living continues to skyrocket, and yet it remains a popular choice.

                              Comment

                              Working...
                              X