Announcement

Collapse
No announcement yet.

Hortonville WI - Homebrew cast WFO over sand form

Collapse
X
 
  • Filter
  • Time
  • Show
Clear All
new posts

  • Hortonville WI - Homebrew cast WFO over sand form

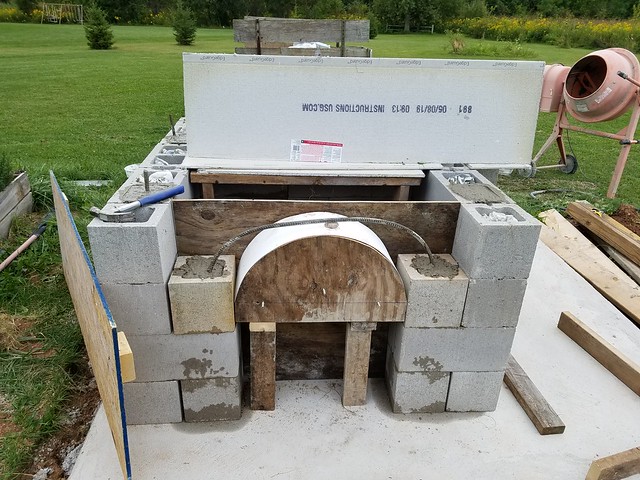
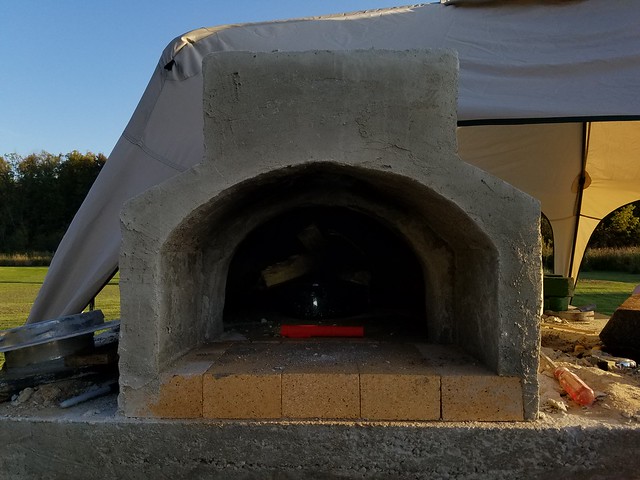
    Here is the progress and pictures from my recent WFO build. This is somewhat of a budget build as I did not use the rather expensive insulation board or ceramic blanket. I may regret not using these advanced materials but I am hoping that I will find my build adequate for my needs.

    I picked up a lot of great information from folks that have posted on this forum. For my cast build, I found the following two builds the most useful for the cast oven I had in mind and you will probably notice similarities in the methods I used for my build.

    cnegrelli's build:
    https://community.fornobravo.com/for...sted-over-sand

    purplehaze's build:
    https://community.fornobravo.com/for...made-cast-dome

    As I was finalizing my plans and laying out my foundation blocks, I stumbled upon Leemc's youtube video about his oven/smoker. I pondered if I should try to incorporate a smoker in my build and so far I have, but the smoker portion won't go live for trials until next year.
    leemc's smoker build:
    https://community.fornobravo.com/for...-florida-igloo

    A few more FB members I would like to thank:

    Special thanks to David S, the resident expert on cast ovens. I didn't feel the need to consult him for information as I found so much good advice already peppered throughout the forum by him.

    Thanks to Forno Bravo for hosting the site with it's plethora documented builds I have learned so much already about different methods of building and now I look forward to learning how to cook with my new oven.

    dbhansen - Closest FB member to my location - Was able to confirm the cheapest source of local fire brick - Brock White @ $2.54 ea.

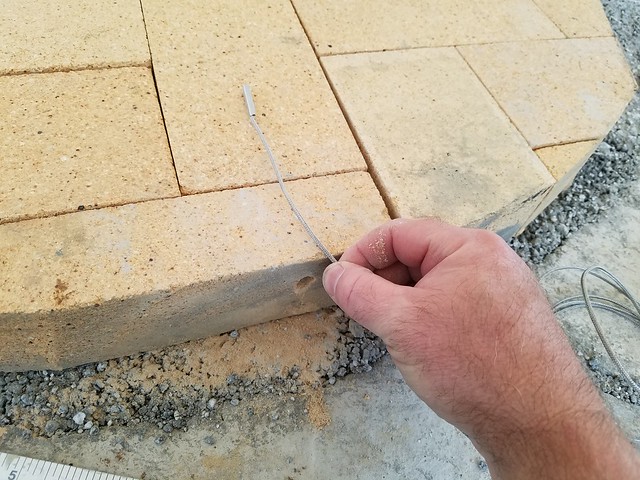
    thomasmn for some thermocouple advise. I ended up using a 4 sensor meter with slightly upgraded thermocouples from Aliexpress. Meter $23(https://www.aliexpress.com/item/32793596685.html), Thermocouples(https://www.aliexpress.com/item/32865650808.html) $1.xx x 6 - 2 below the oven floor, 2 in the firebrick floor, & 2 in the dome. Mini connectors for Thermocouples (https://www.aliexpress.com/item/32617027526.html)
    Not needed, but for $30 all in, it might be fun to learn how my oven heats up and improves as it dries out.

    A partial list of materials used:

    Hawthorne bond Fireclay (http://www.christyco.com/minerals.html) sourced from Krueger Pottery Supply in St Louis
    https://kruegerpottery.com/products/...=7219307151423
    $10.50 per 50lb bag. I purchased 4 bags, still have over 1 1/2 bags left.

    I used this for my dome insulation, specs says good for over 2,000 deg F.
    https://www.menards.com/main/buildin...1738084&ipos=4

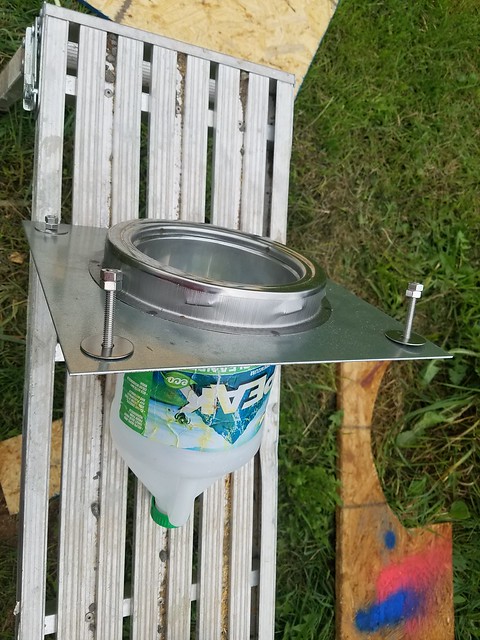
    I used this adapter plate to mate up with a 3 foot 6" SS chimney pipe.
    https://www.menards.com/main/heating...153-c-6894.htm

    Lime for the mix:
    https://www.menards.com/main/buildin...529484&ipos=10

    Portland cement:
    https://www.menards.com/main/buildin...6340558&ipos=2

    3/4 ton of mason sand from a local quarry, around $10.

    1 ton of 3/4" clear stone used under the concrete foundation for drainage, around $10

    1/2 ton of clear chips used in the concrete counter.

    1" Stainless Steel Needles - ebay $35 for 10lbs plus $14.35 shipping.(https://www.ebay.com/itm/Refractory-...0/132197747489)


    Fiberglass reinforcing strands - used in countertop
    https://www.amazon.com/gp/product/B0...?ie=UTF8&psc=1

    Concrete countertop pigment - Charcoal
    https://www.menards.com/main/buildin...223147&ipos=22
    Last edited by arnesr; 11-01-2019, 12:07 PM.

  • #2
    Here is my helper Tucker checking out my forms and gravel.

    I have about 6" of 3/4 clear stone under my floating slab reinforced with rebar.

    [/url]
    Here my son is helping me as he loads up our harbor freight mixer. I added two runs of piping in case I decide to run electrical or gas at some point in the future. We went through 67 60lb bags of premixed concrete for our 8x8 slab measuring 5 1/2" thick. I ran some PVC piping from the outside of the forms to inside where I will lay my blocks in case I want to run electrical or possibly gas later.

    Tucker is supervising the layout of my cement blocks.

    I used a cardboard template that measured 40" in diameter as I wanted to end up with a 36" oven with 2" walls resting on the firebrick floor.
    Last edited by arnesr; 11-01-2019, 12:09 PM.

    Comment


    • #3
      Final block configuraton: I thought it might be good to make the wood storage area a bit smaller and the center wall would support the oven a bit more. I'm going to have an overhanging countertop at the right side of the oven. The back section I'm hoping to use for tool or utinsel storage, probably with a door.


      Perparing the form work to cast the lower arch and support platform and laying cement board as a base.


      Outer forms installed:


      Form created for my insulation basin consisting 2" of foam and 3" of 2x4 support ringed with a 5" strip of plastic material. This basin will later be filled with pumice stone and perlite concrete for insulation.

      Last edited by arnesr; 11-01-2019, 12:14 PM.

      Comment


      • #4
        I actually ended up doing the support slab in two layers due to unanticipated rain. The top of my basin was a little wavy due to the form edges sagging inward.


        Forms removed, some voids revealed that will be filled later.


        Basin form removed. Wavy edges created by my edging dipping inward were removed with a few glancing blows with a hammer. The basin ended up about 1" larger than my template, which I think is good.


        Last edited by arnesr; 11-01-2019, 12:16 PM.

        Comment


        • #5
          I got out my circular saw with a diamond blade and made a notch for my thermocouple wires as well as several parallel cuts to be able to knock out an area for insulation under the oven entry. If you look close you can see some drainage holes have been drilled to release any water that may infiltrate.


          Filled to within 1 1/2" with loose but packed pumice stone. By leaving the stones loose I am hoping to achieve a higher insulation value, less surface contact to conduct heat. This part of the build is a bit of an experiment as I'm not sure how this will hold up long term. I don't see a problem, but I haven't seen others use this method.


          Perlite/concrete layer for insulation and support. I believe I used a 5 to 1 ratio here, 5 perlite, one cement.
          Last edited by arnesr; 10-31-2019, 01:09 PM.

          Comment


          • #6
            Laying out fire bricks:


            For cutting the bricks I used a old miter saw I had laying around with a 10" diamond blade from Harbor Freight. I'm impressed on how well this worked.


            I used a nozel and regulator that I picked up on year end clearance and inserted where the dusk sock would go. I adjusted the flow to a light trickle. I had the saw plugged into a GFI outlet for safety and had no issues.


            Floor all cut. In needed to level a few of the bricks with some sand underneath. Some high corners I was able to settle down with a gentler tap of a rubber mallet causing the perlite grains underneath to compress. Some of the smaller wedges of brick wanted to lean out, so I glued them in with some homebrew mix.
            what's that sitting on top of the floor?
            Last edited by arnesr; 10-31-2019, 01:11 PM.

            Comment


            • #7
              Why, that's my smoker hole door so that I can remove it and let smoke in from another source outside the oven. It is cast from a 4" to 6" plumbing adapter with a piece of ply glued in. I used a flush router bit in my drill press to remove a ridge inside the fitting to give me a smooth edge on my form. I plan on adding a small stove outside the base and routing a 4" chimney into the hollow block chamber which leads up into the WFO.


              Drilled two spots to place thermocouples in the floor bricks.


              Forming up for my dome. I used some heavy weights from our lawn tractor to hold the forms in place. They are intended for adding weight/traction to our lawn tractor in the winter for snow removal, but they worked well for this purpose too.


              Last edited by arnesr; 11-14-2019, 08:20 AM.

              Comment


              • #8
                Sand form made. I had to use a lot of water to make the sand hold it's shape, just like making a sand sculpture or castle at the beach. Note the dowel inserted in the middle with a mark at 15" and 17" to mark the 2" target thickness for my casting.


                I used strips of kraft paper instead of newspaper to keep sand out of my casting. Who gets the newspaper anymore anyway? The wind was starting to blow the paper strips off my form, so I had to find a non toxic binding agent. Using the strips of wet paper almost immediately brought me back to my childhood and I remembered using flour as a glue while making paper mache. I gooped and sprinkled the strips with flour and the paper held.


                On to the mixing. For the mix, I used the standard homebrew recipie. 3 parts sand, one part fire clay, one part lime and one part portland cement. I used a 2 gallon pail to measure ingredients. To the mix I also added 1" stainless steel melt extract fibers. I just estimated the amount and added perhaps a pint to each batch, maybe a smidge more( I used a plastic pint freezer container as my measure). I tried to go a bit heavier on the needles as I progressed to the top of the dome. I mixed the dry materials in the cement mixer and then dumped the mix into a galvanized tub to be mixed by hand as water is added. I tried to add as little water as possible and still have the mix be workable.
                Last edited by arnesr; 11-14-2019, 08:27 AM.

                Comment


                • #9
                  The base of the dome ended up being closer to 3" thick and the thickness varied a bit throughout, but I made sure I had at least 2" thickness everwhere.


                  Looking kinda ugly here


                  First stage cast done


                  Comment


                  • #10
                    Forms removed. voids and an error on my form work resulted in a missing area for my door to seal against on the left side.


                    Tucker on the scene


                    I fixed the left side of the entrance and I had some extra homebrew mix, so I filled in around the top edge of my forms to smooth out the transition from verticle to the start of the curved surface. We has some wind which dried this out quickly which produced vertical cracks in this veneer layer. It's not structural and no one will see it anyway.


                    Digging out, that's a large volume of sand.

                    Comment


                    • #11
                      Peeling back the paper reveals a few small voids and a layer of flour from my paper mache project.


                      I tried to patch the voids the best I could, but I had a hard time reaching into the back of oven, it was quite a stretch as my shoulders are wider than the oven entrance width. I was using the Casa 2 plan dimensions as a general guide, so my entrance is only 17"

                      Forming the entrance and flue:


                      View from above:


                      With sand:
                      Last edited by arnesr; 11-14-2019, 08:30 AM.

                      Comment


                      • #12
                        Adapter plate and washer fluid jug for fill


                        Entrance poured with homebrew mix


                        Forms removed, some voids revealed which need to be filled.


                        I had trouble finding a way to remove my temporary door/form, so I used a hole saw to cut to holes where I could grip and gently pry the door out from the bottom.

                        Comment


                        • #13
                          voids patched


                          Curing fire. I believe this was fire number 3. I started with a couple charcoal briquette fires in the pan the previous two days.


                          Maybe a bit too warm as i start to notice some hair line cracks and some moisture lines. Still, I don't think any real harm was done and structurally it will be fine. Perhaps I should have added the Propylene burnout fibers, but I'm hoping I can get away without.


                          I have one crack in my entrance casting as well. I have a thermal gap in the floor brick from the entrance to the oven floor, but no break between the oven and the entrance casting. I will patch this crack as cosmetic, but again I don't think it is structural to cause failure.

                          Comment


                          • #14
                            Final drying fire. I probably should have waited but was in a hurry. First snow of the season, though no accumulation.


                            I used this opportunity to cook my first round of pizza's. They turned out just ok, better than a frozen pie, but not superb. Dough was a bit under cooked and I had too much flame in the oven. It didn't help that I used pans as I don't yet have a peel.


                            Here is a photo of the oven at it's hottest, the cracks are really open now. I have no doubt that most of the moisture is out 
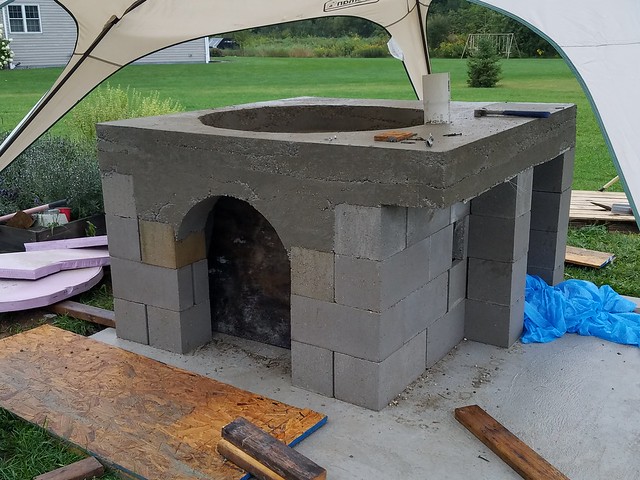
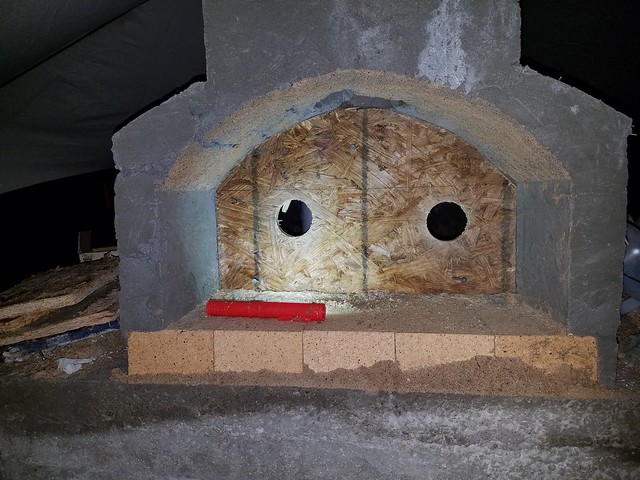
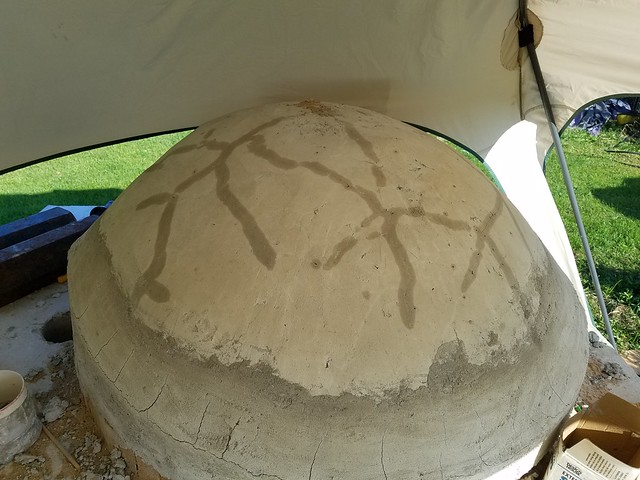
I probably should have put insulation on before firing. Not sure how much that would have helped, but I would not have seen the cracks then.
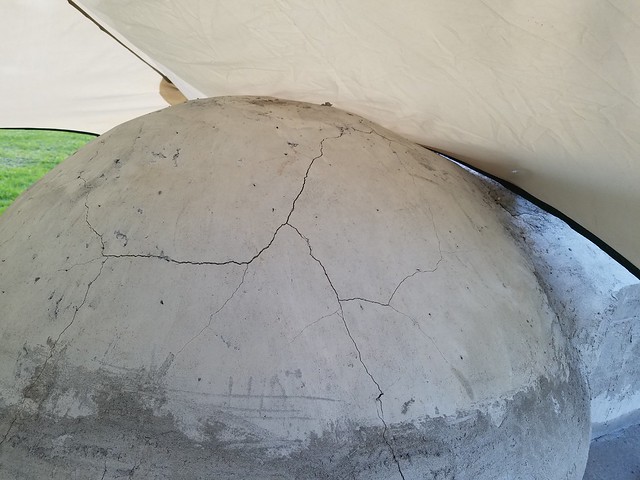
                            Last edited by arnesr; 11-14-2019, 08:32 AM.

                            Comment


                            • #15
                              when the oven cools the cracks almost disappear, so that tells me they are more a factor of the material expanding than steam related. Here I am inserting some thermocouples in the dome.


                              Smoke door plug removed. The duct tape I wrapped it in is charred and will be removed. I wanted the hole to be just slightly larger than needed so I could insert the plug easily. Like an oven door the reveal is what seals the opening.


                              Taping thermocouple wires. Note the concrete screws in place to wrap wire to hold the yet to be installed insulation in place.
                              Last edited by arnesr; 10-31-2019, 01:20 PM.

                              Comment

                              Working...
                              X