Re: Michigan WFO
Mike
Excellent job...that is a much more stable arch...you will probably still need to create some buttressing on the sides but you are right on...the two piece keyston shows that you understand what is going on now and that you are using your "noodle"...I have attached a photo of our doorway arch at the restaurant I bonded three full bricks on their flat side and tapered the back and sides to fit in the keystone of the arch...it created a flatter top and allowed me to have a nice keystone look from the front
Congratulations on a job well done!
All the best!
Dutch


-
Re: Michigan WFO
What are the tools and procedure for cleaning the mortar joints on the inside of the oven?
I've been using a wire brush, but there's still a film of mortar on the face of many of the bricks. It doesn't look very "shiney". I know that Muriatic acid (diluted) is used to clean off bricks on an outside, visible surface. Would you use the acid on the inside? A wet rag has worked well to clean up as I go, but I haven't always been around to do that while the mortar is still curing. That's why I use the wire brush after it's cured (a day later).
Also, I thought about this for an idea: A wire brush attachment in a drill and lightly brushing the joints and surfaces that need it, might be faster? Like getting your teeth cleaned at the dentist.Leave a comment:
-
Re: Michigan WFO
Mike
Congrats on a job well done. I would have done the same thing. I am not all that happy with the way my arch looks. But it won't be seen. If I thought I had a structural issue, I would have done it over. My brother was bricking the front of his house. Half way up he realized that it wasn't perfectly level. He pulled it all down and started over.Leave a comment:
-
Re: Michigan WFO
It looks good Mike, and the two part keystone is no issue at all given the directions of the forces at play. Nice solution and Nice job!
TravisLeave a comment:
-
Re: Michigan WFO
Very nice. You'll be a lot happier with this one. I don't see a problem with the laminated keystone.Leave a comment:
-
Re: Michigan WFO
OK. It's all good now. As always, Dutch was right. I rebuilt the arch. I think this one is better. At least it looks better to me.
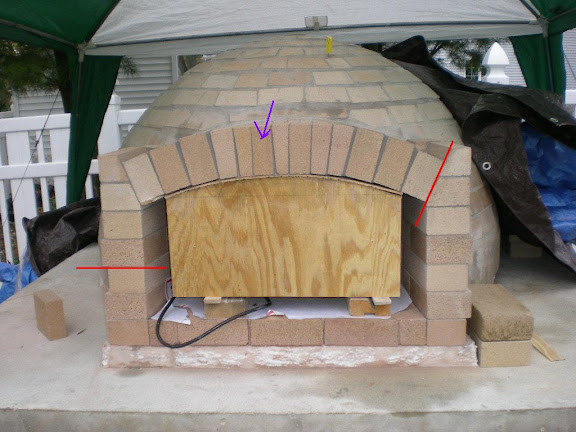
Here was the old one. The blue arrow points to the brick I was trying to fix. I was going to remove and redo the middle 7 bricks. In the process the arch and left support, between the red lines, came down.
I rebuilt it today. Here is the new arch. It's a little less flat, and the bricks are more uniform in size.
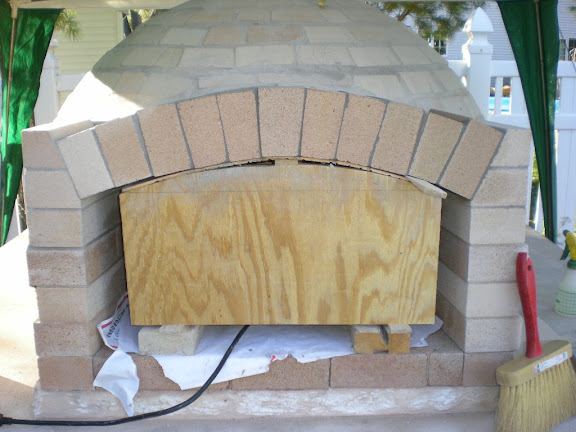
The keystone needed to be slightly larger than the brick width of 2.25 inches. Rather than cut two small keystones, I bonded together two bricks on their face side, and cut them to size. It was rather simple, I hope it is structurally sound.
It's dropping into the low 30's at night with heavy frost on the ground every morning. I've put a halogen bulb in the oven at night. Seems to keep the brick fairly warm.Leave a comment:
-
Re: Michigan WFO
Never look back Mike, you did the right thing. I had to re-do my floor cause of no insulation underneath. Lost lots of time, and lots of questions from friends. Oh, that will probably be OK, stuff like that. If you aren't happy, you have to do it! When it's rebuilt you will be back on track, never to look back! Just throw away those photos of the old arch, and slip in the new, no one here will ever tell. On the coating over the bricks, I did it as I went on up, and then another skim coat over everything later to smooth everything out nice. One benefit to coating is that at curing time you will be able to see any cracks that may [will] show up. With that perfect looking dome you won't have any cracks to worry about anyway! There was a post somewhere by someone here that said if you don't have any cracks, your not using your oven. We use ours, and there are a few cracks, but after a few pizzas and a wine or two they are hardly visible! I have outdoor work till nearly Christmas this year, so I predict fair weather for another 7 weeks! Happy Halloween, JimLeave a comment:
-
Re: Michigan WFO
It should be fine if it's even just a little flared. Mine's straight, and my next one won't be!
Travis, when I fire the oven, I use a piece of durock, angled backward toward the front, raised up about 1 to 1/2 inches from the floor. It keeps the wind from interfering with the fire, and sucking the air in the bottom and venting out the top really gets the fire going well.Leave a comment:
-
Re: Michigan WFO
Just seems to me like a flared entrance would be a huge benefit trying to get brushes and stuff to the sides of the oven, though I guess it could be a detrement if you are in a windy area.
TravisLeave a comment:
-
Re: Michigan WFO
That's right, Travis. I do have a flared entrance into my oven. It's not much, but I hope it helps.Leave a comment:
-
Re: Michigan WFO
I am pretty sure Mike's sidewalls do open up by about 2" or so, but I may be confusing threads. I have added that to my list of must include design features!
TravisLeave a comment:
-
Re: Michigan WFO
Hey, now that you've torn it down, you can take into account something I've been irritated with on my own oven over the past few days- I left a reveal for the stop, but my sidewalls on the landing are at 90 degrees to the opening after that. It's wider than the inner opening, but trying to fit the door into the opening and make it tight has been a real pain. If you rebuild it with a little spread angle to the vent sidewalls it will make your life easier! It wouldn't take much, less than 1/2 inch per side.Leave a comment:
-
Re: Michigan WFO
The flue tile taper was a pain to do. It was cut with the angle grinder you see in the background. The stuff in VERY hard, and hard to cut. In the end, I think some kind of transition is a good thing to have, but if I had to do it again, I think I would have built up about eight inches worth with firebrick splits, and called it a day.
That said, my chimney, as built, draws like a champ. There is seldom even a whiff of smoke coming out of it on start up. That may have something to do with the fact that it is two stories tall.
Your arch will support any reasonable number of flue tiles. I think I have eight or nine stacked up on mine. Since my chimney was so big, I built a third reinforced slab over the oven, supported by the slab below, to bear the weight of the external masonry structure of the chimney, independent of the dome and the flue stack.Leave a comment:
-
Re: Michigan WFO
Mike
I am glad you did it now because I know it would have eaten at you if you didn't...also I am sorry you lost a few bricks on the supports but I think they may have become an issue and that is why they came out...now you get to redesign the vent area and have an experience to draw from albeit not a happy one...as far as the chimney goes tapering the flue run aids in the draw because it creates a constriction and thereby a difference in pressure(bernoulli's law) and virtually sucks the gases out...it is not important that you create a tapered flue tile like dmun and les(although they are excellent work)...you can do it as masons for many years have done and create it using brick and then stack the clay liner on top of a nice flat surface...you can go from simple by setting each successive course inside the other(called corbeling) or you could angle the front and back sides and stack the bricks up along the sides to create the taper...smooth transitions are excellent but with something like a brick oven I don't think a few edges would negatively affect anything...as far as weight is concerned if you support the sides of your doorway arch well enough it would carry a huge amount of weight...and if you don't have to build a very long chimney...as in 1 or 2 clay flue liners there sertainly is no problem...dmun had quite a tall chimney on his as I remember...
All the best!
Check out this website to learn a bit about stability and design principles in arches and domes...cool stuff...
Auroville Earth Institute is a research, design and developing agency for vaulted structures, construction of various Vaults, Arches, Domes (VAD).
Dutch
Originally posted by mfiore View PostLeave a comment:
-
Re: Michigan WFO
Thanks for the encouragement and support. I know in the long run, it'll all be just fine.
I have some remaining chimney questions. I had previously inquired about round vs square flue tiles. It appears that the square flue tiles are measured by the outside measurements, while the round are from internal dimensions. No logic, but I'm sure there is a reason. As it turns out, according to Superior Clay website Superior Clay Flue Liners
an 8.5x8.5 square flue tile has an effective area of 49 sq inch, while the 8inch round has an area of 50 sq inch. Essentially the same.
How important is the taper as you go up?
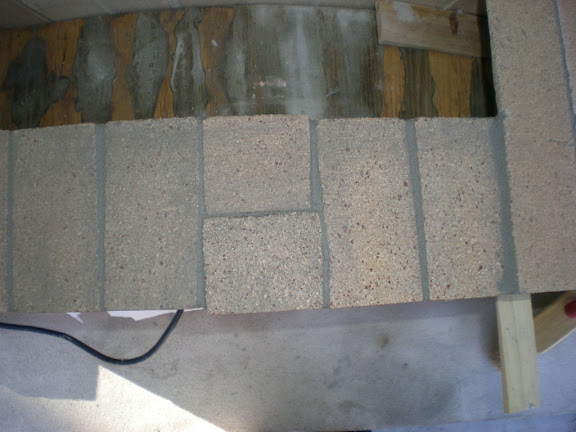
I plan to build a tapered vent entry into my arches. Mine is not done yet, but will be similar to this

The bottom dimensions will be about 4.5x 21.5 inches, tapering up to a dimension of 4.5x 12.5 inches.
Locally, I can find 8x13 inch flue tiles that will span the opening. This would be in increase in the effective area as vent opening transitions into the flue tile. Will this cause a problem?
Is it important to alter the flue tile for the chimney to continue to taper as it goes up (like dmun and Les did)?

Even more importantly, can my arch support this weight?
Thanks in advance. This chimney stuff is giving me a headache.Leave a comment:
Leave a comment: