Re: 36" Pompeii in DC
RS, I think I read something from Stonecutter that said a 2-2.5:1 ratio of sand to portland was best and to be sure it was course sand not rounded. Take a look at the latest posts on Gulf's thread for the specific quote/context.
As far as "grinding now" or filling with the slurry I don't know what advantage grinding now would give you, since you will have to grind it down after you lay the slurry anyway. Maybe grinding now would allow you to control the placement of the slurry coat. I'm only thinking out loud...you are WAY ahead of me on this....But I am watching and learing from your experience...Looks very promising so far.
Thanks for sharing.
Regards,
AT


-
Re: 36" Pompeii in DC
Looks like the first try went well. May want to consider a concrete bonder to place in the areas where you put the contrasting slurry. Quickrete makes one that is fairly cheap$10 a quart.Leave a comment:
-
Re: 36" Pompeii in DC
It looks great to me, especially the little Fluer-De-Lis in the mat form
Leave a comment:
-
Re: 36" Pompeii in DC
Well, I started an experiment over the weekend. Poured a 10" paver using a concrete tube, and used the center of a rubber mat as a stamp.

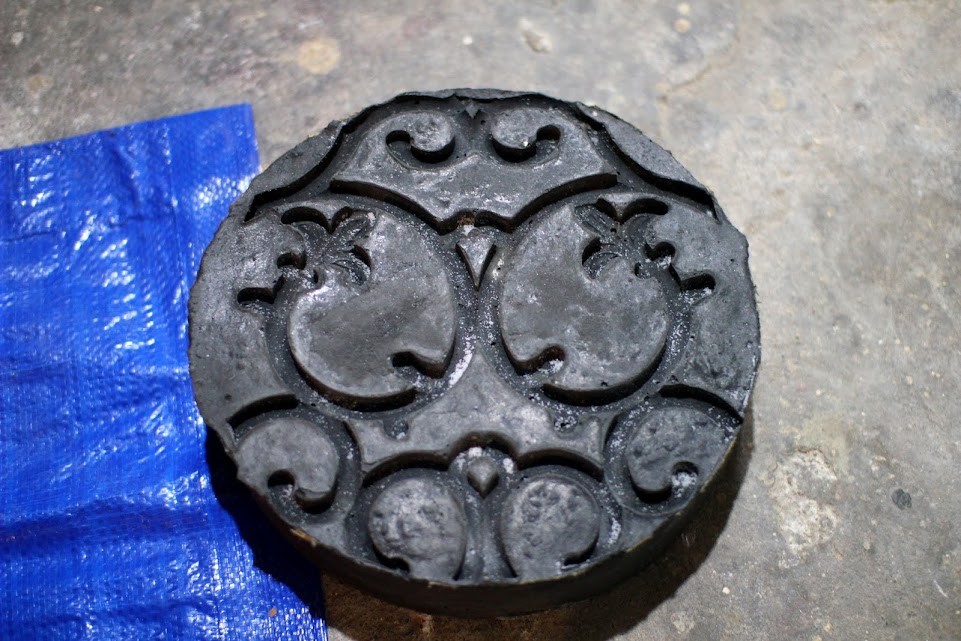

For the first round, I took a 4" piece of cardboard tube, filled it halfway with sand (to keep the thing in place), then poured in the concrete. I used a superplasticizer along with 4 oz. of charcoal pigment, which was probably overkill. Used my orbital sander sans sandpaper (tongue twister!) to vibrate the edges, though I'm not sure if that did anything. After two days I pulled out the mat and cut away the cardboard.
The surface generally came out pretty smooth, but there are slight raised edges along the sides of the stamp, where cement beaded up along the edges of the mat (I couldn't get deep enough to be flush with the surface of the concrete, both because the concrete didn't have enough give, and the mat kept floating as water seeped out of the concrete.)
I've got some diamond pads now, and so I'm debating whether to wait a few days and grind off those edges (as well as doing the first pass at polishing the black surface) or fill in the indentations with white slurry now, and polish it all together once the slurry hardens. Any thoughts?
Similarly, anyone have suggestions of what proportions to use for the slurry? I'm planning on white sand and white portland, but 1:1? 2:1? Add some lime?
Next experiment is to try one poured facedown. The mat came out of the first one even though I didn't oil it, so I think this will work...

Leave a comment:
-
Re: 36" Pompeii in DC
Amazing build. I think I have a new addiction to think about
Leave a comment:
-
Re: 36" Pompeii in DC
Chip,
I'd imagine that you'd have real trouble removing the mat with that method. I love this idea and look forward to seeing one finished.
DaveLeave a comment:
-
Re: 36" Pompeii in DC
I think it is a great idea but I might do it the other way arround and pour the concrete over the mat inside of a form that way you would end up with a very consistent depth on the impression from the mats.
ChipLeave a comment:
-
Re: 36" Pompeii in DC
Very interesting idea, so many possibilities. Something like that would even make an interesting inlay to cover the sides of the base. Even if it wasn’t filled in and polished as you described above. So many cool/creative ideas out there…so little time. Keep us posted.Leave a comment:
-
Re: 36" Pompeii in DC
Not sure if I was clear, the picture is just an idea found online, not something someone is selling. I'd just go buy some rubber mats and press them into the concrete when I pour it. Certainly I'd want to do a small sample before pouring a whole counter top. In addition to figuring out the slurry, I'd want to test the colors, and figure out the polishing process (in particular, how to deal with the inevitable bug-holes on the raised bits).Leave a comment:
-
Re: 36" Pompeii in DC
Ummm, interesting idea, do they have any small ones or broken ones that you could experiment with? Could turn out quite nice if the slurry will bond well enough to withstand polishing and the winter conditions of DC.Leave a comment:
-
Re: 36" Pompeii in DC
Alright, here's crazy idea #54, which may rule out the mini-ash drop for aesthetic reasons. So far I've been thinking of doing polished concrete counters in the usual way, with exposed aggregate, etc. But then my wife found these when browsing pinterest:

These are created by pressing a rubber doormat into the concrete. While doing exactly this wouldn't make very good counters (all bumpy), what if one were to fill the gaps with slurry of a contrasting color, then polish the whole thing? Say with a dark colored concrete and a slurry made with white Portland cement. You'd end up with what would look like a fancy inlay. This would probably rule out the mini-ash slot, since it would get in the way of the pattern.Leave a comment:
-
Re: 36" Pompeii in DC
I totally agree. I have a small coal scoop/shovel that helps, but i'd rather sweep the whole mess down a hole and be done with it.Originally posted by rsandler View Post
Keep us posted on what you come up with. You've done a real nice job so far, I'm sure whatever you come up with will be good. I'm thinking about installing my ash drop behind a cast iron door and sealing the front edge of my insulation layer with a dam of concrete and fire brick.
Another thought I have been kicking around (since I have a ton of wasted space under my hearth), is putting my old shop vac back there with a metal canister installed between the vacuum and the end of the hose. That way I could just vacuum out the ashes and the canister can catch the coals (I like to reuse the charcoal when I start the next fire - they heat up fast). Now if I could just figure out a clever way to switch the vacuum from sucking to blowing, I would have a killer oxygen supply for stoking the fire!
If I do this, I'll definitely start my own thread.
Good Luck,
Regards,
ATLeave a comment:
-
Re: 36" Pompeii in DC
I think most builders who do an ash drop put it at the back of the arch, not the front - which keeps it from being exposed.
That said, I don't find cleaning the oven to be that much of a chore or even very messy. I don't now that trying to get ashes to go down a small slot would be any easier than brushing them into a dustpan, but that is just my $0.02. Take it FWIW!Leave a comment:
-
Re: 36" Pompeii in DC
Hmm, had not thought about the problem of water getting down to the insulation. I've found sweeping ashes and small coals into a round can sufficiently annoying that I'm still tempted, but that will take some thought.Leave a comment:
-
Re: 36" Pompeii in DC
Funny, I have also been playing with the idea of incorporating an ash drop in my counter top. Assuming my counter top is 2" thick, I'll only have about 3 1/2" to use for the drawer (depth) which is kind of shallow. Given your double layer of insulation you should have plenty of room. My only concern/misgiving for this idea is the potential for water to get down to my insulation layer. I'm sure I can engineer around it but given the amount of work I still have ahead of me (oven enclosure, counter tops, built in bar and BBQ pit), I'm not sure it's really worth the effort.
Regards,
ATLeave a comment:
Leave a comment: