I'm still having trouble understanding out of round vs out of level. All of my bricks have faces that are perpendicular to the IT and at proper distance to the centerline, it just seems like I allowed the bricks closest to the arch to angle down slightly, or more correctly not angle up enough, over multiple courses (like I marked up in pic 3). I'm correcting an out of level condition, not an out of round condition, unless it is just semantics. I have a plan to fix locally with some creative cutting - can't see any other possibility. If I try to stay on plane I will have to fill a series of gaps like my second pic. This was my original question - I don't have much exposed mortar in my oven, would that little bit around the arch really matter? Would it be attacked by the heat and gasses escaping the oven?
If I try to follow the droopy line, I will have converging downward slopes and will end up with a large vee (about 6 inches across by 1" deep) that would still require a shaved brick and possibly some half thickness bricks on top of it
To see what I need to do, I clamped a block to my IT to fix the angle to be "level" with the "non-droopy" bricks around the top course (Gulf's suggestion from post #14). I then clamped a brick on location and took a picture of the gap. The last picture is one of my shaved bricks that I am going to mortar in. I'll have a couple of tough cuts on each side, but then will be back to something I can correct/maintain with little effort (that is the plan....)


-
JR,
The dreaded droop in common and can be fixed, at least in your case, fairly easily. However, make adjustment transitionally over several bricks right and left of TDC as well as the following courses above. Getting back to round will help you in the cutting of bricks farther up the dome, otherwise there could be a lot of shaving and cutting for fitting the out of round area. Not that it matters now for your build but for future builders reading this thread, I mentioned that one should check the level front to back as well as side to side to keep the dreaded droop in check. Spread the corrections over several bricks and courses and you will never see the oops.
Leave a comment:
-
Here is a picture of the inside of my arch from a few rows ago. I think the droop is starting. I'll have to pull out my cardboard tomorrow, fix the angle of my IT relative to the floor like you suggested in post #14, and see what that tells me.Leave a comment:
-
If the arch was too far forward would the brick sitting on TDC (second pic) be level when held by the IT and contacting the arch on it's forward edge? It seems like it is on the proper plane with all the bricks in that row except those just adjacent with the arch, which is why I think it is droop - and if it is it seems to me that the only option is to get the top of those left and right bricks back on level with either fancy cuts or a bunch of mortar. I can't visualize how going out of round would help me. If I could cut a brick with the profile of the template and position it with my IT, the top of it would be in plane with the bricks on the opposite side and I would be round and level. There does not seem to be any way I can see to drive on without doing a fix now. What am I missing?Leave a comment:
-
I can't really tell from the pics. It may be the droop or the arch is too far forward. Neither is a concern for worry. I wouldn't use an over large mortar joint. It may take a couple or three courses to get it back to a true circle. I wouldn't sweat it. It will be as strong and perform just fine imo.Leave a comment:
-
I finished mortaring the bricks in my arch today and dropped the form by pulling my shims. The form fell under it's own weight - I was anticipating having to fight to get it out, so was happy how easy it was. The prospect of completing the last course over the top of the arch had me feeling pretty good. I placed a brick in position over my arch TDC brick and used my long level to see how well that brick aligned with the opposite side, and it looked good. Then reality hit - I had the dreaded droop. Gulf and others warned me about it and I was sure I was paying attention, but noooooo I am sort of screwed. My options are doing a teardown (probably not going to happen), slathering on quite a bit of mortar (would be about 3/4 inch thick at the max), or brick at odd angles to make up the gap. The trouble with cutting brick is I need more than 2.5 inches, so would have to either cut some pretty nasty angles (all four sides non-90 degrees), or cut a plug that would be 2.5 inches thick and either fill the backside (outside) with 2" or mortar or stick two bricks together and shave off an inch. I made a paper template (photo 4) showing the shape I need to fill - It's about 4" at the widest, and 3.5 max height. Anybody have a good suggestion? Would a big blob of mortar be better than a brick "sandwich" or a couple of slivers?Leave a comment:
-
Gastagg, you hit the nail (brick) in the head. On my sixth course most of my bricks are a different size. I plan on trying to find a size that will put most of my seams in the middle third of the brick below and pick up a little speed. I was looking at your build and it is very similar to what I hope to end up with - I'm going for an igloo with short brick vent and metal chimney. What product did you end up using for your chimney? Duravent or one of the alternatives?Leave a comment:
-
Looking good JR...one of the things that can slow you up once you get to the top is worrying a lot about joints lining up, so I was sizing and cutting each individual brick to avoid this for several courses, and it was going SO SLOW. I was making too big of a deal of it and began cuttings same-size bricks based upon diameter and slope and it started going much faster. After 5 days of curing now, the only crack I have is a hairline NOT in line with those joints that occasionally lined up, but is cracking right through brick and mortar. Keep up the good work.Leave a comment:
-
Last brick of the sixth course in! Can't wait to finish out the arch, and I'm going to have lots of work to do filling gaps. Like UtahBeehiver tells me, "mortar is your friend". I might have to make that part of my signature. Looks like a mortar bag is in my future.Leave a comment:
-
Yes, I'm pleased with my progress to date, but I'm hitting one of the parts of the build where things slow down. The cuts are getting more complicated as I near the top of the arch, I had to make a new end for my IT, and access to the dome is getting more difficult. It's funny but when you look at all the build pics they show the dome looking down from the top, so I had this mental image of almost bending over and doing the build. The reality is when the courses get up to and over eye level you have to climb up on the hearth, which can be problematic when working near the edges and makes for lots of climbing up and down. Good exercise I guess. I knew I would eventually need a narrower end for my IT, but thought that would come later. I had trouble with some of my smaller bricks getting access to mortar the edges. The new end gives me plenty of room, but the angle it holds the bricks is slightly different, so I won't begin using it till I start a new course. I went to Mutual Materials Friday and they were out of bricks! Must be lots of folks building ovens . Will pick some more up Monday.
Leave a comment:
-
Your build looks good JR. You must be happy with your progress. I used the castor type IT and you can get a true hemisphere by setting it below floor level (I removed a brick and replaced it with a timber block below floor level) and since I used a threaded rod it was simple to shorten it up as the dome progressed to get the desired height. One other point with IT's is that the rod that determines the distance should strike the L shaped piece that engages the brick, in the centre of the brick to keep the brick at 90 degrees to the pivot point. It will make a difference in where the bricks meet with the previous row.
Leave a comment:
-
Having the arm pivot point closest to the floors surface and axis of rotation at the centerpoint is the best way to make a perfect hemispherical dome. That is what I was trying to achieve, although I think all of the other variations will produce an oven that works. The forum owners had this picture which puts the axis of rotation at the floor but it is off center, so the dome will be a little wider than twice it's height, unless you make adjustments. Having the tool centered in the middle but above the floor (like with a caster) will make a dome that is taller than half it's radius. I was inspired by both Gulf's build (Mississippi 44") and also by jcg31, where it looked to me like they were going for optimum placement of both axis of rotation and location of pivot point. My pivot point is actually about 1/2 inch above the center of the dome, and at course 5 I did two rotations to shorten my arm by 1/7 of an inch (my threaded rod has pitch of 14 TPI). I'll do the same probably twice more and end up with almost a perfect 19.5 high dome. I really like the symmetry of a 39 inch oven - my door opening is also 19.5. and outer dome is at 48 inches, which fits my sheets of insulation perfectly.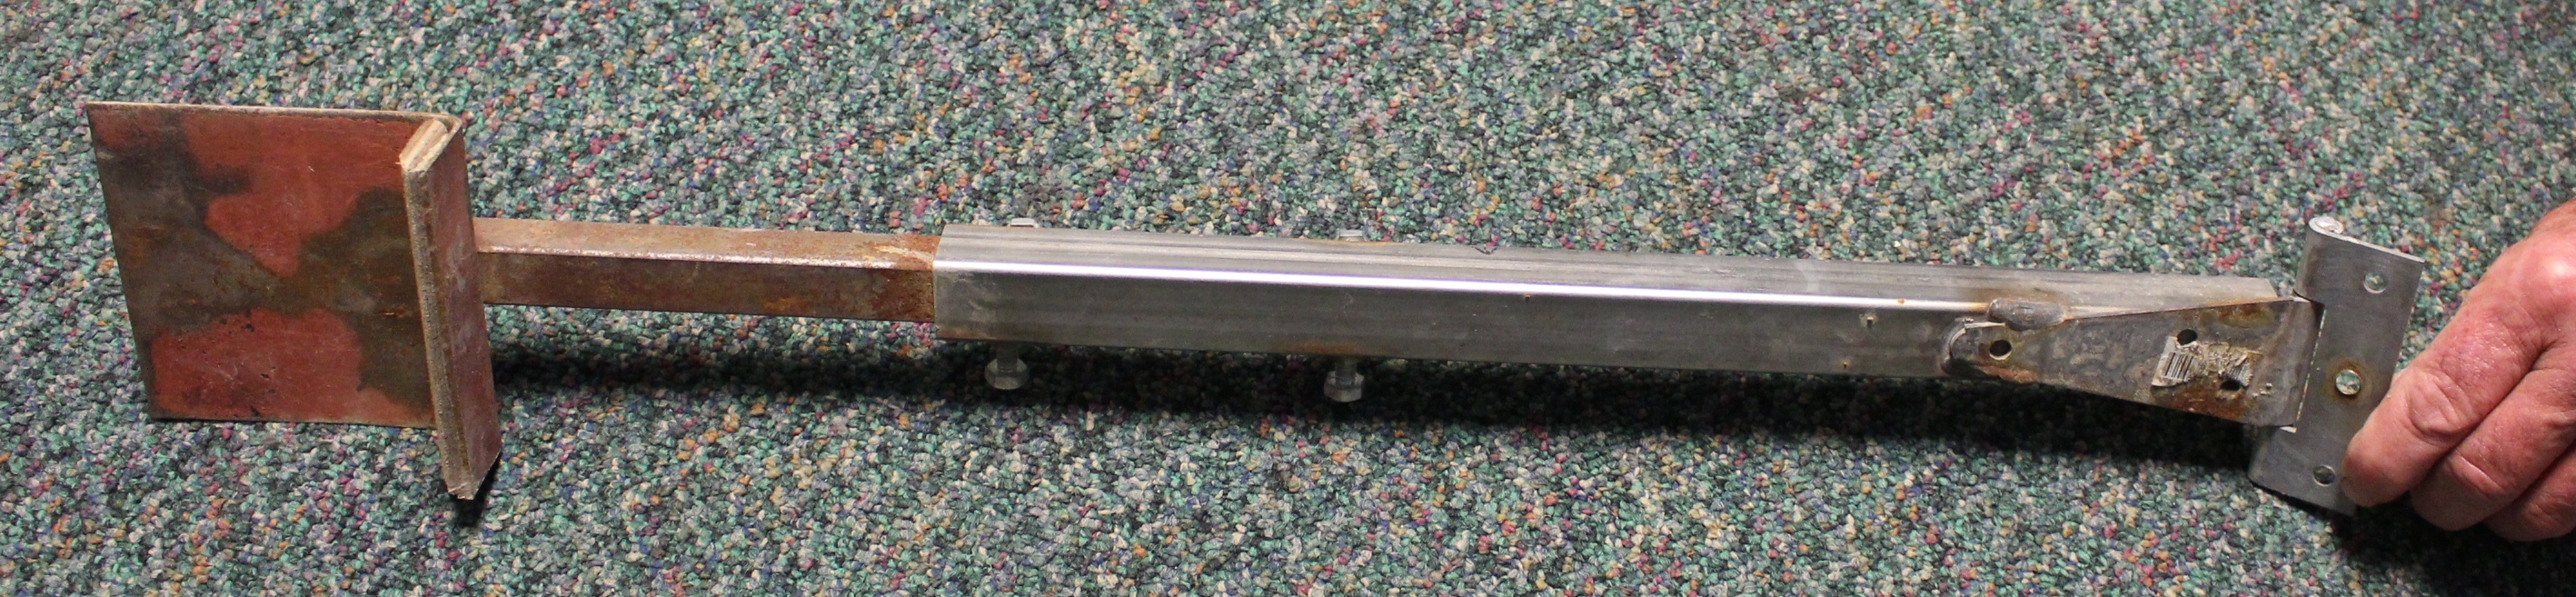 Last edited by JRPizza; 03-05-2019, 09:09 PM.
Leave a comment:
-
Great looking dome JR. I like your IT tool and how you used it for your inside arch angles. I also just built my IT and was unsure how to set it to proper 42" oven. I noticed your pivot point is right at floor level.
was that intentional. I have seen other members with the pivot point several inches higher than the cooking floor height and that's where im confused. Any suggestions on clearing this up for me.
ThanksLeave a comment:
-
Thanks. The inside of the arch is a little rough and might benefit from being hit with the grinder, but I might just leave it as is depending on how I feel when I get it done.Leave a comment:
-
Looks great! Inside seams are nice and tight. It's worth the time to get the cuts right. Great job on the arch!Leave a comment:
Leave a comment: