Announcement

Collapse
No announcement yet.

Looking for advice on how quickly I can finish my WFO

Collapse
X
 
  • Filter
  • Time
  • Show
Clear All
new posts

  • Looking for advice on how quickly I can finish my WFO

    Hi all,
    This is my first post and I hope that I am in the right subforum for this kind of post. All the information here has been very helpful in my project so far but as always, some questions remain.
    So far I have built a base and cast a concrete top that now holds a half finished 35" brick igloo oven. I have built up four five rows and finished the entry arch, too.
    The situation that I causing me trouble is that I am nearing the end of a six week vacation I spend at this place where I am building the oven. I was initially planning to complete it in this time and I will not return here for at least half a year. This is why I am still very motivated to get it done in the remaining 9 days.
    I know that this is a very tight budget but I would still like to hear your feedback on how I can speed things up. Especially the curing makes me worried.

    I am optimistic that I can finish the dome in the next two days, maybe even tomorrow. After that I would want to install the chimney and put on the isolation and stucco. The oven is outside without roof, so stucco is mandatory from my point of view.

    What is the worst case scenario for me if I start using the oven after a week of wait for the cement products to cure?

    I am aware of the obvious answers here and really looking for ways I can get out of this vacation with a pizza...


    Also, another question for the Chimney installation: I was not able to source a mounting plate for it, so I am planning to create a short chase from brick and place the Chimney in refractory mortar. Will this work? Is there a better way?

    Thanks for any feedback.

  • #2
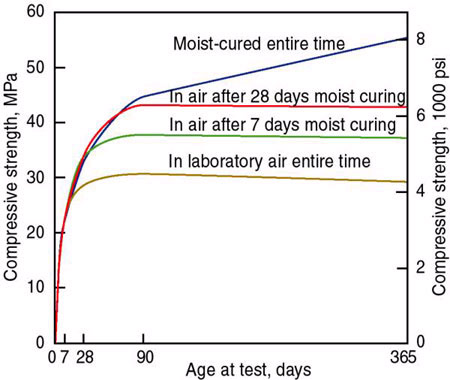
    A week will give you around 70% of concrete strength depending on ambient temps, but there will still be lots of contained water that can be a big problem if eliminated too quickly. You might be lucky to get away with it, I wouldn't, but who knows. Click image for larger version

Name:	P2160559.jpg
Views:	358
Size:	863.7 KB
ID:	411407
    Regarding the flue fitting it is a good idea to allow for some expansion of the pipe because it will expand faster than the refractory that surrounds it. You can wrap some cardboard around the pipe, about 1 mm thick, build up around it and remove the cardboard after it's set.

    Re lack of anchor plate, you can fir the flue pipe like this. It will also be supported higher up where it penetrates the outer shell. Do the cardboard trick again here and fill the space, after removing the cardboard with high temp silicon.
    Last edited by david s; 03-09-2019, 08:54 PM.
    Kindled with zeal and fired with passion.

    Comment


    • #3
      Originally posted by david s View Post
      A week will give you around 70% of concrete strength depending on ambient temps, but there will still be lots of contained water that can be a big problem if eliminated too quickly.
      Although it takes all my ability to restrain myself, I will probably finish building the oven and leave it unfired. The next visitors here will come in May, it will be upon them to light the drying fires then.

      Regarding the chimney attachment I will come back for confirmation later with some pictures.

      Comment


      • #4
        Hello Fstein , you can read my thread about the chimney if you have doubts like I had at the moment, maybe you can find some useful info in there.

        I leave you the link to the post.

        https://community.fornobravo.com/for...ing-refractory

        Regards

        Comment


        • #5
          Originally posted by cmendezg2000 View Post
          Hello Fstein , you can read my thread about the chimney if you have doubts like I had at the moment, maybe you can find some useful info in there.

          I leave you the link to the post.

          https://community.fornobravo.com/for...ing-refractory

          Regards
          Thanks for the link, interesting read!


          I have now attached the Chimney like David proposed and will build up the insulation around it for support.
          For the insulation I wasn't able to source ceramic blanket, vermiculite or perlite. However, as I am located on an volcanic island, airy gravel type material is readily available. I used it in a mix with cement as the hearth isolation and will use it as the isolation for the dome of too. I will do about 4"/10cm of isolation and then a cement rendering on top of that.
          I also attach some pictures.

          Should I put the isolation mix directly on top of the dome? Should I have a separating layer? (aluminium foil?)
          Do you think that the isolation method will work?
          Attached Files

          Comment


          • #6
            Some more pictures
            Attached Files

            Comment


            • #7
              Some more questions regarding the insulation:
              Should I use some glass fiber isolation instead of ceramic fiber?
              I am a little uncertain about this, as I will not build a roof over the oven and I am afraid that the mat might soak and hold water when the oven is not in use.

              Is lime recommended in the cement mix for the insulation? What ratio is good?

              Another concern I am having is thermal expansion. With a fibrous isolation of some sort, there is room to absorb the expansion of the dome.
              With the concrete mixture isolation, there is a rigid compound from the inside of the dome to the outside. Will this increase the risk of cracks?

              I hope to do this step soon, so every little comment helps me a lot.

              Thanks!
              Last edited by Fstein; 03-12-2019, 03:44 AM.

              Comment


              • #8
                Both ceramic fiber and glass fiber insulation batting can absorb/hold a lot of water. The fiberglass insulation is not nearly as efficient as the ceramic fiber and in fact will break down at much lower temperatures than the ceramic product. Those are the reasons that it's important to provide some sort of outer enclosure to make the dome waterproof (or realistically, water resistant ).

                Lime is added to the homebrew mortar because it will not degrade at higher temperatures during oven firings as the Portland cement does. With much lower temperatures on the outer portion of the dome, the lime is not required...but it certainly won't hurt anything if you're looking to get rid of some that you have on hand. Just make sure that you are not adding more than the Portland cement portion of the insulation mix. Normally, that dome insulation mix would be somewhere between 8:1 or 10:1 (perlite/vermiculite:cement), so adding 1 part lime (8:1:1 or 10:1:1) to either of those mixes should be fine...again, don't buy lime special for this since it is NOT required.

                You are absolutely correct that some sort of expansion layer between the dome and the outer final coating is essential to eliminate cracking. The dome IS going to expand upon firing and if there is no flexing material between the dome and the outer layer...well, you will have cracks appear in the outer layer. Perlite and vermiculite insulating concrete mixes are soft and provide a bit of cushion to absorb the expansion. I'm not sure if your insulation material will have the same property. Putting a thin layer of fiberglass insulation over the dome and then adding your insulating concrete would work to create an expansion space and should work to protect your outside render.

                The problem is that you need to let the moisture contained in your build escape during the curing process...and it's going to take more time than you've got remaining. Even though the current recommendation for the curing process is to put on the outer insulation batting (or insulated cement) first, in your case going slowly through the curing process for your remaining time is your best option (IMHO). Then, cover your dome and leave instructions for the next occupant to uncover and "be gentle" (or Do Not Touch! ). When you return, you can complete the outer insulation, proper "repeated" curing, and final outside render. You certainly can use the retained heat of your oven during the partial curing process for some good eats before you go......and the thought of your first pizza next stay will carry you through.

                p.s. I used aluminum foil and diatomaceous earth between my dome and perlcrete outer insulation layer. The foil used to be recommended to add "slip" between the dome and the outer rigid insulation layer. The diatomaceous earth was used to "fill-in" minor cracks and provide a little expansion...again, old school method.
                Last edited by SableSprings; 03-12-2019, 10:47 AM.
                Mike Stansbury - The Traveling Loafer
                Roseburg, Oregon

                FB Forum: The Dragonfly Den build thread
                Available only if you're logged in = FB Photo Albums-Select media tab on profile
                Blog: http://thetravelingloafer.blogspot.com/

                Comment


                • #9
                  Originally posted by SableSprings View Post
                  The problem is that you need to let the moisture contained in your build escape during the curing process...and it's going to take more time than you've got remaining. Even though the current recommendation for the curing process is to put on the outer insulation batting (or insulated cement) first, in your case going slowly through the curing process for your remaining time is your best option (IMHO). Then, cover your dome and leave instructions for the next occupant to uncover and "be gentle" (or Do Not Touch! ). When you return, you can complete the outer insulation, proper "repeated" curing, and final outside render. You certainly can use the retained heat of your oven during the partial curing process for some good eats before you go......and the thought of your first pizza next stay will carry you through.
                  Thank you so much for your response, highly appreciated. Right now I am leaning towards applying all outer layers including the outside render, over the next couple of days and then wrap it in a tarp cover and leave it until may.
                  I think if I don't make the cover too tight, et will still slowly dry out over this period of time. I would then instruct the next occupants to do some light "curing" fires and get it going..
                  What do you think?

                  Comment


                  • #10
                    If you finish the enclosure render before the cure, obviously you will have a lot of moisture trapped. Several of our members in tropical Australia have noted that even covered, their ovens will absorb significant moisture from just the humidity of the season. I don't know the climate of your area, but just covering may not allow the oven to dry much. One additional thing you might add on your oven if you do render now, is a breather cap. I'll put a link to the breather cap used in the auto industry at the bottom, but basically you can just take a short piece of tubing or pipe and set it into the insulation area. Coming out of the render, add/construct a 90 degree down turn to the open end. This allows trapped moisture a pathway out while preventing rain from coming in. Also, if your chimney is in two sections, remove the top one and put a bucket over it to prevent water from coming down that avenue. If you can make the chimney lower by removing a section, it makes putting a tarp over the oven a bit easier.

                    Be aware that no matter what you tell people, they will probably make too hot a fire and cause damage to the oven as the steam fights to find a way out of the solid render coating.
                    Again, personally I would buy/leave them some adult beverages NOT to use the oven until you have completed the cure in May.

                    The upside is that the dome structure of the oven is incredibly stable and having some cracking on the inner dome is inevitable and cracking of the outer render is easily repaired. You will find that almost whatever you do, if the oven isn't used regularly, it will need some "re-curing" to get it back to optimal efficiency. Relax and enjoy the last few days of your stay...

                    Here's the link to a dome breather cap install and discussion:

                    https://community.fornobravo.com/for...699#post406699
                    Mike Stansbury - The Traveling Loafer
                    Roseburg, Oregon

                    FB Forum: The Dragonfly Den build thread
                    Available only if you're logged in = FB Photo Albums-Select media tab on profile
                    Blog: http://thetravelingloafer.blogspot.com/

                    Comment


                    • #11
                      Mike, thank you! I am a big fan of the breather solution, especially because the oven will stay unfired for longer periods. This way it can be re-cured after a longer break with the breather open and then it can be closed for the "real" use. Nice and simple, I like it.

                      You are talking about a pipe, I saw that pvc fitting in the other thread that was nice. I will see what I can find tomorrow.

                      Comment


                      • #12
                        Looks like you have rattled off a good looking oven in such a short space of time. Many of us on here take months and months, years even to get to the stage you're at. And by the looks of things you look like you have just used hand tools to cut your bricks in half. Most on here cut each brick to fit. I never - mine is life yours and its hard going with all the mortar gaps involved so well done lad. One thing I would say regarding the curing .. looking at your oven, there isn't much staggering of the joints between brick courses. Whilst this isn't of critical importance, because as sablespings said - the mechanical structure of the dome shape etc will keep a good strong shape, even without much mortar. However...if you try rushing it, because there are obvious vertical striaght lines of mortar between courses, then if you go too hot too soon it will likely crack and will need a bit of grouting to sort.
                        Thus, getting your next batch of folk in the appartment to take care of 'your baby' - they won't have the same care and attachment to it as you, and will most likely just ramp it up too fast, I ended up struggling to hit big temps, so started slow and ended up doing many consecutive 'medium' fires. It STILL cracked but just on the outside, which I repaired and moved on with. So take it easy on it. With the summer approaching the natural warmth of the island will be warm enough to let it naturally cure. If anything - get the guys to remove the tarps and let it air dry in the 30c temps. Then, when you return the moisture content will have dried out as naturally as loads of us here would have dreamed could happen!!

                        Comment


                        • #13
                          Thanks for the feedback on the build so far. I am happy with how it all went, even though it could have been a little more tight as you said.
                          The mortar doesn't fill the gaps all the way to the inside of the dome. Should I fill the gaps from the inside? I figured, it will most likely only flake off and the bricks will work just fine as they are.

                          I only used an angle grinder for halving the bricks, but later found out that I didn't even need to score them first. Just a clean whack with a chisel and a medium heavy hammer were enough for a rather clean break.

                          I'm not too happy about the staggering, either. But it wasn't really possible any other way because the reduction of diameter with ech row made it so that the joints would eventually align again. I tried starting off each row with a half brick overlap, though. I kinda like the Fibonacci look of it

                          Tbh, I don't even care about cracks in the done itself. As you said, it will hold. I mainly care about aesthetics and water resistance. I am only worried about big cracks in the hull.

                          Comment


                          • #14
                            Don't rush it. You most likely know yourself that if you DO (because of this tight,self-imposed timescale) then its almost certain that months/years down the line you will be left thinking "I wish I'd just.... If only I'd done...." etc If you haven't filled those gaps too thoroughly then do so. And, its not all pleasant like...but crawl inside and clean up and grout every join so that its got a good smooth and sealed join. Much better do that because its probably more likely that bits of mortar will fall out of a splodged mortar joint than a neat sealed one, I think. Then, once its done its done!! I HATED doing that job to be honest. I built a wooden platform and used that to crawl inside. Took a good couple of hours.
                            Had to laugh because I see you did EXACTLY same as me regarding the inner arch and never left a reveal for the door to hit against, but instead, staggerd the arch down! I kinda rushed through things a bit myself and just threw caution to the wind. Most things are fixable. But get those joints sealed up so smoke doesnt start escaping through gaps!! Mine was all pretty mortared up well but STILL managed to crack - but only externally.

                            Have to say that its a very neat job you've done though and I love the compactness and cyclindrical form of the base combination

                            Comment


                            • #15
                              The “airy gravel” you describe sounds like it is probably pumice which is a good insulating material. The problem of applying it as a wet mix directly over the dome is that you’ll have a lot of water right next to the hot dome bricks. The trick is to do it in layers no more than about an inch and a half thick with at least a week drying after each layer. The pumice should be broken up so no grains are bigger than 1/4 inch, then mixed with about 8-10:1 with cement and just enough water to make a workable by hand mix. A little powdered clay added to the mix will help. Fibreglass batting insulation is not a good material to use because it is too light and springy. It compresses too much. I used it for my first oven and although it insulated ok and on dismantling the oven after three years to build a larger one, it had not deteriorated at all.The pumice mix will work fine though provided you make the mix fairly lean as it has some give. I hope you insulated under the oven floor.
                              Kindled with zeal and fired with passion.

                              Comment

                              Working...
                              X