 Tweet
Tweet
Found the spiral chimney


-
Oh, ok thanks for finding the photo for me, I see what you mean by the skills required for building something like that. My design is much simpler in a way as I will place the bricks vertical trying to make the circle. I have a slight concern about the stability as the bricks I found are quite small but it’s a risk I am willing to take. If you have any suggestions regarding extra strength in building these bricks I would be very grateful. I will be using refractory mortar that I have lots left and could add more Portland cement and lime if necessary. Today I did a dry run with the first course of bricks..
Attached FilesComment
-
-
The vertical bricks are going to be a inherently weak design with no stagger bond (alternating 1/2 brick/full brick) You will also need to account for the expansion and contraction of the steel chimney inside.Comment
-
Adam,
I thought long and hard about the exact same round chimney design that you are attempting. That was an option that I was exploring if I needed to extend my chimney heighth. I'm assuming that you like the brick look and want to continue that same look on up to the crown of your ss flue. There are several options if, you think think a little outside of the box. Like I did on my dome, I thought about a brick veneer. That is thinly sliced bricks like those used for flooring. I intended to get a larger circumference galvanized duct pipe and attach galvanized mesh with spacers and long sheet metal screws I was going to form a strong surface with 3/4" stuccco and glue the thin brick to that. A little grout and the look of a brick chimney would be there. The space between the ss flue and the outside galvanized pipe could be filled with a layer of blanket insulation or dry filled vermiculite. A double walled insulated pipe would work fine for this, but the single wall that you have will let you choose the largest round duct that will fit on your existing chimney base.
I will elaborate more, if needed, and you are interested in this option.
Joe Watson " A year from now, you will wish that you had started today" My Build Album / My BuildComment
-
I chose a single wall pipe because I didn’t have enough space on my base and I was planning on leaving a small space around the pipe ( 0,40” ) and fill it with perlite and cement 10:1. Then build the bricks around that. All this process going on at the same time. I know that the space left between the flue pipe and the bricks is not enough for insulation but I don’t know if I can push it much more, maybe I could double that to 0,80 “ which in that case will make the round brick base arrive flush with the rectangular base underneath.
The option of putting an extra pipe ( galvanized or steel ) around the center one could be useful for me to function as a guide for building the bricks straight going up but I didn’t quite understand first if the bricks can actually stick with mortar on the steel pipe ( can someone use mega epoxy or is it not the case ?) and second if it’s better for them not to touch the steel pipe at all because of the difference in expansion. If the second reference is the case, I wonder if I do put a second pipe then because of the gap between the first one it shouldn’t get as warm in order to affect the bricks.
As you can see I am quite lost on this adventure at this point but I won’t give up . Please have a look at some further photos I am attaching including my confusing drawing ..Attached FilesComment
-
-
Thanks, tomorrow the weather should be fine so I will start building the chimney and hope for the best ..Originally posted by zoolanderComment
-
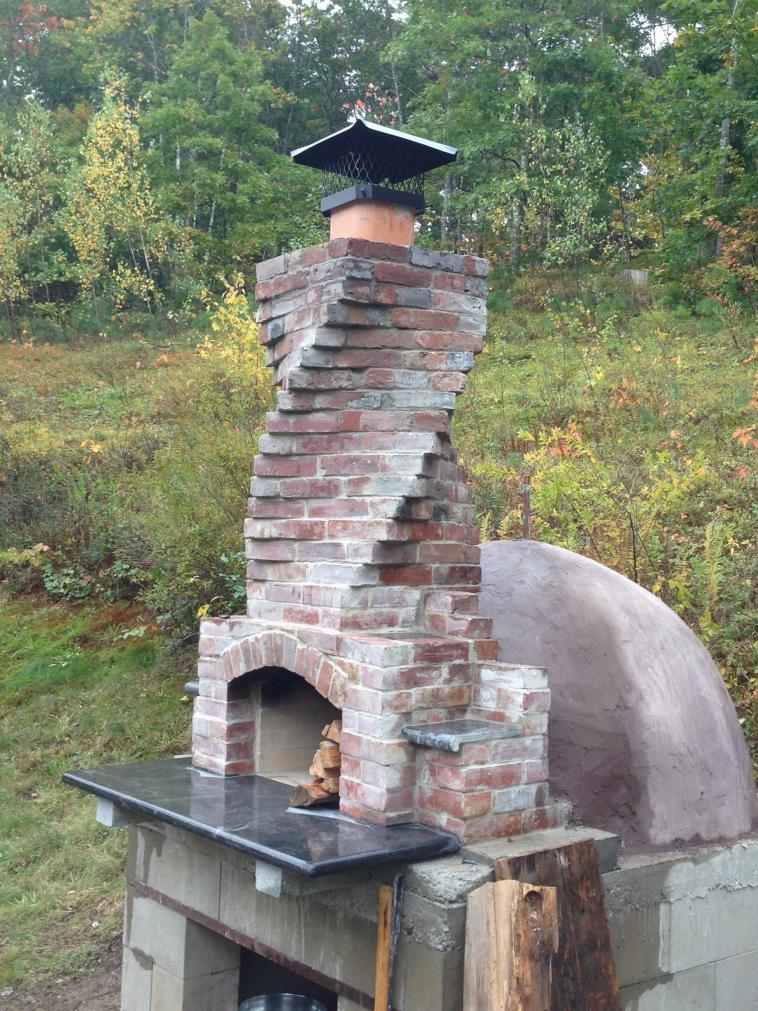
I am almost finished with the chimney, ( only the top cover is left ). I tried to keep the whole weight to the bare minimum in order to avoid the buttressing after all. It was a really hard work cutting those bricks but at least I managed to achieve what I wanted ..Attached FilesComment
-
-
Very nice! It looks like it will blend in great with the old Greek archetecture.Joe Watson " A year from now, you will wish that you had started today" My Build Album / My BuildComment
-
This is pretty sick in design...I love it great job!My Build Pictures
https://onedrive.live.com/?authkey=%...18BD00F374765DComment
-
Well done Adam, that flue / chimney certainly has a wow factor.
I love the way you decided to do it anyway and not worry about the buttressing, awesome job Mate
Cheers DougComment
-
Thank you Doug, I don’t have any experience in building and don’t know how things will hold up in time but I had an artistic education so at least I am trying to do what pleases me aesthetically. This wood fired oven is a journey and we men especially are like kids, we love to play, experiment and enjoy the making process..Originally posted by Karangi Dude View PostComment
-
Can anyone tell me if it’s better maybe to make a cut with my angle grinder around the dome where the granite blocks are touching the dome ? It could be a problem with the thermal expansion i suppose .. any ideas ?Attached FilesComment
-
-
Adam,
Sorry for the late reply. Assuming that is an uninsulated dome, yes, definately! You need as much distance as possibe for insulation. If, what is pictured, is blanket insulation covered by render/stucco....no worries imo.Joe Watson " A year from now, you will wish that you had started today" My Build Album / My BuildComment
-
Ok I will cut the parts around it as what you see it’s just a 3mm coat of refractory mortar that I’ve put around the dome. Which in fact today I had to remove it cause I started curing the oven and I noticed various cracks around the dome so I wanted to see well what was going on.Originally posted by Gulf View Post
I noticed even some smoke coming out from some cracks. Is that normal to happen or did I do something very wrong ? What do you suggest I do now put some refractory mortar to fill in the cracks ? I was planning on keeping the WFO burning the whole day today slowly and tomorrow fill in the cracks and put the insulation on. Is that ok or do I need to wait more in these passages ?
thanks for the guidance
Attached FilesComment
-
-
I installed my blanket insulation, a vermicrete layer, and the stucco before starting the heat drying process. I still have cracks. But, there was no turning back for me. Imo, the only ovens that don't have cracks are those that haven't been fired. You don't show a pic from the inside but, I bet it doesn't look that bad. Remember, the dome can't fall in on itself. I have been firing my oven for 7 years. My advice is to insulate, take your time on the further drying fires, and enjoy your oven .
Joe Watson " A year from now, you will wish that you had started today" My Build Album / My Build
.
Joe Watson " A year from now, you will wish that you had started today" My Build Album / My BuildComment
Comment