If this is your first visit, be sure to
check out the FAQ by clicking the
link above. You may have to register
before you can post: click the register link above to proceed. To start viewing messages,
select the forum that you want to visit from the selection below.
The first CAD of the arch intersecting the dome at the top is definitely something I missed when placing the arch. Was it the CAD program that recommended the 620mm distance?
I think lots of people miss it, or at least did in the past, which is why there were earlier builds that had to compensate for the arch and dome not wanting to intersect properly. If you go back and read the thread I linked to below, you can see I was only thinking of the lower intersection until Gulf helped me understand that the arch intersects the dome continuously but variably from bottom to top. Yes, I got the 620 from my cad sketch. When you make your cardboard layout, and have your arch form built (both things you should do before you get too far along) you can place the front of the form 620 from your oven center and use your IT or a tape measure to see how a top dead center arch brick will be "within" the dimensions of your inner and outer dome diameters. That is when you will know for sure you have it right. I can also help you find where the center of the oven should be on your hearth, but you will want to put your oven template on the location to double check. I always liked using models at work, but never trusted them enough to not do a spot check
Totally stuck on hearth size, and forum problems are keeping me from looking at some images that I think might help me. I have laid out a 70X70 corner base, but space is at a premium so would like to shorten to a 62.5X62.5. I have a sketch but am not sure about how much room the vent/landing need. I am
Thanks JR, and for the plans - will need to find a few spare hours to have a crack at FreeCAD. Having a template to start with certainly make things easier!
Perhaps creating a dropbox account, making it public and putting the complete plans for your 39" there may be the way to go. Others can add their CAD plans to it over time to have a 'gallery' of pre-done plans for members to leverage.
That said, half the fun is actually working thru and understanding the intricacies of the finer details. Learning a new skill like this is always useful (I do enjoy using the graph paper, pencil and drafting set however - something therapeutic about it)
Russell, believe it or not - materials are cheap compared to the labor for someone to do it! And being in Canberra, we tend to pay a premium of 20-30% on top of pretty well anywhere else in Australia. I'm going into the details of my build, calculating as much as I can, as I plan to do a run to either Sydney (3 hours drive) or Melbourne (8 hours drive) on a supplies run. The cost of one trip like this will save me more than that in the saving on the price of materials. Hopefully I can tie it into a weekend getaway with the family to justify the trip to the fun sheriff. I would do a back-load on a truck, however they usually require you to unload when it gets to the destination. Unloading over a tonne of firebrick etc by hand in a hurry doesn't appeal to me and will probably lead to more damaged bricks than it's worth.
Today's task is going through and developing a financial model for the materials I will require now the design is 'roughly' there. Quite a few builds have found the 39" or 1000mm WFO is an optimal size when it comes to procuring materials. Want to also look at the impact of using 50mm and 75mm firebrick in the construction. I have done this for the foundation, stand and concrete hearth and it already tops $1,000. Scary.
I started out keeping track of my costs, but got tired of tracking every nickle and dime (more like $10's and $20's) since I was always running to the supply store for a few more bricks or a new blade (or something else I didn't have). I also think my original estimate was off somewhere between 2X and 10X. Hopefully the numbers won't be so high as to scare you off - the oven and outside area you are planning is a lifestyle choice and as long as you don't move (or divorce) it will be worth everything you put into it in terms of enjoyment.
Hey JR, playing with your plans - sweeet... although I think I get a handle on it - then it doesn't play nice lol...patience
So, edits i'm trying to make:
Reduce the inner arch protrusion from the dome to 50mm (2") - currently it's 66mm (2.5")
Change to a 75mm (3" reveal) rather than the current 50mm (2" reveal). This givs me a total outer vent ID of 650mm
The outer vent bricks will overlap the inner arch bricks by 25mm (1") - stuffed with rope/sealant.
Assuming a TB of 10mm (3/8"), points 1 and 2 will significantly reduce the amount of beveling/notching into the outer vent brickwork for the overlap, more brick (stronger) and wider (more room to work the oven). Doing this because I think I can now see from the plans I have the space to do it.
Between points 1 and 3, this will gain me an inch or more wriggle room at the front of the oven.
I see what you mean by having more 'landing' to work on now. Will definitely factor in some formwork to pour an arc'd extended landing of 150-250mm. I wont include this in the hearth as this section is non weight bearing and will affect the head room I have to get in and get wood from underneath it. I can see my 4 year old (6-7 by the time I'm probably done) getting this task ....
Fine tuning and working out those distances if you have time would be super handy as a starting point for a cardboard mock up.
I really like the neatness of the hemispherical design...something about it appeals...
I'm going to going to be putting the walls onto the insulation - not the oven floor and leaving a 1/8" gap between them as recommended (stuffed with cardboard/taped over).
Using a 75mm (3") firebrick floor + some 7mm (1/4") form ply over the top to mount the IT etc that works out to be an 82mm (3.5") floor height. So I would need to match this in a 82mm high sailor course - before I start the hemispherical dome walls. It would also eliminate any gap at that point. Is this the right /recommended process? Having this first course level with the floor will mean no IT adjustments throughout the process?
Also, with an opening at 63% of the dome height at 345mm - should I make the vent opening 690mm to keep this consistent? Thats going to be a big change to the CAD plans! The alternative is I need to do couple flat courses to 95mm, then start the hemisphere on top...hmmm
......................I do enjoy using the graph paper, pencil and drafting set however - something therapeutic about it.....................................
I can relate to that Fnbroken. I do see the benefits of the new age tools. I used cad viewer extensively where I was employed. I even downloaded a free version to play with for the oven but, I let it lapse. Being old school, I keep going back to my old drafting board. One thing I learned years ago, is that any project 8' or under is easy to do in full scale for the final approval. I've drawn out a many of a project on the back of a piece of 4'X8' paneling.
I got the idea for this trick from my old employer. To upgrade in position (and pay) we were required to draw and explain the equipment and process for a pulpmill, one area at a time, from memory. They had dry erase boards placed around the administrative offices. It was required that you do this in a set amount of time. Being a slow country boy, I figured that I would need to have extra practice. So, I went to to one of the big box buiding supplys and bought a couple of sheets of the cheap white bathroom/utility room panel board that they had. It was about 10 bucks a 4'X8' sheet then. I think that it is a little over $12 a sheet now. Practicing at home on my off time, I aced every one of those drills.
A few years later, I had given those boards to a young coworker who was upgrading. I still had a few dry erase markers. So, working on the back of a chest type freezer, I was able to consult and verify (full scale) what a newbie builder was seeing in cad . I just had to make sure that I had cleaned the freezer before SWMBO got home .
My point to all of this, is that your case, (especially a corner build) to make a full scale template. It can be done on scrap card board box or poster board spliced together. You can set that template on top of your stand and see in full scale, if you need to make adjustments.
Joe Watson " A year from now, you will wish that you had started today" My Build Album / My Build
Without a doubt! Absolutely critical and will do one for sure.
In reading many of the build threads, it is most often those that skip this step that end up with issues further down the track.
I was planning on a few templates (cardboard is one thing we can get free around here) - floor plan (marking out the dome walls and floor, inner arch, TB, outer vent), dome profile, inner arch, outer arch and a 'brick'.
I would trim these to fit, then mark out on formply etc when finalised.
.......Fine tuning and working out those distances if you have time would be super handy as a starting point for a cardboard mock up.
I was just beginning to edit my reply. I see from your post while I was composing mine that you are already on top of this. You are in good hands. And, your willingness to do your own research makes this one easy "to hit out of the park" .
Joe Watson " A year from now, you will wish that you had started today" My Build Album / My Build
The devil is always in the detail - research and planning is one thing - but once you get started and find you don't have the skills for key elements or it takes longer to get into the swing of things than you thought - all plans can come undone. Whilst i *think* I have planned this thing out - each stage I can see has its own challenges and will probably be subject to further refinement or change.
Plus the wealth of knowledge and innovation here will keep me on my toes
lol...I don't think I have ever completed a project in line with the original plans...and I hope to leave this house 'feet first' if you know what I mean.
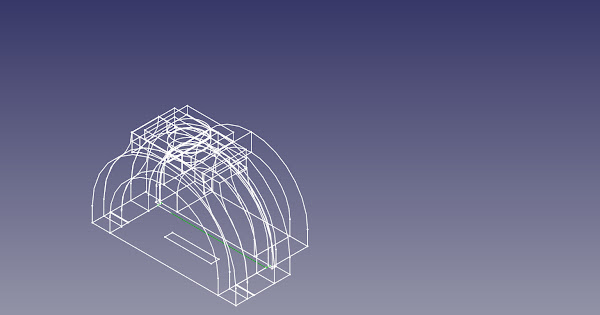
So, got to playing with FreeCAD a little bit too much today.... Big shout out to JR who sent me a number of plans that enabled me to pull them apart, understand and reconstruct my own...
A few images of the components - even got down to laying out the firebrick floor in a herringbone pattern / calsil etc.
Will try something a little harder tomorrow and model the serpentine flue and inner/outer arch forms. You can print these images off on full size accuracy - might take a few pages and a bit of stick tape - but hey! cardboard forms done!
When I built my oven, which is still not completely done after 5-6 years, there were design or material changes along the way but the core design remained the same. Although an engineer by schooling and used computers daily in my real work, I did most of my planning with a #2 pencil and grid paper (sans the slide ruler - LOL). Some people are CAD nerds like JR but I am not. Good luck. You may want to contact Colin (aka) as Oasiscm if you head down to Melborne to see his oven or get resource info. I guess material and Labour cost are just plain costly in the Southern Hemi. Some the Aussie builders have been successful in finding materials via your version of Craiglist or classifieds but it takes time.A wet saw might be something to start looking for.
Thanks Russell - check my post that popped in just before yours - I think I'm hooked on FreeCAD lol...
I have a couple searches with notifications set up for any brick saw that might appear in a number of classifieds - hopefully something reasonable will turn up before I really need it.
I was about to post a general query to the Aussie folk about there most recent experiences with obtaining materials at reasonable prices....With things like this, specialty in nature, you rarely find sales or really good deals. I'm basically going to look for bargains where I can up until need it to progress, then bite the built and get what I can as best I can.
Glad you are having fun with the Cad program. We had a saying at work "trust but verify", which is a good philosophy with using a modeling program. I was able to figure out exactly where on my hearth I should have the center of my oven, then put my cardboard mockup at that point just to make sure.
By the way, I think I might be the "newbie" that Gulf was talking about in his post above. He helped me so much in understanding the geometry of the oven - I would probably still be scratching my head if he hadn't been willing to help me out
Next step is to put the foundation/stand in and join the each of the component parts to create 3D images which I can color code and make it all easier to see. This will allow me to fit 'bricks' into the structure - hopefully getting me an accurate count of material requirements etc...
 Tweet
Tweet


 .
.


Comment