If this is your first visit, be sure to
check out the FAQ by clicking the
link above. You may have to register
before you can post: click the register link above to proceed. To start viewing messages,
select the forum that you want to visit from the selection below.
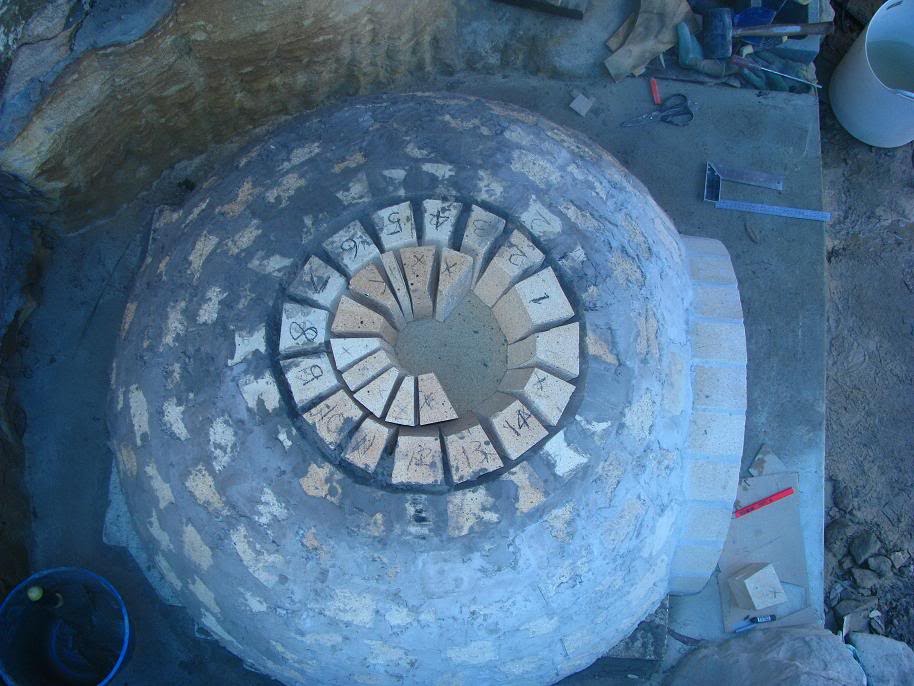
I went to 1/3 bricks on the 9th chain and persisted with using the dome tool to hold the bricks while they set. I also made a couple of hooks that would help hold them in place. Basically just 2 pieces of ply wood screwed together to form an L shape which could sit upside down with the short side of the L on the top of the brick. The long side sat down the outside of the oven and had some weights hanging from it. They took 5 minutes to make and worked pretty well.
I then used a sand form to finish the dome. The bricks were cut and sat in place. For the final brick of each chain I cut a template of the shape out of cardboard and transferred that onto a brick.
The outer row was mortared on the outside edge. The rest of the bricks were just resting in place. The final 2 pieces wanted to sit together so I held them apart with my pencil until I could get some mud in there.
I then mixed up a very wet mix and just poured it over everything and worked it in with my hands. I think doing it this way was much easier than using the dome tool.
As you can see from the photo below there was not a lot of room to work around most of the oven.
Last edited by Sharkey; 01-04-2018, 09:41 PM.
Reason: Photobucket removed
Sharkey.
I love cooking with wine. Sometimes I even put it in the food.
The next morning I was up early to remove the sand form and see what it looked like inside. I think it turned out OK. Just a couple of gaps to be filled and a bit of cleaning needed. The final plug was roundish, so that's a good sign.
It?s hard to believe you can make something so round out of square bricks.
I have to have a couple of weeks off from building but my head will still be busily thinking about the outer arch, vent, chimney, insulation, curing fires ??.
and pizza!
Thanks to everyone on this forum for helping me get this far.
Last edited by Sharkey; 01-04-2018, 09:44 PM.
Reason: Photobucket removal
Sharkey.
I love cooking with wine. Sometimes I even put it in the food.
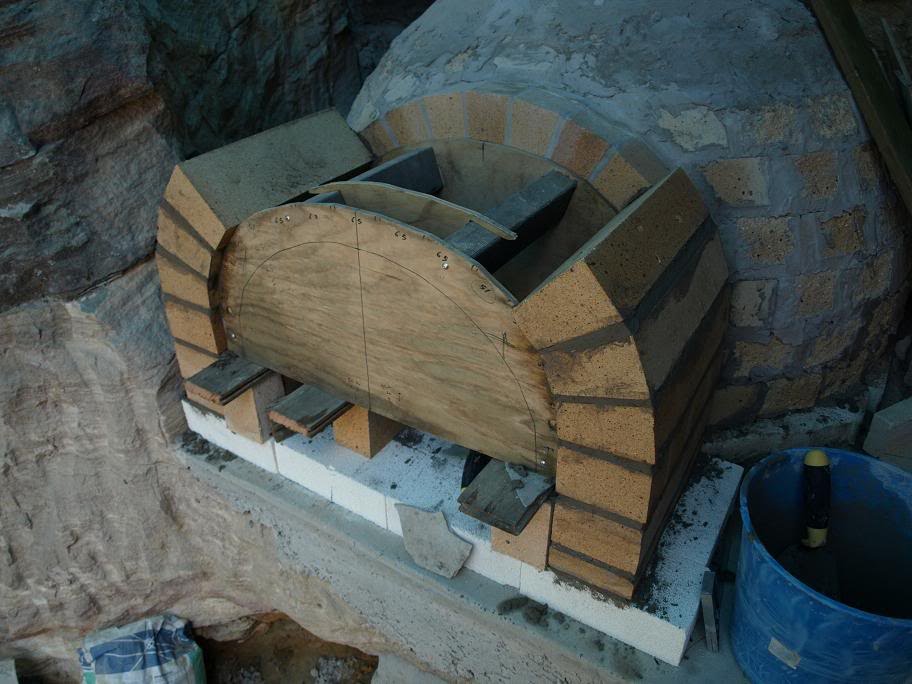
Finally I have had a chance to get back to the build. During the last few weeks I put a lot of thought into the vent design. I wanted something that was a smooth transition but as I don't have a proper brick saw I wanted to do as few complicated cuts as possible.
So we came up with this. I had bought extra long, tapered bricks for the outer arch. We laid the fist 6 on each side as normal.
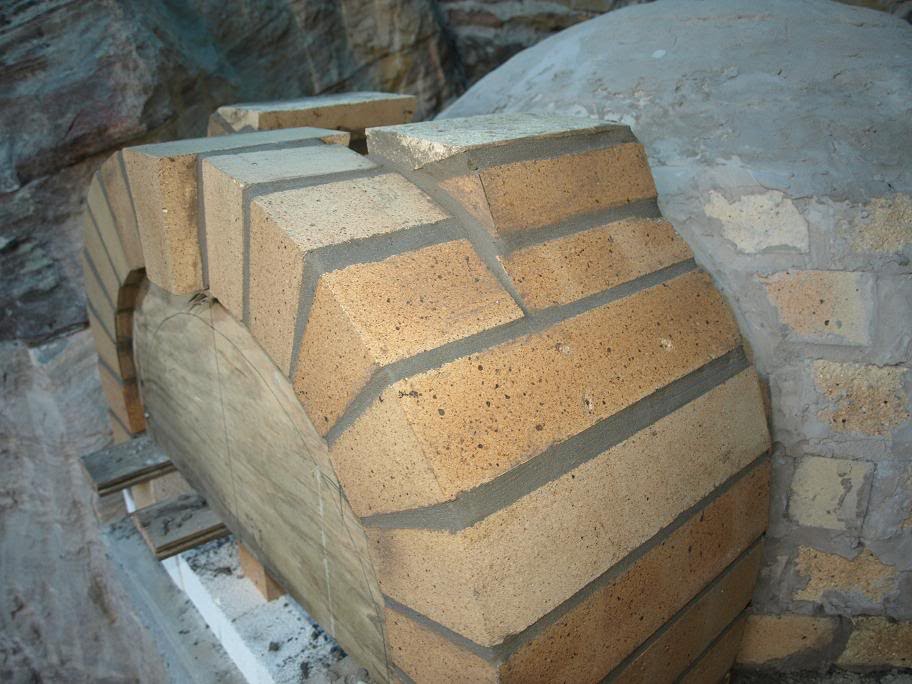
Then for the next 2 bricks on each side I cut about a third of each brick off. This was used in the outer arch as normal and the other part (the two thirds bit) was laid with the taper reversed to create the vent. This created a smooth transition on both the inside and outside. In the photo below, the 2 pieces above the last full brick actually come from the same brick. I then only had to cut a tapered bit to finish the vent off flat on the top and 200mm (8?) wide.
I pulled the form out the next evening when I got home from work and cleaned up the excess mortar. A couple of joints need a bit of patching but I am pleased with the way the vent looks from the inside.
Now I have to cut the bricks to sit on the inner and outer arches for the front and back of the vent to square everything off and tie it all together. These will be the only compound cuts I have had to make.
I feel I am finally getting close to cooking now.
Last edited by Sharkey; 01-04-2018, 09:47 PM.
Reason: Photobucket replaced
Sharkey.
I love cooking with wine. Sometimes I even put it in the food.
Another weekend and I'm working on The Oven again. This is the first time I have had two weekends in a row for a long time but I am so close to cooking I can almost taste it.
I managed to cut and grind the four bricks to level the top of my arch / vent. These were the most difficult bricks to shape in my entire oven but I wanted them to interlock with the rest of the vent and finish with a nice 200mm (8 inch) hole.
I then cut 12 bricks and laid them to add a bit of height to the vent.
Next day I lit a small fire to see how it worked. I had finished the dome a month or so ago and had been heating it with halogen lights and heat beads in the meantime. I was very pleased to see the smoke come out under the inner arch and go straight up the vent. I took a longish exposure photo to try to show this so please excuse the slight blur of the photo below.
And here you can see the smoke all going where it should. I am still going to add a double skinned stainless steel flue. I need 3.6 metres (12 feet) to get the smoke above the rock.
Last edited by Sharkey; 01-04-2018, 09:53 PM.
Reason: Remove Photobucket
Sharkey.
I love cooking with wine. Sometimes I even put it in the food.
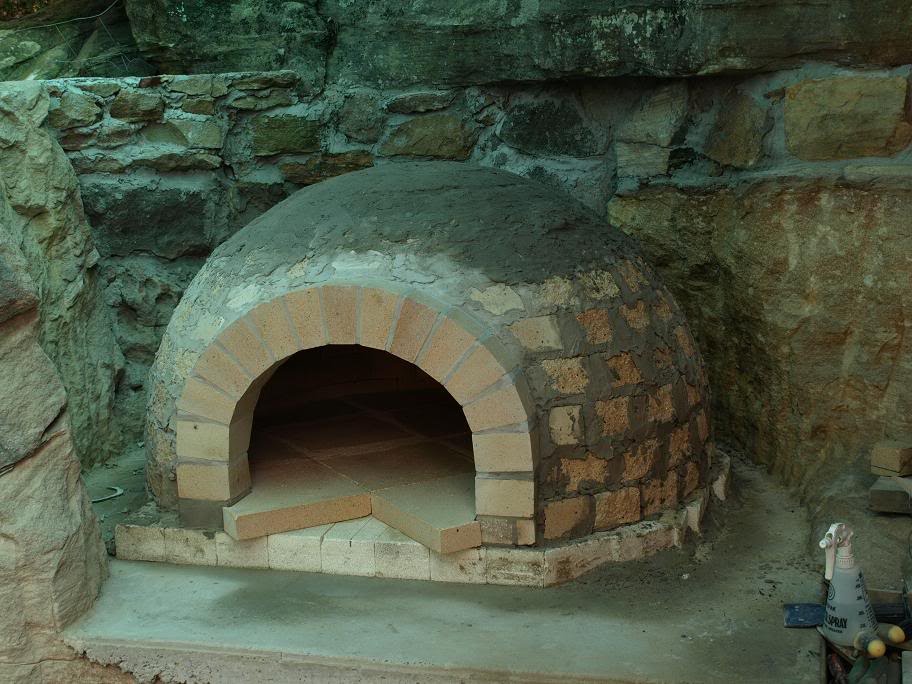
After a couple of fires you can see exactly where the smoke goes by the black marks. It pretty much all comes under the inner arch and stays close to the back wall of the vent. I had considered cutting a channel into the side walls of the vent to catch any smoke that might wander out that way but decided it probably wasn't worth the extra work. I'm glad I didn't.
And you can see below there are no smoke marks on the front of the outer arch. I do have a few hairline cracks though, but this seems to be normal. At this point we decided the oven was hot enough to bake some bread. It turned out pretty good for a first effort.
With the technology we have today for cooking ? convection microwaves, induction cook tops etc ? there?s still something special about cooking with fire!
Last edited by Sharkey; 01-04-2018, 09:55 PM.
Reason: Photobucket removed
Sharkey.
I love cooking with wine. Sometimes I even put it in the food.
Sharkey, I noticed you followed the basic design that Field Furnace provide, I too will be utilising them for the firebricks. I would be interested in knowing what diameter your oven is. I think your transition is extremely neat and your chimney opening allows for a good flow of smoke. You mentioned you used your tool to measure the required angle of the arch brick for the door arch. Don?t suppose you noted what the approximate angle was? I noticed that the door and entrance arch firebricks are tapered i.e. arch brick 345 x 115 x 75/51mm. arch brick 345 x 115 x 75/63mm How did you find using them?
Great effort with the oven, will be interested in seeing what design you come up with for your chimney! I have a couple of tonnes of Gosford sandstone which I will be using for my oven render.
Yes, the guys at Field Furnace are very helpful. Mine is sort of a hybrid of Field Furnace and Forno Bravo. It is a 42 incher, which is about 1070mm. I purchased the parts as an 1100mm kit from Field Furnace. I changed a few things from the Field Furnace design.
I did the floor tiles on a 45 degree angle. I don't think it is any more difficult to do - most of the shapes are the same except for the landing. On the 45 you don't have horizontal gaps that stop your peel.
As I mentioned above I thought about the smoke channel in the side of the outer arch but decided the cuts were too much trouble for the perceived benefit. I focused on getting a smooth flow instead.
When I made the templates for my arches I re-jigged the tapered bricks until I finished with a brick at top centre (a keystone). If you just put the tapered arch bricks in where they seem to naturally fit you end up with a join at the top centre. I'm sure it makes no difference to the cooking; I just think an arch looks better with a keystone.
The pre-tapered arch bricks are probably easier to fit than non-tapered, but I have no experience to back that up. Just ensure you brace the side of your arch as you are fitting the top bricks. I had a little sideways movement in the side of the arch when I was forcing mortar in the final joints.
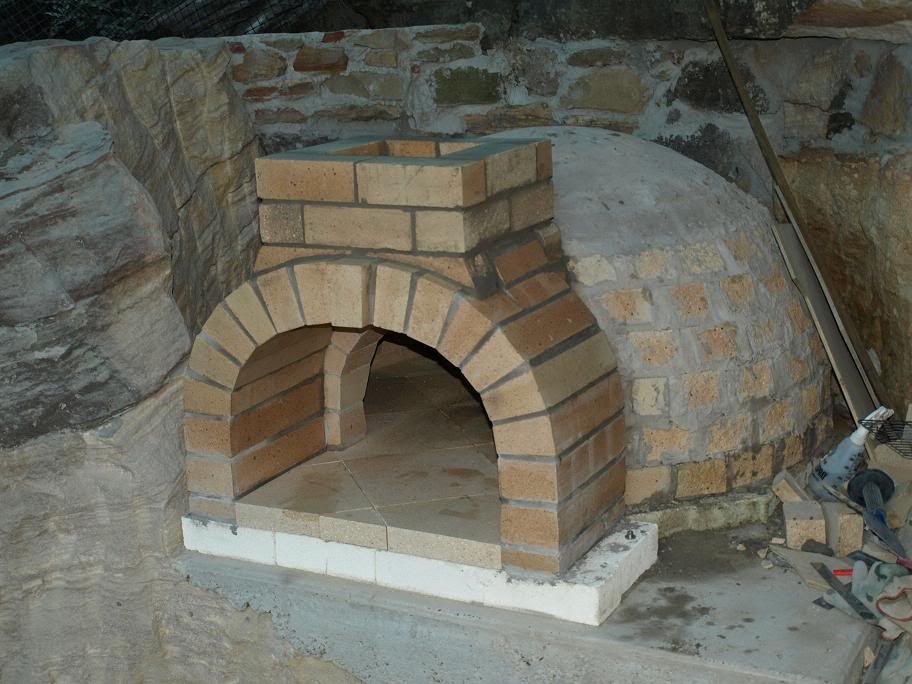
As far as the angles for the arch bricks, I think each brick is a little different. I dry stacked the arch with spacers one brick at a time and marked and cut each brick as I went.
In the photo below you can see the arch bricks in a pile ready to be mortared in. The first arch brick on the left side is already in place. You can see how this brick meets the dome ? where the back left corner has been cut off. The angle is just a line from the bottom centre of the oven (my dome tool had a thin extension piece to mark this) and the surface needs to be a half brick (115mm) in length for the dome to meet it.
The other cut ? the short edge of the bricks in the pile ? actually becomes part of the inside of your dome. Again just use your dome tool to mark this. I think I did this cut first and then marked and cut the other one. Then the top side of one brick can be traced onto the bottom side of the next brick and you just need to mark the top of that brick. As you climb up the arch the bricks get a bit longer.
My chimney is going to be stainless steel as it needs to be 3.6 metres tall to be above the height of the rock. The oven will be enclosed inside a sandstone walled house. I have a couple of tonnes of Blue Mountains sandstone that I excavated from the site that I need to do something with. I have already moved about 10 tonnes (by hand) and used it in walls, stairs and pathways.
I take your point abut the floor tiles. Seems like most of the ovens in the forum adopt this view.
I am excavating at present and hope to have a thread started shortly to document the project and ask for lots of advice. I expect you, Doug and Brickie from Oz amongst others will be sick of all my questions by the end .
Are you happy with the 42 inch size or would you have gone bigger, I note Karangidude built a 48 inch and there is not a massive difference in the internal diameter.
Keep taking pictures. I am interested in seeing how you enclose the oven with the sandstone. We had rain last weekend and a small piece of sandstone weighed a considerable amount with the water absorption. A sealer will definitely be required on my sandstone render to minimise the water absorption which will greatly add force on the internal dome.
Hi Sharkey
Just thought Id put my 2 bits in on sealing. I'm in brisbane and have suffered from moisture over the rain this summer. Rain rain and more rain. I let an expert... a Mason look at my oven (I know gutsey move) but he was a friend of a friend and he pointed out that all materials rock and brick will soak up a certain amount of moisture. As long as you have moisture barrier in you base (which I do) to seal of the moisture that the brick/rock will naturally attract he recons a couple of watered down coats of Boncrete will do the job. Its not poisonious will not change the colour and should not make things shiney (if you don't put too many layers).
I'm still waiting for the dryer wheather to try this out but I recon it should work and the good thing is the old boncrete is cheap and easy to obtain
PS love the setting
Regards
Cobblerdave
Measure twice
Cut once
Fit in position with largest hammer
"Can I use Bondcrete to waterproof my concrete slab"?
"No, BondCrete is not a waterproofing product and will re-emulsify when it comes into contact with water".
Bondall has other concrete treatment products. Were you thinking of one of them instead? Maybe avoid a problem by doing a little research of their product line.
So far I am happy with the size. Plus, as you can see in my photos, I did not have a lot of room to work with.
Thanks Dave and Bob.
Yes, I have bought a pump pack of one of the Bondall sealers and plan to use it on the oven and surrounding rock and brick walls.
I am a couple of weeks behind on posting because I've been too busy getting my oven ready and cooking in it. Easter was just a five day pizza fest. Here is an update of the last couple of weeks.
I continued with curing fires trying to get as much moisture out before I insulated. We cooked roasts and breads during this time and they were great. Next fire I noticed that the dome was mostly cleared so decided to try a pizza.
This took about 4 minutes to cook and was the best pizza I have ever eaten. It was beyond my expectations. One mouthful made all the effort worth while.
And later during that firing the dome cleared completely. We cooked another 4 pizzas and they were all fantastic.
 Tweet
Tweet


Comment