Announcement

Collapse
No announcement yet.

My Wood fired Redux

Collapse
X
 
  • Filter
  • Time
  • Show
Clear All
new posts

  • #76
    Re: My Wood fired Redux

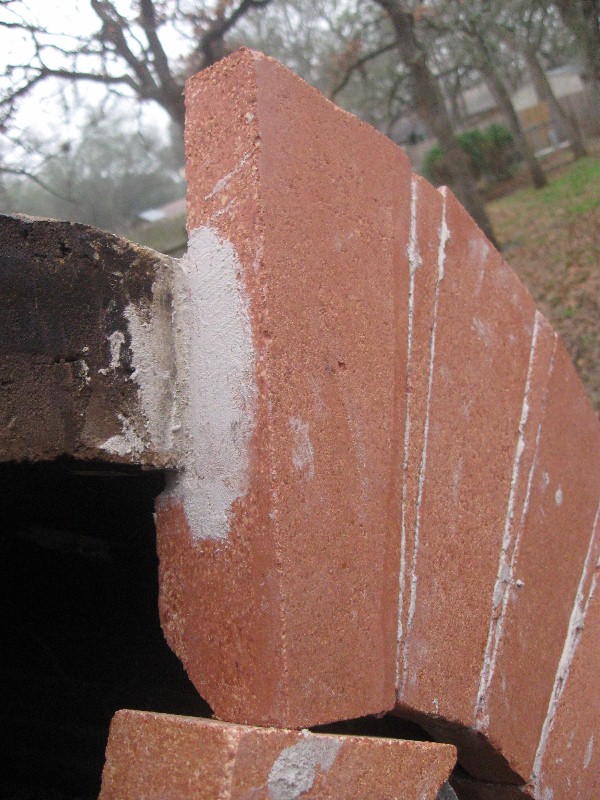
    Slurried the the four finished pieces with white portland/polymer mixture and didn't really like how much it contrasted. So I sanded them down with 70 grit diamond pads to open the concrete up, and then re-slurried with cement that was 1/3 grey mixed 2/3 white. I like the toned down look better so this is how the next four will be done too.

    Here is the first slurry, sanded to 600 grit. They are dark because of the water, the second to last pic is closer to what it would look like dry...still too much contrast for me.


    Click image for larger version

Name:	IMG_1431 new.jpg
Views:	1
Size:	79.1 KB
ID:	294120

    Click image for larger version

Name:	IMG_1433 new.jpg
Views:	1
Size:	122.7 KB
ID:	294121

    Click image for larger version

Name:	1430 new.jpg
Views:	1
Size:	138.7 KB
ID:	294122

    Click image for larger version

Name:	1434 new.jpg
Views:	1
Size:	83.7 KB
ID:	294123
    Old World Stone & Garden

    Current WFO build - Dry Stone Base & Gothic Vault

    When we build, let us think that we build for ever.
    John Ruskin

    Comment


    • #77
      Re: My Wood fired Redux

      This is what I'm going with. These were sanded today, and placed on the base to check the color. It looks close to the granite, and you are only going to see the edges after the next layer is installed on top of these. The top layer will get a technique called Scagliola, which will add subtle veining. Then I'll fill the pin holes with the slurry to match the edges you see here. That's the plan anyway. The last pic shows the joint spacing...I'm just putting some Lexel in between the pieces, no cementitious material.

      Click image for larger version

Name:	IMG_1442 new.jpg
Views:	1
Size:	119.8 KB
ID:	294124

      Click image for larger version

Name:	IMG_1443 new.jpg
Views:	1
Size:	108.7 KB
ID:	294125

      Click image for larger version

Name:	IMG_1446 new.jpg
Views:	1
Size:	136.5 KB
ID:	294126
      Old World Stone & Garden

      Current WFO build - Dry Stone Base & Gothic Vault

      When we build, let us think that we build for ever.
      John Ruskin

      Comment


      • #78
        Re: My Wood fired Redux

        Some of the latest pics of the dome and cladding....

        Click image for larger version

Name:	IMG_1416 new1.jpg
Views:	1
Size:	93.9 KB
ID:	294184

        Click image for larger version

Name:	IMG_1419 new.jpg
Views:	1
Size:	94.9 KB
ID:	294185

        Yeah I know, the arch looks horrible. But when the vent goes on, you will only see 3/4" of the intrados...so there you go.

        Click image for larger version

Name:	IMG_1424 new2.jpg
Views:	1
Size:	155.5 KB
ID:	294186

        Click image for larger version

Name:	IMG_1425 new3.jpg
Views:	1
Size:	139.4 KB
ID:	294187

        Click image for larger version

Name:	IMG_1427 new4.jpg
Views:	1
Size:	84.1 KB
ID:	294188
        Old World Stone & Garden

        Current WFO build - Dry Stone Base & Gothic Vault

        When we build, let us think that we build for ever.
        John Ruskin

        Comment


        • #79
          Re: My Wood fired Redux

          Finished interior and curing fires 1 and 2

          Click image for larger version

Name:	IMG_1428 new5.jpg
Views:	1
Size:	65.2 KB
ID:	294189

          Click image for larger version

Name:	IMG_1448  new6.jpg
Views:	1
Size:	84.3 KB
ID:	294190

          Click image for larger version

Name:	IMG_1449 new6.jpg
Views:	1
Size:	55.9 KB
ID:	294191
          Old World Stone & Garden

          Current WFO build - Dry Stone Base & Gothic Vault

          When we build, let us think that we build for ever.
          John Ruskin

          Comment


          • #80
            Re: My Wood fired Redux

            I also unmoulded and slurry coated 4 more watertable pieces today. Yet another design change...I eliminated the second layer, and I'll make up the height difference at the oven vent by carving a granite landing to go with the arch.
            Old World Stone & Garden

            Current WFO build - Dry Stone Base & Gothic Vault

            When we build, let us think that we build for ever.
            John Ruskin

            Comment


            • #81
              Re: My Wood fired Redux

              Looks great. My interior arch looked like crap too, until I trimmed it and fitted the smoke chamber. The first interior arch, for that matter, I knocked down while cleaning the interior and had to rebuild it completely.

              Comment


              • #82
                Re: My Wood fired Redux

                I almost grabbed my makita with a surface grinder to smooth out the arch, but eh...I seriously doubt it will be an issue, when the vent goes in. Plus the outside granite arch will have clean lines and I think the eye will be drawn to that. Or I'll just reach in with the grinder and have at it.
                Old World Stone & Garden

                Current WFO build - Dry Stone Base & Gothic Vault

                When we build, let us think that we build for ever.
                John Ruskin

                Comment


                • #83
                  Re: My Wood fired Redux

                  Mine is offset so it looked pretty funky when built. I cut it flush with the barrel to facilitate the vent, even though it is all covered up. The left side is flush with the vault, the right extends 2-3 inches above it prior to cutting it off.


                  Comment


                  • #84
                    Re: My Wood fired Redux

                    I did 45 the upper half of the arch on the interior face to help with the draft, worth doing if you don't want smoke stains.

                    Comment


                    • #85
                      Re: My Wood fired Redux

                      That looks fine to me!

                      I knew going in that it might look weird...turning an arch with square units never looks good to me, but I didn't feel like all the cutting was worth it, especially since it will be very low visibility and function normally. I may reach in there with the grinder and bevel my edges on the inside like you did...forgot to do that! Maybe while I'm at it, my ocd will kick in and the arch will get some fine tuning too.
                      Old World Stone & Garden

                      Current WFO build - Dry Stone Base & Gothic Vault

                      When we build, let us think that we build for ever.
                      John Ruskin

                      Comment


                      • #86
                        Re: My Wood fired Redux

                        On the low done Neapolitan I did, I just ground it after building instead of cutting prior to fitting, it probably worked better that way.

                        Comment


                        • #87
                          Re: My Wood fired Redux

                          Make your outer decorative arch,if you plan on having one, bigger than the entry arch or you will have trouble fitting the door easily.
                          Kindled with zeal and fired with passion.

                          Comment


                          • #88
                            Re: My Wood fired Redux

                            Yes David, that is something I am well aware of....all of the ovens I built in the past have larger vents and outer entries. The granite arch I have mentioned is going to be the outer one...following the line of the vent. It will be around three inches wider than the oven opening.
                            Last edited by stonecutter; 04-24-2013, 04:44 AM.
                            Old World Stone & Garden

                            Current WFO build - Dry Stone Base & Gothic Vault

                            When we build, let us think that we build for ever.
                            John Ruskin

                            Comment


                            • #89
                              Re: My Wood fired Redux

                              Looking good there man, keep it up.
                              Matthew 19:26. With God all things are possible.

                              My Build: http://www.fornobravo.com/forum/f21/...les-18741.html

                              Comment


                              • #90
                                Re: My Wood fired Redux

                                Another fire today, I'm guessing between 400*-550*...maybe a touch hotter. Cracking in the cladding allowed a lot of moisture and puffs of steam to escape...but the joints inside the dome are still tight. I also sanded and second slurried the watertable today, should have those installed by the end of the weekend.

                                Click image for larger version

Name:	IMG_1469 new1.jpg
Views:	1
Size:	79.2 KB
ID:	294199

                                Click image for larger version

Name:	IMG_1470 new2.jpg
Views:	1
Size:	82.9 KB
ID:	294200

                                Click image for larger version

Name:	IMG_1471 new3.jpg
Views:	1
Size:	81.5 KB
ID:	294201

                                Made use of that test panel of perlcrete...holding the heat in the oven after the fire dies down for a long slow cure. V-wiz, this is what I try to do when I cure ovens...and it works well. But as SCChris pointed out, maintaining the temp is a challenge and all day firings aren't always practical.
                                Click image for larger version

Name:	IMG_1468 new44.jpg
Views:	1
Size:	111.5 KB
ID:	294202
                                Old World Stone & Garden

                                Current WFO build - Dry Stone Base & Gothic Vault

                                When we build, let us think that we build for ever.
                                John Ruskin

                                Comment

                                Working...
                                X