Announcement

Collapse
No announcement yet.

My build, New Zealand.

Collapse
X
 
  • Filter
  • Time
  • Show
Clear All
new posts

  • #16
    Here's a few photos of the throat to the flue. I see there's much talk about a flared flue throat but I have instead decided to use the old English method of a relatively narrow throat and smoke shelf design.
    As we know that a 200mm dia. (8") flue is more than big enough for a 510mm (20") wide x 317mm (12.5") tall fireplace opening, all that remained was to "guess" the throat size. Somewhere, I have an ancient British construction book which gives the relationship of fireplace opening to throat to flue size but I could not find that so I had to "guess" based on what looked right. I recall that 100mm was considered more than enough for a throat width, so I settled on a throat of 300mm x 95mm (12" x 3.75"). Had I not "guessed", I would have made it 317mm x 100mm (12.5" x 4") or the full width of 510x75mm but really, I was pretty close, especially considering the height of the flue (2.7m / 9').

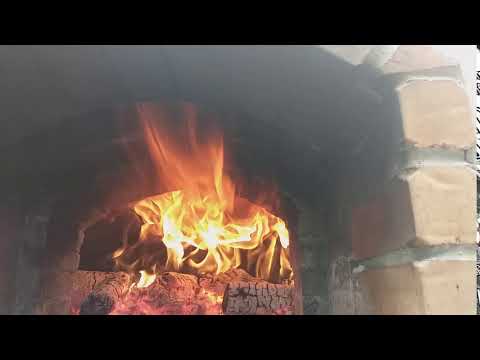
    As can be seen from the flames, when I'm not overloading the fire (which does cause some smoke to come out of the door opening) then the flue draws beautifully and there's no smoke out the door. The trick is to start with a small fire and to build it up gradually to a medium size fire. Large fires are not needed, but longer burn times are, as that heats the fire bricks to depth.

    Click image for larger version  Name:	20201025_205428.jpg Views:	0 Size:	197.0 KB ID:	432256 Click image for larger version  Name:	20201025_205447.jpg Views:	0 Size:	176.1 KB ID:	432257
    Last edited by MarkJerling; 10-31-2020, 09:35 PM.
    My 42" build: https://community.fornobravo.com/for...ld-new-zealand
    My oven drawings: My oven drawings - Forno Bravo Forum: The Wood-Fired Oven Community

    Comment


    • #17
      In further news, the door construction is almost complete. I need to fit some seals and I need to fit handles. The basic door construction is a 45mm thick steel "box" (with galvanized steel for the side facing the ply, as that's what I had lying about, but 316 stainless facing the inside of the oven) which is screwed to a 32mm ply face. Inside the steel box I have a two layer insulation system: Furnace blanket and 32mm thick furnace insulation bricks.

      The bricks are interesting. As they are secondhand, I'm not sure what they're made from, but a test with a piece of the stuff, heating one side to red hot with an oxyacetylene torch, showed that the other side stayed cold, so I feel that, combined with the furnace blanket it should work well for door insulation. Also, there was no off-gassing in the test, so I'm pretty confident that the door should not impart any strange flavours to the food!

      Click image for larger version

Name:	20201029_091306.jpg
Views:	1229
Size:	222.8 KB
ID:	432259 Click image for larger version

Name:	20201029_091232.jpg
Views:	1339
Size:	265.5 KB
ID:	432260 Click image for larger version

Name:	20201029_091248.jpg
Views:	1150
Size:	272.8 KB
ID:	432261
      My 42" build: https://community.fornobravo.com/for...ld-new-zealand
      My oven drawings: My oven drawings - Forno Bravo Forum: The Wood-Fired Oven Community

      Comment


      • #18
        The comparison of flue requirements for a cross draft system, as used in a front flued oven, with that of an updraft system as used in a standard fireplace, is unsound. This is because a decent draw is required to pull the flame sideways and slightly down before exiting. An 8” x 2.7m high flue
        is pretty big and would do for a 45” ID oven.
        Last edited by david s; 10-28-2020, 11:12 PM.
        Kindled with zeal and fired with passion.

        Comment


        • #19
          Originally posted by david s View Post
          The comparison of flue requirements for a cross draft system, as used in a front glued oven, with that of an updraft system as used in a standard fireplace, is unsound. This is because a decent draw is required to pull the flame sideways and slightly down before exiting. An 8” x 2.7m high flue
          is pretty big and would do for a 45” ID oven.
          Yes, I wondered about that. Strangely though, it draws really well. I suspect that, even though the throat is on the small side, the height and size of the flue compensates for the slight undersize in throat.
          Will fire again on Friday (tomorrow by us) so more temperature tests, this time with the door.
          My 42" build: https://community.fornobravo.com/for...ld-new-zealand
          My oven drawings: My oven drawings - Forno Bravo Forum: The Wood-Fired Oven Community

          Comment


          • #20
            Originally posted by MarkJerling View Post
            In further news, the door construction is almost complete. I need to fit some seals and I need to fit handles. The basic door construction is a 45mm thick steel "box" (with galvanized steel for the side facing the ply, as that's what I had lying about, but 316 stainless facing the inside of the oven) which is screwed to a 32mm ply face. Inside the steel box I have a two layer insulation system: Furnace blanket and 32mm thick furnace insulation bricks.

            The bricks are interesting. As they are secondhand, I'm not sure what they're made from, but a test with a piece of the stuff, heating one side to red hot with an oxyacetylene torch, showed that the other side stayed cold, so I feel
            that, combined with the furnace blanket it should work well for door insulation. Also, there was no off-gassing in the test, so I'm pretty confident that the door should not impart any strange flavours to the food!

            Click image for larger version

Name:	20201029_091306.jpg
Views:	1229
Size:	222.8 KB
ID:	432259 Click image for larger version

Name:	20201029_091232.jpg
Views:	1339
Size:	265.5 KB
ID:	432260 Click image for larger version

Name:	20201029_091248.jpg
Views:	1150
Size:	272.8 KB
ID:	432261
            unfortunately stainless has a propensity to warp badly under heat, particularly if heated unevenly as occurs with an internal facing for a door.The edges hiding behind the door rebate staying considerably cooler than the middle facing the hot oven. The thinner the stainless sheet used the greater the warping. The warping is likely to result in sealing of the door against the oven mouth. If it is screwed to plywood you may also get problems with excess heat transfer to the plywood.

            Kindled with zeal and fired with passion.

            Comment


            • #21
              Originally posted by david s View Post
              unfortunately stainless has a propensity to warp badly under heat, particularly if heated unevenly as occurs with an internal facing for a door.The edges hiding behind the door rebate staying considerably cooler than the middle facing the hot oven. The thinner the stainless sheet used the greater the warping. The warping is likely to result in sealing of the door against the oven mouth. If it is screwed to plywood you may also get problems with excess heat transfer to the plywood.
              Thank you. Only the "cold" side is screwed to the outside ply, so I don't think we should see any heat transfer to the ply. But, will let you know tomorrow when I test it! As to warping, the inner face may bulge but the rest of the box should be stiff enough to hold things relatively straight. But, we'll know tomorrow night. Fingers crossed!
              My 42" build: https://community.fornobravo.com/for...ld-new-zealand
              My oven drawings: My oven drawings - Forno Bravo Forum: The Wood-Fired Oven Community

              Comment


              • #22
                Originally posted by MarkJerling View Post

                Yes, I wondered about that. Strangely though, it draws really well. I suspect that, even though the throat is on the small side, the height and size of the flue compensates for the slight undersize in throat.
                Will fire again on Friday (tomorrow by us) so more temperature tests, this time with the door.
                Yes the flue diameter and height is what creates the power of the draw and as long as the throat is no less than about 2/3 of the cross sectional area of the flue pipe, it will simply act as a Venturi at the restriction . Observe the smoke at that point and you should see it accelerating there. All good.
                Last edited by david s; 10-28-2020, 09:52 PM.
                Kindled with zeal and fired with passion.

                Comment


                • #23
                  Originally posted by david s View Post

                  Yes the flue diameter and height is what creates the power of the draw and as long as the throat is no less than about 2/3 of the cross sectional area of the flue pipe, it will simply act as a Venturi at the restriction . Observe the smoke at that point and you should see it accelerating there. All good.
                  Aha, thanks. Well, that explains it then. The throat is about 90% of the flue size, so it works well! I'll post once I know if the door is working as it should (or not!).
                  My 42" build: https://community.fornobravo.com/for...ld-new-zealand
                  My oven drawings: My oven drawings - Forno Bravo Forum: The Wood-Fired Oven Community

                  Comment


                  • #24
                    Originally posted by david s View Post
                    unfortunately stainless has a propensity to warp badly under heat, particularly if heated unevenly as occurs with an internal facing for a door.The edges hiding behind the door rebate staying considerably cooler than the middle facing the hot oven. The thinner the stainless sheet used the greater the warping. The warping is likely to result in sealing of the door against the oven mouth. If it is screwed to plywood you may also get problems with excess heat transfer to the plywood.
                    Good news with regard to the door: The door construction has worked out well. Not only is it working very, very well in keeping the heat in, but the door has not warped. What's also really fun to see is that the outside 32mm ply only heats to around 35degC with the maximum it got to being 38degC / 100degF. The stainless steel interior face has browned somewhat but it's doing the job, so all good!

                    Here's the revised temperature profile showing the difference the door makes. It's still 87degC / 190degF in there, and it's two whole days since we fired it.

                    Click image for larger version

Name:	heat-profile3.JPG
Views:	1537
Size:	170.5 KB
ID:	432341
                    My 42" build: https://community.fornobravo.com/for...ld-new-zealand
                    My oven drawings: My oven drawings - Forno Bravo Forum: The Wood-Fired Oven Community

                    Comment


                    • #25
                      Great job. How thick is the stainless sheet that you used?
                      Kindled with zeal and fired with passion.

                      Comment


                      • #26
                        Thank you David. It's 1mm thick, so a tiny bit thicker than 1/32". It's the stainless steel used for kitchen bench tops.
                        My 42" build: https://community.fornobravo.com/for...ld-new-zealand
                        My oven drawings: My oven drawings - Forno Bravo Forum: The Wood-Fired Oven Community

                        Comment


                        • #27
                          Happy to report that, 3 whole days after firing the oven, with the door fitted, it's still holding a little heat. Down to 50degC now, 122F.
                          My 42" build: https://community.fornobravo.com/for...ld-new-zealand
                          My oven drawings: My oven drawings - Forno Bravo Forum: The Wood-Fired Oven Community

                          Comment


                          • #28
                            Here's a little video clip showing the flames going up the flue with a nice, hot olive wood fire.
                            My 42" build: https://community.fornobravo.com/for...ld-new-zealand
                            My oven drawings: My oven drawings - Forno Bravo Forum: The Wood-Fired Oven Community

                            Comment


                            • #29
                              Mark, your heat measurement fascinates me. How are you collecting this data? A thermocouple with a connection to ??? I'm a hobby computer nerd and this sounds like something I've overlooked! Beautiful door by the way, I'm looking to reach out to a fabricator family member to help create mine, but am stumped on what to use for insulation inside. Where did you source your stuff?

                              Comment


                              • #30
                                Originally posted by Corsairmo View Post
                                Mark, your heat measurement fascinates me. How are you collecting this data? A thermocouple with a connection to ??? I'm a hobby computer nerd and this sounds like something I've overlooked! Beautiful door by the way, I'm looking to reach out to a fabricator family member to help create mine, but am stumped on what to use for insulation inside. Where did you source your stuff?
                                Nothing quite so technical. I have an infrared thermometer which will read to 600degC, so I measure the top of the dome and the centre of the floor and then I graph the data using AutoCAD because I could not make Excel graph it the way I wanted to see it!

                                Almost all my materials are from old nightstore heaters. Other than refractory mortar, cement and concrete, of course. So, for the door I made a stainless steel and galv. steel box of which the one side is screwed to my timber door face. The box is filled with a layer of furnace insulation and some insulating brick. The insulating brick came out of the one nightstore heater. I suspect they had it in there to keep the heat away from the electronics module. I think that, had I not had the insulating brick, that two layers of furnace blanket would have worked just as well.

                                I've found it valuable to know roughly what temperature the oven is at at given hours after firing as that helps me to plan cooking times and foods to cook at given times. It's a learning experience, of course, but it's fun!

                                Feel free to check out my food thread too: Saturday night pizza, Sundy night lamb shanks. - Forno Bravo Forum: The Wood-Fired Oven Community

                                I need to graph it all again. Since I started using olive wood, and since everything has dried out properly, the oven is holding it's heat much better.
                                Last edited by MarkJerling; 12-07-2020, 03:14 AM.
                                My 42" build: https://community.fornobravo.com/for...ld-new-zealand
                                My oven drawings: My oven drawings - Forno Bravo Forum: The Wood-Fired Oven Community

                                Comment

                                Working...
                                X