Announcement

Collapse
No announcement yet.

Finally started

Collapse
X
 
  • Filter
  • Time
  • Show
Clear All
new posts

  • mnl
    replied
    Re: Finally started

    Originally posted by Calisdad View Post
    Among other things we put in the newspaper from the day we sealed it up.
    While it is not going to the day that it gets sealed, was going to put a copy of today's paper in it which will mostly be about the Melbourne Cup and who won.


    Wet the slab down a couple if times. I'm away for a couple of days but have left a request with SWMBO to give it a wet down again tonight.
    Last edited by mnl; 11-05-2013, 02:36 PM. Reason: Spelling

    Leave a comment:


  • hodgey1
    replied
    Re: Finally started

    If only you could be around to see that being opened in a 100 years or so. That put a really cool twist on your build.

    Leave a comment:


  • Calisdad
    replied
    Re: Finally started

    Originally posted by hodgey1 View Post
    Sounds like a great way to spend a friday off, looks like you're off to a good start. I really like the time capsule idea. I would make sure to put in an assortment of coins and put some paper money in a sealed plastic bag, some other ideas would be a few photo's of your pizzas?
    Among other things we put in the newspaper from the day we sealed it up.

    Leave a comment:


  • hodgey1
    replied
    Re: Finally started

    Originally posted by mnl View Post
    Slab poured, start building base this weekend. Might even take Friday off to get a head start!
    Sounds like a great way to spend a friday off, looks like you're off to a good start. I really like the time capsule idea. I would make sure to put in an assortment of coins and put some paper money in a sealed plastic bag, some other ideas would be a few photo's of your pizzas?

    Leave a comment:


  • cobblerdave
    replied
    Re: Finally started

    Gudday
    Time to get out the hose and give that piece of concrete a good water. Soak the surrounding ground for good measure and cover with a little plastic or damp cloth etc. Anything with Portland cement in it cures not dries out. Curing damp makes stronger slabs. The humidities down and we have a breeze so keep it damp.
    Regards dave

    Leave a comment:


  • mnl
    replied
    Re: Finally started

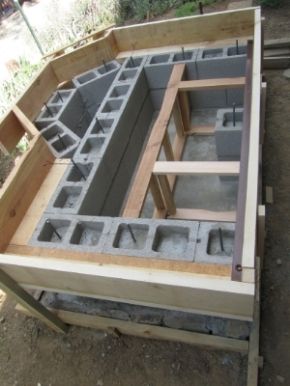
    Slab poured, start building base this weekend. Might even take Friday off to get a head start!

    Leave a comment:


  • Calisdad
    replied
    Re: Finally started

    Originally posted by mnl View Post
    What do most people do who are core filling, do you pour the concrete as a continuous pour between the cores and the hearth slab or do you till the cores one day nearly to the top and do the top slab the next day?

    My guess is it is better construction technique to do a single pour as will be stronger, but not sure I can get it all done in a day? There will be roe that links both in any case.
    Don't do more than you are comfortable with at a time. It will be more than strong enough if you half fill the last course of block then pour the slab later.
    If you use a cement based board above the block you won't have to strip it later.

    Enjoy your build.

    [IMG][/IMG]

    Leave a comment:


  • stonecutter
    replied
    Re: Finally started

    Build first, grout later.

    Leave a comment:


  • mnl
    replied
    Re: Finally started

    What do most people do who are core filling, do you pour the concrete as a continuous pour between the cores and the hearth slab or do you till the cores one day nearly to the top and do the top slab the next day?

    My guess is it is better construction technique to do a single pour as will be stronger, but not sure I can get it all done in a day? There will be roe that links both in any case.

    Leave a comment:


  • stonecutter
    replied
    Re: Finally started

    Yep...layman's terms (in Imperial numbers) 3'-4'-5' or 6'-8'-10'

    Standard way to check square with a tape.

    Leave a comment:


  • mnl
    replied
    Re: Finally started

    Thanks Dave, John and stonecutter. Keep the hints for first timers coming as that is certainly what I am. I was going to use Pythagoras Pythagoras - Wikipedia, the free encyclopedia to check the square.

    Leave a comment:


  • cobblerdave
    replied
    Re: Finally started

    Gudday
    Just thought I'd add another trap for the first timer and that's getting that first layer square. It' takes just a minute but run a tape diagonally across the first block layer. Thats measure from corner to corner. If the measurement of those two diagonals aren't the same ,its not square. If you don't adjust it then it will come back later. I know of one good looking build that required 2 days of fancy work to hide the "out of square"in the top tile work.
    Regards dave

    Leave a comment:


  • silvfox
    replied
    Re: Finally started

    Dave beat me to the suggestion for a second opening for wood storage. If the back is not accessible the second opening could be on the side. Can't tell for sure from your picture but it looks like one of your form stakes is higher than the 2x4. If so this will get in your way for sqreeding concrete. With the top of the form below surrounding grade you'll want to cut your sqreed board fairly short. Its nice to have all your ducks in row before you pour because concrete does'nt like to wait for you.
    John

    Leave a comment:


  • stonecutter
    replied
    Re: Finally started

    Originally posted by mnl View Post
    With the trial stack, I seem to struggle with some if the tops of blocks not being level and a bit rough which looked like were the casing was when they were poured.
    .
    I did a dry stacked block base on one build just to see what it was like, and had the same problem. I had expected it though, masonry units are never perfect. No more dry stacking...if I build another cmu base, every course gets mortared. Unless it's a dry stone base of course.....

    You can get yourself a fluted brick rub or use an angle grinder to get rid of high spots. Washers work too, but often times you will create a wobble, requiring more shims.
    Last edited by stonecutter; 11-03-2013, 06:37 AM.

    Leave a comment:


  • mnl
    replied
    Re: Finally started

    Dave - the back side is up against the fence, therefore would not be able to access it. I though about a shape like the photo, however it would probably not get used anyway. I also have a slab around the corner that we use as a firewood store for the fireplace as well.

    David S - thanks for the tip, I have been putting the thicker part at the top.
    Last edited by mnl; 11-03-2013, 02:36 AM. Reason: Spelling

    Leave a comment:

Working...
X