Re: Dino's 42" Pizza Oven Starts
Dino,
What kind of stones did you use? Are they cutured; a certain manufacturer...what style?? I love the look of them
Peter


-
Re: Dino's 42" Pizza Oven Starts
Dino, congratulations on finishing your oven! Funny thing about these projects is you'll always find something else additional to do to them...
GeorgeLeave a comment:
-
Re: Dino's 42" Pizza Oven Starts
Dino, Your wood will enjoy it's new home!
DanLeave a comment:
-
Re: Dino's 42" Pizza Oven Starts
.hi Dino ,
A great finish to a fantastic build.
I ask are we ever finished ? there's always seams to be something to do or add!!!!!!Soon as I acid wash my red arch entry facade, I just might be done, Yah")
enjoy the fruits of your labor , and keep posting photo,s of all that wonderfull food you keep producing.
regards GaryLeave a comment:
-
Re: Dino's 42" Pizza Oven Starts
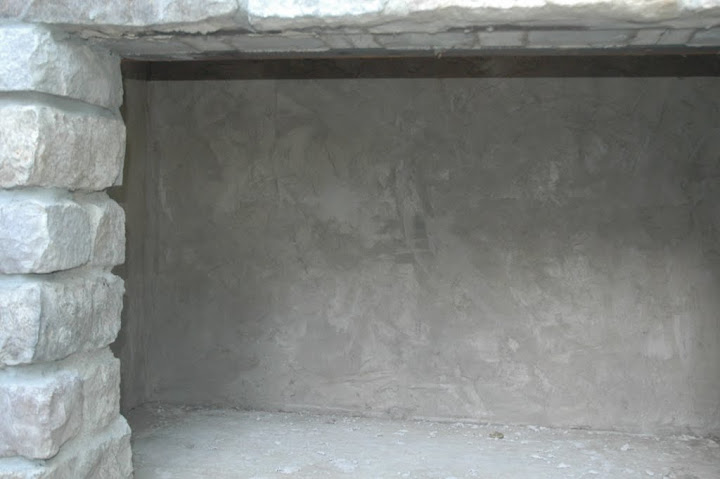
I did the Surface Bonding Cement (SBC) thing yesterday. It's really hard to do a tuscan smooth plaster kind of finish. I decided to just swirl a rubber float and rough it up a bit, like smoothish stucco. I used Quikrete SBC (white) and added a 2 cup bag of gray stucco color and a small scoop of tan. It wanted to be more tan than gray, but it matched just fine. Oh and I replaced 1/2 gal of water with Acrylic Fortifier. Easy to mix by hand in 2 batches. 1/2 batch is: 50 lb sbc bag in half: 25 lbs, add 6 cups of H2O and 4 cups Acrylic Fortifier (you could reduce by 1-2 cups of H20 if its not hot/dry outside).
Here is a pic of the inside of my wood storage. You no longer see the CMU lines. I thinks it's still damp and the suede look will sadly go away.
And here is the back of my oven. I put SBC on the upper half, since the lower half is stoned (...dude) Yes, there are a few, barely noticeable "hairs" or fibers that stick out of it, but it's fine. It was really hard to keep it at 1/8" thick but after checking it this morning, the 1/8" areas (some even less that I was worried about) looked great. So I recommend trying to go that thin if possible.

Soon as I acid wash my red arch entry facade, I just might be done, Yah -Dino
below attached is the "before" pic of the back.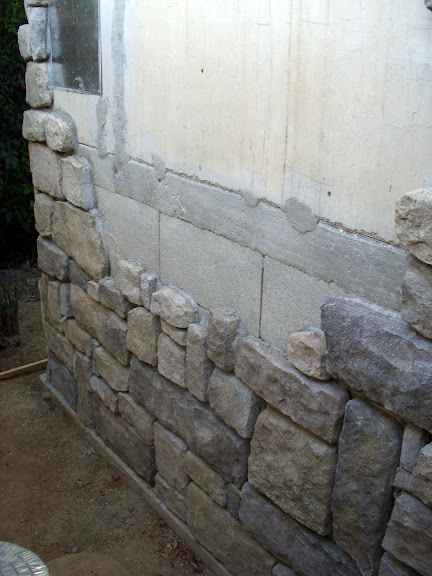
Leave a comment:
-
Re: Dino's 42" Pizza Oven Starts
Well, those units used to occupy where my wfo is now. I need to find a new nesting location for them as they are currently taking up temporary home right in front of our main entrance to the house, and it's somewhat unsightly. But who knows, once I get my wfo fired up I may not used them as often....they may end up behind the garage...Originally posted by Dino_Pizza View Post
GeorgeLeave a comment:
-
Re: Dino's 42" Pizza Oven Starts
Thanks Dave, I've found those heavy leather gloves they sell here on FB indispensable. I still burn knuckles turning the pizzas.
Hey George I saw your weber kettle and smoker in the back of one of your pics recently. You're going to enjoy smoking in the wfo too. I make sausage about every other year but I'm going to try smoking it as well. Do you just buy the Chorizo fresh and smoke it? Hmmmm...
Thanks Bill and Mike. My temp wfo door isn't tight so I took the temps to 400 deg at the peak and put the 2 racks in for 3.5 hours. I knew (and hoped) the temps would quickly come down to below 300 but it still cooked hotter than I wanted though they came out perfect. There was a pan of water under the 2-tier rack, not under the Tuscan Grill and the moisture helped. We cant remember or find the internet receipt of that 2 tiered steel rack. Others have asked me. I'll keep looking, it works great.
I found this on sale at Sur-La-Table for 1/2 price.
Three-Tier Collapsible Smoking Rack - Sur La Table
Can't tell if it's too tall or stiff enough to push in and pull out of the oven with a poker but it looks good.
thanks, DinoLeave a comment:
-
Re: Dino's 42" Pizza Oven Starts
Looks mighty tasty Dino. I can't imagine firing our oven it's so hot out here in VA. I'm thinking I need longer pizza tools.
DaveLeave a comment:
-
Re: Dino's 42" Pizza Oven Starts
What a feast, Dino! Very nice showing us the versatility of your oven.
I can't wait to use my WFO once it's up and running. I've got two baby backs and some chorizos on my 22" Weber kettle now as I post this....
GeorgeLeave a comment:
-
Re: Dino's 42" Pizza Oven Starts
Dino - Looks perfect. What was the temp for the ribs and duck?
Cedar planked salmon does great as well. Got to watch the plank doesn't ignite though.
Enjoy the wee.Leave a comment:
-
Re: Dino's 42" Pizza Oven Starts
Dino,
I really need to come to CA to take a cooking class from you! Your food looks awesome! What are you using for 2 tier smoking rack?Leave a comment:
-
Re: Dino's 42" Pizza Oven Starts
OK, I'm still not ready show pics of my finalized wfo 'cuz it aint final yet. I still need to grout more and SBC the back and visible storage area. But....
I had a family-swim-pizza party yesterday and although I did not take pics of any pizza's (I can't take photos while making them-home cured gravlox and creme fresh/ wfo smoked duck, mozza, crimini's / 4 cheese) I did take photos of the smoked baby backs and 2 duck legs I used in the pizza (iron Tuscan grill was bought on Forno Bravo).That 2-tiered smoking rack is great. The 3 sea bass was also roasted in the wo-fo and it was a total hit. Roasted high on a rack, rubbed with evoo and herbs, it got really crispy yet inside was perfect in the after-pizza-temp oven.
Leave a comment:
-
Re: Dino's 42" Pizza Oven Starts
Dino
Thanks for the reply and yes that did help a bit. I think it just confirmed what I was thinking and that is cutting provides a tighter fit and probably adds to the construction time but the mortar works amost as well and would shorten some of the construction. What to do? What to do?
And to address your comment on the photos, I have been posting photos of my build under the following thread:
Getting Started-One small step for pizza
Comments are not only welcomed but encouraged!
One last item, I am having a little difficulty trying to see how the opening and dome should come together on my oven. You can see, maybe, what I am planning if you look at my photos.Leave a comment:
-
Re: Dino's 42" Pizza Oven Starts
Dino, yes. Only ceramic board (2") between. I thought I'd skip the heat sink idea and rout out the back of the wood a little around the bolt heads. No problems yet. I do remember now that i used aluminum tape around the edge and adhered the fire ribbon/tape on top of that per his directions.
I also have a simple plywood door that I wrapped with the excessive AL tape and a shelf support bracket as a handle and support. Used for sealing the oven in between fires and for creating a draft when lighting. Often hear the wood smoldering beneath the tape....
Cheers!Leave a comment:
-
Re: Dino's 42" Pizza Oven Starts
Thanks Bill,
It looks like you used 2 sheets of steel and the 2" of FB board between it. Jim had 1" insul boards so he had 3 sheets and used the middle sheet as a heat sink to keep the wood door isolated from the interior screws. But you don't have any issues with that? I guess not with those nice temps you're getting the next morning. So the only thing between the raw cut edges of the insulation board and the heat tape is the gasket sealant? It protects it enough I take it?
I think I'll try to copy both of yours ideas. Thanks !
Hey GDEST: I definetly had some rows (it may have started with my 2nd -or even 1st row after the "shoulder") that required no tappering cut on top but just a little thicker mortar in the back than the front. I may have started the side tapers to reduce the inverted V but I'm not sure if that started in row 3 when the dome got tighter.
Is it worth the effort to tapper your 2nd row you ask? I would say no unless the mortar in the back exceeds 1/4" (I know...I know...many of you -me too somewhere in my build but I'm denying it - went 1/4" regularly and it works out fine. I did it now and then but attempted a "tighter" dome...on the whole)
If I had it to do all over, I would have been a bit less tight and used more mortar but would use 1/4" as a max, then tapper. At some points in the dome, you HAVE to tapper a lot to get the dome "over" into your half sphere or squished sphere. Good luck this weekend. Post some pics if you can. Let me know if this answered your questions or if you get any new ones,
-DinoLeave a comment:
Leave a comment: