Announcement

Collapse
No announcement yet.

Gus's Corner - Timo's Build

Collapse
X
 
  • Filter
  • Time
  • Show
Clear All
new posts

  • #31
    Re: Gus's Corner - Timo's Build

    Wow Timo, you are really cranking on that dome. Looks great. I found that I was using 1/3 bricks and then 1/4 bricks by the time I got to the last courses, more cutting but worth it for a better fit.

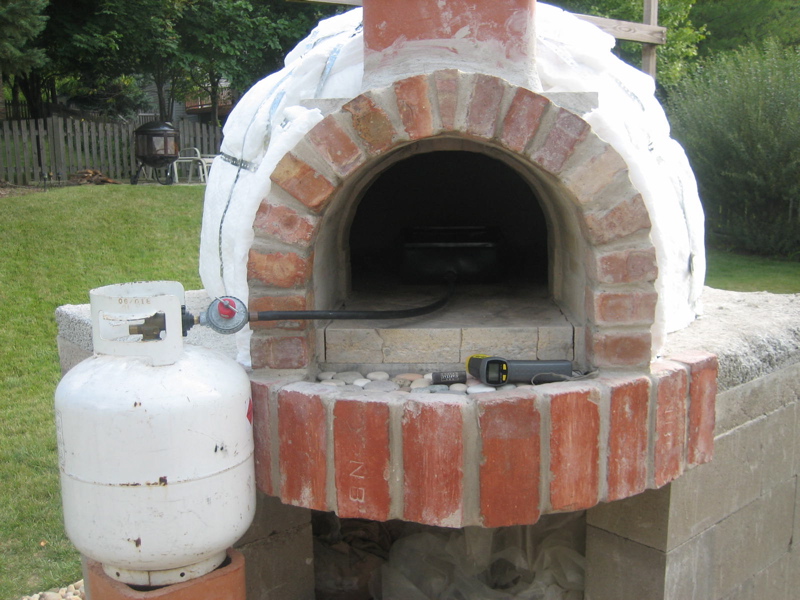
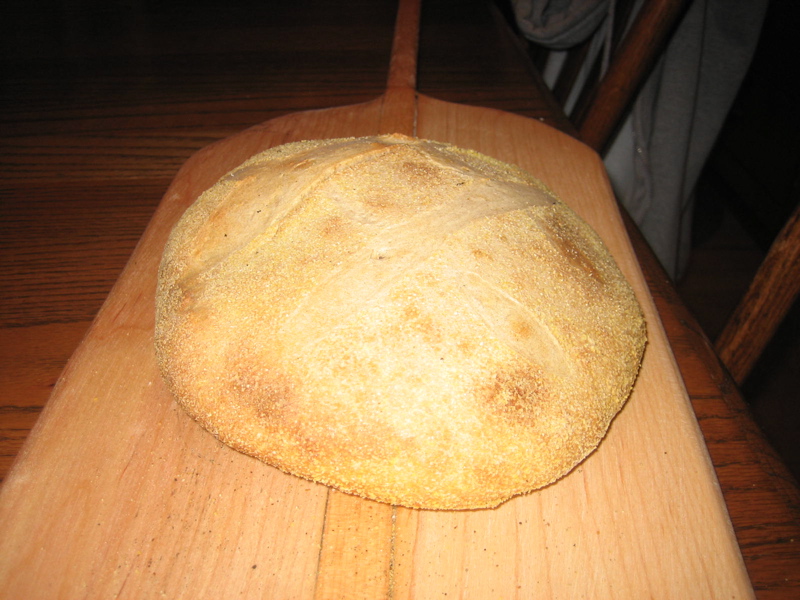
    Hoping you find more time to get it done and get cooking. I just had my very first pizza tonight after 1-1/2 years of construction, probably have about another 3 months to really finish the oven, TOTALLY WORTH IT!

    good luck, the bulk of the project is done for you.

    Doug

    Comment


    • #32
      Re: Gus's Corner - Timo's Build

      I just saw your pictures of the oven and your first pizza and it looks totally cool! I like the way you insulated the oven and outer arch. The material around the oven looks very nice, too. Hope you use that oven for the rest of your life.

      That's my plan, seeing how at some point the ability to construct all these projects around the house will eventually cease to exist, but I'll be cooking until the day I die.

      Congrats!
      My Build Thread

      Comment


      • #33
        Re: Gus's Corner - Timo's Build

        I just wanted to post the fact that:

        1. The cuts over the arch sucks.
        2. Tying in the course over the arch sucks.
        3. Having to use a form to keep the bricks in place when they go vertical sucks.

        Hopefully it will go better tomorrow.
        My Build Thread

        Comment


        • #34
          Re: Gus's Corner - Timo's Build

          Timo,
          That's why I decided to arch over back and forth. I never thought I would be looking at the dome ( inside) so much. You look at it every time you get up to temp and it burns off the creosote.

          It'll be worth it. Try not to get a bad back ache, though.

          L.
          This may not be my last wood oven...

          Comment


          • #35
            Re: Gus's Corner - Timo's Build

            Yeah Timo, I know what you're saying, but I think the fact that it gets more challenging as you go up makes it that much more satisfying when you finally close that dome.

            Just think about it, that same force that you're cursing right now, is what will lock all of those bricks together once the dome is complete so you can cook in that oven 'til you're old and gray. Sometimes gravity is your friend and sometimes...well, not so much.

            Now get back to it and have some fun dammit!

            Doug

            Comment


            • #36
              Re: Gus's Corner - Timo's Build

              Thank you for the responses Lars and Doug. I went gorilla monster and finished the dome keystone and set the flue tile. I can not believe the monster I just made, what did I do? And I don't even know if it will work.

              I decided to make a sand form for the last three courses, so I got up at 5:30am to do that today. Then I had to wake up and smell the coffee to the fact that I didn't go perfectly round after the arch. Because of that, the tear drop effect took place and it warped the top of the dome, but I am OK with that. My oven is my oven and it reflects the builder and it looks unique. Besides no one can tell from the outside. It really looks like a perfect round dome I was able to bring it back to round for the keystone area which ended up looking like a wheel and spoke with the keystone being a split circle axle.

              Now I am amazed at the tonal dynamics of this oven and can't wait for the fire! As I pulled away the sand form, I saw that I had to get in and clean up the mortar that stuck to the sand. I shouldn't have waited so long because I had to chip away at it. I let it sit for about 4 hours before I took out the form. As I was chest deep, face up in the oven I noticed if I made a pop sound with my lips the pressure wave or something would bounce back at me just as hard. Also, when I placed a piece of cardboard of the vent opening without the flue on it and tapped it on the oven it made a bass drum sound.

              Soon I'll be in Door County, Wisconsin while the oven sits and the mortar hopefully gets cured and hard. There is a restaurant named Digger's that has been up there for at least 25 years that was recently sold and remade into a... wood burning brick oven pizza place! My daughter says it's some of the best pizza she's ever had! I told her some day that's what will come out of my oven and probably better because I'll use better ingredients.

              Now of course here are a few things I noticed:

              1. If you are using a cheap 4 1/2" wet saw like me so you have to cut the blocks twice, once you set the fence to cut the block in half, slide a 2x4 width wise next to the fence and you have the perfect set up for thirds.

              2. The same 4 1/2" blade fits into a grinder.

              3. My back, Lord my back.

              4. The closing in around the arch or opening is insane. I was happy to spend a whole day measuring and cursing the bricks. I finally got a brick to "hang" on the top of the arch by cutting an "L" in the middle of it on an angle. Crazy.

              5. It gets hot fast inside the oven. With a small Halogen bulb to help me see while cleaning the bricks up, I was sweating in no time.

              I do have a question about the flue height. I have a 2' 8x13" flue tile on the vent and it looks big already. I was going to place another 8x8" flue tile on top of the 8x13: for a total of 4' of flue. Not too sure I need something that high? In a couple of weeks I'll start the cure fires and find out how it draws. I guess it would be easy to set the other one on top, but it looks so dang high!

              On another note, for the decorative brick arch and chimney I found some old pink salvaged Chicago commons. It's amazing what you will find at an old brick yard. They are full of charm and have that "I've been around and still kicking" look to them. I was wondering how bad it would be to rip them down the middle to make to strips and use that for the chimney? From all of the pictures I've seen, the chimneys seems too wide...

              That's all for now. Thanks Forno Bravo
              Last edited by timo; 07-15-2009, 06:47 AM.
              My Build Thread

              Comment


              • #37
                Re: Gus's Corner - Timo's Build

                Timo,

                I knew you would get it done..Congrats and have fun in Door county!! Can't wait to see some pictures.

                Peter
                Member WFO-AMB=WW

                Comment


                • #38
                  Re: Gus's Corner - Timo's Build

                  Awsome work, now that the hard yakka is done the fun (fires) can begin.

                  Cheers
                  James
                  Real men cook with fire
                  My Oven and Fireplace Build

                  Comment


                  • #39
                    Re: Gus's Corner - Timo's Build

                    Here's an update on the oven. After vacation I had a chance to work on the outer brick arch and it looks like this:

                    I got too greedy with the available hearth area and built an oven too big and left me no room for the decorative outer arch and front. Just a few inches too short. I really liked these old commons, so I made an angle iron shelf for the bricks to sit on. Most of the weight of the arch is on the curved reinforced concrete hearth ledge. The upright bricks in front are acting like a pointer finger to keep the arch in place.

                    I can't remember who, but someone asked a question about this very same problem. This seems to be working out and may be a solution. I used the blue Tapcons to attach the angle iron to the structural concrete spaced out about every 3"-4". I also ground a small notch in the concrete for the iron to sit on the concrete blocks on the ends.

                    Timo
                    My Build Thread

                    Comment


                    • #40
                      Re: Gus's Corner - Timo's Build

                      After letting the oven sit since mid July I was able to complete the outer arch and now insulate. I used two rolls of 6# 1" ceramic blanket. 4" on the top and 2" on the sides. Looks like this:


                      Here's an old Char broil grill modified with a longer hose. I am using this to slowly raise the temperature. The most I can get out of it is 200-225 degrees. After it sits at this temp for two hours, I started tossing in small chunks of embers from the fire pit I had going next to the oven.


                      Here's a short video showing a small fire staying at 300 degrees. If it got too hot I would take a ember chunk out. With the coals and embers it was a lot easier to control the temp - little flame, lot's of heat.

                      Tonight I'll go up to 350 and keep it there for 6 hours and go up more each night. I did insulate, and I have an insulated door. The oven temp was 180 on the dome the next morning, so this is a long cool down. I think it's a good idea to insulate then cure because the oven is more than just brick, it's the whole system working together.

                      One another note, I am relieved to find that the flue does NOT need the additional flue tile I had on hand in case it wouldn't draw well. There was one point after warming the oven and placing the first embers in that the oven filled up with smoke for the first time. I had used newspaper to have a small fire, but it's not the same. I waited to see what would happen...it was all the academic work set in to motion and was the moment of truth.

                      The smoke began to swirl and dance from the rear to the front with each flow of smoke parting to the left and right and meeting under the center vent area and exiting in a rush. The smoke began to pour out of the top of the flue and a small flame tornado appeared at the top of the small bed of coals. It was perfect. I watched this dance for hours last night with a smile on my face. My wife and kids asking when we could start tossing pizzas into it.

                      Anyway, I'll be making a desum and getting ready to bake some bread before plasmatic pizza firings. So totally cool and fulfilling.
                      My Build Thread

                      Comment


                      • #41
                        Re: Gus's Corner - Timo's Build

                        Great job Timo on the insulating blanket. I've 4" on top of mine and it never gets warm on top. Your oven will heat like the best of them and you'll be really happy with it. Also, good that you took the insulation to the arch walls too.
                        Congratulations, Dino
                        "Life is a banquet and most poor sons-of-bitches are starving to death." -Auntie Mame

                        View My Picasa Web Album UPDATED oct
                        http://picasaweb.google.com/Dino747?feat=directlink


                        My Oven Costs Spreadsheet
                        http://spreadsheets.google.com/ccc?k...BF19875Rnp84Uw


                        My Oven Thread
                        http://www.fornobravo.com/forum/f8/d...arts-5883.html

                        Comment


                        • #42
                          Re: Gus's Corner - Timo's Build

                          Thanks, Dino. Your oven house looks like it will really keep the elements out. The lights are neat, too. I should have thought more about lighting. I am thinking I will do some low voltage solar lights in the rock surrounding the foundation.

                          Here's a picture of my attempt at a chimney. I won't be quitting my day job anytime soon. Let's just say it fits into the rustic brick look. I ended up splitting the bricks down the middle and using the halves.


                          Here's a picture of my very first "food" cooked in the oven. It's organic wheat berries I malted and then dried in the oven. It was still 120 degrees a day after my third curing firing, which is just right for drying the berries. I hope to use the malt flour to get a starter going.


                          Dino, I hope your oven doesn't give you any more fits. I did learn from your experience and perhaps can offer another curing method for people. I used a fire pit to burn wood into coals, then put the coals into the oven. A bit of stacking of the coals and it would fire up. Laying them out would knock the flame out. I preheated the oven first with a propane grill to 225 degrees for 2-3 hours, then started up with the coals for 4-6 hours. Still crossing my fingers not to see any huge cracks.
                          My Build Thread

                          Comment


                          • #43
                            Re: Gus's Corner - Timo's Build

                            Here's a picture of the chimney crown and cap. I found a stainless steel cap for $36 at Lowe's that I liked. The black was one was cheaper, but this shouldn't rust for a very long time and it fit perfectly on the flue tile.


                            Here's a loaf of wheat sourdough. I really don't know what I am doing, but that's the whole point. I'll have many years, hopefully, of testing different recipes and techniques. It came out at midnight. Quietly I slide it out and was surprised that the bottom was only slightly burned. I just couldn't wait to see what I had done. I ate the whole thing over the next day. It didn't matter how it tasted, it was a loaf of bread from the oven I built and it actually works...pretty well, too. The oven keeps temps over 400 degrees 24 hours later. It's still 175 degrees four days later. Dang.
                            My Build Thread

                            Comment


                            • #44
                              Re: Gus's Corner - Timo's Build

                              Timo,
                              Wow. It has GOT to be the door then. I have noticed my oven loses most of its heat very soon after firing. I plan to make a stainless steel door, but.. I should probably make myself a wood door fairly quickly to make sure my oven will hold heat!.

                              I bought the same exact chimney cap from Lowes!

                              Lars.
                              This may not be my last wood oven...

                              Comment


                              • #45
                                Re: Gus's Corner - Timo's Build

                                This has been a great thread to read through - but it is making me quite nervous!
                                REALLY nervous, in fact.
                                I haven't laid my floor yet - I want to put in an extra thermal mass.
                                I want to get greedy and see exactly how big I can get my oven!

                                My sister and fam just spent a bit of time in Door County -
                                AND I make Desem almost every day! It's the greatest and I can't wait to make it in the oven...

                                But...I'm getting nervous!

                                Cecelia

                                Comment

                                Working...
                                X