Re: Michigan WFO
Mike,
I used one bag of heat stop in the beginning, most of it going on the lower levels and the arch. After that, I started using the home made - I only went through one bag of sand so I tossed the rest of the Portland, clay, and lime. I did borrow about a quart of refmix from Acoma for my flue. With that said, I would estimate that it took less than 4 bags for the build.
Les...


-
Re: Michigan WFO
How many bags did you have, and how big is your oven? I used 3 bags of heat stop and still made my own- I used the home brew to fill in the gaps around the outside. My oven's a 36".
I used the fireclay from cutting my bricks- I saved it all along in a bucket. I used the ratio in the plans of sand, fireclay, lime and portland. It's a pretty good mortar to work with.
I was pretty fussy about spilling, picking up and reusing blobs I dropped, etc. I have very little left over, but I did make it through. If you've saved your fireclay, go ahead and make your own. It's good stuff. I didn't use it in the arches or in the dome proper, just for pointing up the outside and cladding.Leave a comment:
-
Re: Michigan WFO
I really under-anticipated how much Heat-Stop I would need. I am going through this faster than Daren went through saw blades!
How much Heat-Stop did most go through? I feel I'm being conservative, making careful cuts to eliminate much of the gaps between bricks, mixing in small amounts, etc.
Getting more has really become cost prohibitive. It is not available locally, so I need to special order it, with a subsequent fat shipping charge.
I think I'll have to switch to mixing my own very soon. Any tips? I still have some Heat-Stop, but clearly not enough. I thought I'd save that for the stress points. Where do you think those are? Vent/arch/chimney or the rest of the dome?Leave a comment:
-
Re: Michigan WFO
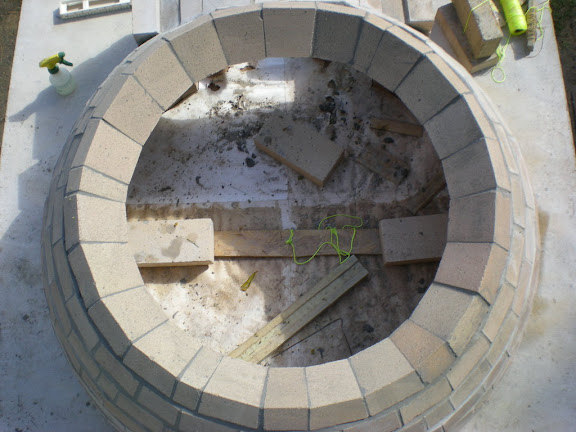
I finished the eighth course. Thanks, Dutch, for the tips. So far, it's working well. Since I'm beyond the arch, with no real starting point, it seems to help to put one or two down and let them set up a bit while doing other things before coming back to finish the course. This gave me a starting block to work off.
Leave a comment:
-
Re: Michigan WFO
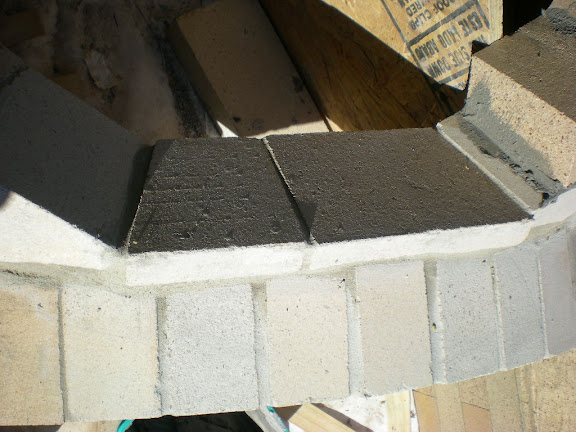
Here is a quick photo of how my transition "bridge" over the arch ended up. Sorry for the shadows in the photo. At least we had a moment of sunshine in MI!!
Leave a comment:
-
Re: Michigan WFO
Dutch, thanks! I'll try the drier bricks. I have been using fairly wet (soaked) brick thus far.Leave a comment:
-
Re: Michigan WFO
Mike
For the upper courses you should consider using bricks that are a bit drier and the mortar will set quicker and reduce some of the stress of gravity. I used the board method and then near the top I gave in to the urge to create a support for the dome...I used damp sand suspended on platform...in hindsight I wish I would have trusted myself and gone without it...my dome would have been cleaner and truer without it...drier bricks and same consistency of mortar get them to hold better...a keystone in each course helps too
Your build is great and your abilities are too...trust that it will be OK...
Best
DutchLeave a comment:
-
Re: Michigan WFO
Peter, i think I may have to pull out a beach ball soon (just one more thing I'll have to steal from my kids). Probably a better idea than my wife's yoga ball that I've been eyeballing
Dino, I've never been afraid to admit my confusion with terms like taper, angle, and bevel. Never sure what part of the brick it refers to.
I cut each brick in half at approximately 5 degree angle, then chopped off the other side of those bricks at the same angle. This made it slightly wedge shaped, allowing a little less of a mortar need. Starting around course 4 or 5, I noticed that the gaps between the inside face of the bricks were coming out pretty big (those shaped like inverted V's). I tipped the brick a little in the saw to cut slight compound angle's on those. This is difficult for me to explain, but I would suggest reading this thread http://www.fornobravo.com/forum/f8/s...ical-3124.html It's a long thread, but very informative from beginning to end. There are some nice explanations and diagrams/photos of methods used to make these cuts. I did not go near that sophisticated when it came to setting up jigs and what not, but the principles were useful.
I am still left with a large gap under each brick as you tip the brick upward. Other's have cut an angle on this side as well to eliminate that gap (refer to Ken's build). It sure looks nice, and I'm sure cut's down on the mortar needed, but this gap is not seen inside the dome, and frankly just was more work than I thought I could handle. As a result, I'm just using more mortar under each brick.
I have been using both the string method (as outlined by Ken) and the board method (Les described this). For my needs, I actually like using the board. It's essentially a quarter circle of plywood with a pin in the end that you use to rotate around the center of the dome. Each brick is tipped up to meet the board, set in place. The board is then rotated to the next brick location. So far, works well. It also has the added benefit of supporting the brick while getting ready for the next. If you can't find photos of this, I'll take one of mine for you.
Good luck. If I can clarify anything with photos, let me know.Leave a comment:
-
Re: Michigan WFO
Mike, the oven looks great! It does seem almost the norm (however disconcerting) that a couple rows add a teardrop shape in order to keep hanging the dome on the arch and you bring it back to round on the last few rows.
2 questions though:
1) How much tapering have you generally been doing? Top, bottom or sides?
2) Are you using the string method for measurement of each brick on the row? How do you determine how much to come in on the next row? Your domes shape looks so good I'm wondering how you got it there.
Thanks, DinoLeave a comment:
-
Re: Michigan WFO
I just wanted to add my two cents. I was able to find a large beach ball for the gravity sensitive courses. There are several options in the plans but I found the BIG beach ball to be perfect. I think it was 48 inches. I am just finishing an outer chimney manifold since I under engineered the first chimney. Yup I will have a two stack oven.
PeterLeave a comment:
-
Re: Michigan WFO
Tried to get another course in today, but mother nature prevailed (as she always does) with cold rain all day. About 5 bricks of my 8th course put in. I'm now at an angle greater than 45 degrees. Gravity is an evil mistress.Leave a comment:
-
Re: Michigan WFO
Hey, Thanks!! I'm certain the credit belongs to someone else on the forum. I am a great copier! Unfortunately, I can't remember where I saw half the ideas I use. I'll still take the genius title, thoughOriginally posted by Dino_Pizza View Post
Les, I just re-read that area of your dome thread. I was wondering if I should put anything under that brick for support, but it looks as if you left as is. I agree, I considered wedging a chunk of brick under there, but don't think it would add much. I'm glad you discussed that in your thread. Now I can put it to rest in my own worries.Leave a comment:
-
Re: Michigan WFO
That's just about how I approached the issue. Seems to work - go for it.
Les...Leave a comment:
-
Re: Michigan WFO
Mike, you are a genius! Your OSG (odd-shaped-groove) for the top brick of the arch support brought it right back to perpendicular! I've spent hours thinking about that since I really want the wider opening in the front too but you've showed me in 1 picture how to do it. This forum rocks. And Mike, the dome is looking awesome.
-DinoLeave a comment:
-
Re: Michigan WFO
Absolutely what I was thinking...well done...that should keep you going once you get your Heatstop
Best
DutchLeave a comment:
Leave a comment: