 Tweet
Tweet
Originally posted by UtahBeehiver
View Post


-
Now, that's really, really pretty! Well done!My 42" build: https://community.fornobravo.com/for...ld-new-zealand
My oven drawings: My oven drawings - Forno Bravo Forum: The Wood-Fired Oven Community -
Ok, I was able to get a few hours in today and I’m here to report that it’s finished!!!!!! All of the masonary is done, the chimney is done, the damper in place and the cap fitted. I wrapped it in plastic because it’s supposed to rain tomorrow and I’d like to keep water off it for a couple of days. I will be buying a bag of charcoal briquettes for do my initial firings. Any advise on the procedure or how many to use?
Last edited by w650gb500; 11-29-2020, 03:58 PM.My newbie build thread: https://community.fornobravo.com/for...ie-ready-to-goComment
-
That looks fantastic. Well done!My 42" build: https://community.fornobravo.com/for...ld-new-zealand
My oven drawings: My oven drawings - Forno Bravo Forum: The Wood-Fired Oven CommunityComment
-
Really nice! Looks great.
Comment
-
Very nice...quantity of charcoal doesn't matter too much start with 25 and see how its going. you want a long consistent heat so you may have to add more and it should get the oven to about 200-250 degreesLast edited by Chach; 11-29-2020, 08:35 PM.My Build Pictures
https://onedrive.live.com/?authkey=%...18BD00F374765DComment
-
In my opinion, whatever it's worth, a cheap laser thermometer is super helpful when going through initial firings. Instead of guessing how much of different fuel to use, go very carefully about adding more while monitoring temps inside of the dome. The first firing should bring the temp to 200F, second to 300F, third to 400F, etc up till you reach 700F. I think there's a pinned-down article somewhere on the forum describing this process.
The oven looks great!Comment
-
I have a Snap-On infrared laser pyrometer that I will use to check the temperature. I guess I’ll grab a few beers, a lawn chair and plan to spend a few hours in front of the oven. If I put a few briquettes in a foil pan, light it and set it in the center, should this take an hour, 2 hours, 6 hours? Just trying to put together a plan and know how much of the day to put aside.My newbie build thread: https://community.fornobravo.com/for...ie-ready-to-goComment
-
I would skip the pan. The sides of it may slow the combustion air that you need. Elevating the first charcaol on a grate a little above the floor wil help a lot for. Make sure that the first charcoal is fully ashed over before placing it inside. A charcoal chimney starter works best for this. I highly advise buying or making one You may be able to start them on charcoal grill and then shovel them inside, but that is less efficient. Use standard charcoal. No match light or starter fluid ever! Before that pile burns up completely you can start feed a few more on top of it to keep it going.
It takes a good bit of charcoal over many hours. Once the oven starts to warm, you can start placing fully started piles directly on the floor, working from the center outward. When you reach the first days target temp and time, let those coals burn down, block the door and close your damper.
On the second day, rake the ash out and leave any unburned charcoal (if any) in side the oven. Make sure you open the damper. It won't take near as much charcoal to get the oven back up to where you left off. This is where a blast door helps a bunch to control the O2 needed for the charcoal and to raise the temp. This is also where you can start playing with how much you can close the damper to help regulate the heat. A temp probe on the blast door is a great thing to have during this stage imo. You will be seeing considerably higher tmeperatures. At the end of the second day, same as first, close it up completely. Oh by the way, you can cook some things during this stage.
Last edited by Gulf; 11-30-2020, 08:14 AM.Joe Watson " A year from now, you will wish that you had started today" My Build Album / My BuildComment
-
I made a template of both openings and will be making the door this week. I have leftover 2” thick CaSi board from the floor, so I will be making a 4” thick door and putting pieces of it inside. That will take a few days to get time to do it though.
Will update as I go, but I greatly appreciate all of the advise. What sucks is that it took so long to begin the project this year. I had too much work around the property doing landscaping and hardscape projects which were more time sensitive and needed to get done while the weather was good. Unfortunately the pizza oven build was the least important, therefore we won’t get to enjoy it this season. I’m wondering if I should just cover it for the winter and worry about firing/curing it next spring?
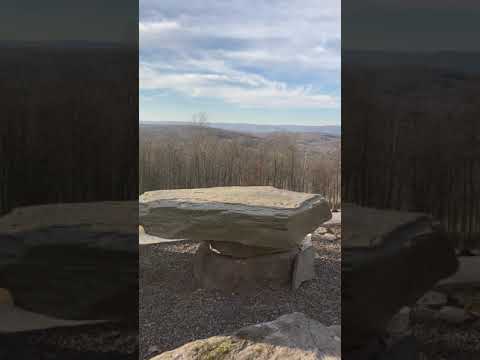
The view from the pizza oven location. Not bad!
My newbie build thread: https://community.fornobravo.com/for...ie-ready-to-goComment
-
Beautiful view. It's a bummer, that you feel that you can't use the oven year round.Joe Watson " A year from now, you will wish that you had started today" My Build Album / My BuildComment
-
I would love to be able to use it year round, but with how exposed we are in the back courtyard, there is just no way. We are 100% open to the west and northwest which exposes us to incredible winds and snow drifts all winter long. That and we just put the yard in(topsoil and grass seed/straw). It isn’t compacted and will remain soft for months. In order to get to the oven, I have to walk across the top of the stones on the wall. As soon as they get wet/frozen, it’s no go because there’s a 12’ drop on the other side. I use the grill on the deck all winter, so that will have to suffice this year
The oven sits on the right side of the picture on the top corner of the wall.
Last edited by w650gb500; 11-30-2020, 01:31 PM.My newbie build thread: https://community.fornobravo.com/for...ie-ready-to-goComment
-
Man, that view of the valley is AWESOME! I love NE PA mountains! I bet you can see stars too! Down by Philly we don't even see stars anymore
Comment
-
Well, I had a feeling about the weather changing and it did not disappoint. Good thing I wrapped it all up the day after I finished it and yesterday we got 4” of the white stuff. As soon as this me;ts, I plan to remove the copper vent, seal the opening up really well and wrap it with rubber roofing for the long and cold winter. Other than possibly working on the pieces for the door, I don’t see revisiting the oven until spring.
Again, I just want to say THANK-YOU to everyone for their taking their time to educate me on how to get this oven done and done correctly. I plan to spend many, many hours enjoying it in the months and years to come and spending a few extra days to do it right will certainly be worth it down the road.
See you guys in the spring.
Dan
My newbie build thread: https://community.fornobravo.com/for...ie-ready-to-goComment
-
Yikes, winter has set in!My 42" build: https://community.fornobravo.com/for...ld-new-zealand
My oven drawings: My oven drawings - Forno Bravo Forum: The Wood-Fired Oven CommunityComment
-
Ouch, looks depressing! We got some flurries down here by Philly but nothing like that! Personally, I am ready for spring.Comment
Comment