Thanks Barry.
For me, building an oven was a learning experience, in some ways a circular one. I started at the beginning of the build asking a lot of questions, and by the time I was done, I'm now answering those from others.
It's the circle of pizza.


-
WOW!
Absolutely amazing Mongo!
Love following the developments and incredibly creativity you are sharing with us!
As one just barely hanging on to a simple build - your work is inspiring (so is your help and support of others!)
Keep up the awesome work!
BarryLeave a comment:
-
Greetings Ope-dog,Originally posted by Ope-dog View Post
My bricks are from a masonry yard the next town over, and they are indeed firebrick, full sized, 9" x 4.5" x 2.5", and weight a little over 7lbs each. The yard stocked two colors of brick, the buff color you referred to as well as the red ones. I simply chose red.
I look forward to following your build.
Best, Mongo
Leave a comment:
-
Hi Mongo, I am fairly new to the site and have read through your build and beehiver's in depth! Some great info and a LOT of hard work. Frankly, there is a TON of hard work by most on this site. And I'm sure my upcoming build will be no different. :-)
If you don't mind me asking, your bricks don't seem to be the typical tan color that most tend to use. I have been researching bricks here in the NW (Portland / Vancouver) region. A have found a supplier of firebrick, however was wondering why yours seem to have more of a "clay-brick-from-home-deeeepo" color? I noticed you mentioned firebrick and how fast they absorb water, so wasn't sure if there was a red brick available someplace or if they are indeed a clay brick from a box store?
I can't say enough for your craftsmanship and patience. It has definitely paid off. Looking forward to starting my build and getting ideas. With all the great minds on this forum, I will look to post pics soon and make sure I don't go too astray too soon!
Leave a comment:
-
Correct, no weep holes. The 'four corners' of my hearth slab are exposed to the elements, I didn't want the slab to saturate and for water to wick up in to the insulation from underneath. My shell (brick dome, insulation, stucco and Thoroseal for waterproofing) had been in place for a couple of winters now, and I've had zero moisture issues inside the dome. I don't see any problem including weep holes. I just never incorporated them. I felt I could always add them later if needed by drilling up from underneath.Originally posted by Chris inPA View Post
Glad you were able to take some inspiration from my build details. I hope you enjoy your build as much as I have enjoyed mine.Leave a comment:
-
mongota. looking over your build I believe that you did a layer of red guard and no weep holes. Am I correct?
I loved your ideas for the stone vernier and poured columns. Enough so that I'm doing that for my build.Leave a comment:
-
Nice, I use a similar product called penetrox and no-lox for attaching dis-similar metals at work such as aluminum cable to copper Buss bar. Good stuff just don't get it on you or your hands it's hard to get off.
RickyLeave a comment:
-
Knew I had a picture somewhere. I posted the previous last night from my phone.Originally posted by Chach View Post
Prior to installation I cleaned the nipple, painted it it with rustoleum type paint. Mortared it in. Then gave it additional paint. The male and female threads that engage were not painted, they were treated with Penetrol. Penetrol protects the metal from oxidation, but doesn't really result in a mil thickness build up like paint does. That way the cap can still be easily threaded on and off.
Best to all, Mongo
Leave a comment:
-
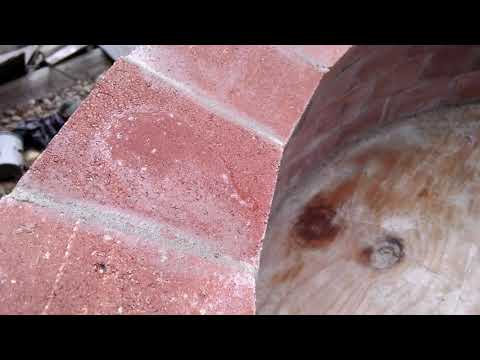
Took this video during the build but only recently uploaded it.
It shows how absorptive firebrick can be, and why it might be a good idea to soak the pricks prior to mortaring them up.
Leave a comment:
-
Dome vent.
When I veneered the dome, I did not mortar down the cap stone, as I felt I'd install a vent pipe later on.
When the time came, I outlined where the vent would go, then drilled the circumference of the circle with a masonry bit. Chipped away the stucco and cut the stucco lath with a pair of side cutters. Put a 1-1/2" hole saw on my drill and drilled a plug out of the insulation to make room for the vent pipe.
Dropped the pipe in to the hole, took a measure of how high the pipe stood above the surrounding stone veneer, then cut it to final length. In retrospect, I could have cut it maybe 3/4" shorter. <sigh>
I cut several slots in the bottom part of the pipe that would be buried in the 4" thick refractory insulation that covers the dome. An easier path for moisture vapor? Why not.
I booger welded three small tabs around the pipe, the tabs will be buried in mortar and lock the pipe in place. I did that to minimize the chance of breaking the bond between mortar and smooth pipe, resulting in the pipe spinning in its hole.
Set the pipe in place, cut the capstone to surround it, then mortared it home.
Leave a comment:
-
Just some decorative finishing details here.
With the cast chimney cap dry fit on top of the vent tunnel, I started dry fitting the stone veneer on each side of the vent tunnel. Used the grinder to trim a few of the stones.
Then I mixed up a batch of mortar, mortared the cast cap in place, then mortared the stones on each side of the landing tunnel.
Next up, the vent pipe at the apex of the dome.Leave a comment:
-
Mongo, this build has turned out fabulously. I love the way you used PVC for the molds & forms...all really eye catching. After seeing what you did with your entry and chimney cap, I'd definitely be going that way on my next build (or recommending it to a friend whose threatening to build soon... ).
).
Leave a comment:
Leave a comment: