Good day all,
Can someone explain the attachment of the clamp with more detail I'm not getting how it is attached. I welded a 3/8 nut centered on a Simpson Strong-Tie # A24 this should be good the first couple of course's but as I get higher I would like to incorporate the clamp or to a strong tie as a separate attachment. The instructions are great for getting started and I know it must slide in groves but not a lot of real-estate to work with. Wish the instructions had more detail on that portion, thanks for any help you all can give me on this.
This is what I got so far. My IT I used some shelf hangers I had laying around with a 3/8 nut welded inside for the round stock to ride, I tacked them together and cut at 17.5" it can be adjusted a couple inches either way. I had some shrink wrap so I used it to keep it easy to clean.


-
Nathan, there are quite a few no-weld easy to build designs in the forum. I highly suggest doing some research and finding a design that you are comfortable making. Building a WFO isn't all masonry - you will most likely be doing some carpentry and even some metal work, so building your own IT is the best way to start the journey. I would highly suggest using the "wooden brick" approach that I copied to attach your IT. I pasted a link to the part of my thread where I was figuring out how to build mine.Leave a comment:
-
If the offer to make one of the tools is still out there I’d pay for sure!!Leave a comment:
-
Adrian, thanks...the photo is back. It appears that you are not using the little camera icon (top left of the message/post box)...if you do, the thumbnails are put at the bottom of the post. Click the camera icon, choose to browse and upload pictures, select up to 6 pictures (lower resolutions are good--800x600 is perfect).
If you need to resize/crop/reduce pictures, there are several free utilities that are available. I use FastStone Photo Resizer and find it's quick and easy for me. As Gulf noted, some of these picture storage services are starting to think about earning more money from us...not so sure that Google will be free "forever"
Leave a comment:
-
I am sorry but I am failing to get them uploaded. I get a error every time. But wil get picassa or so for the rest of the posts.
Thanks for the comment but I just put this down to make an example because I didnot know if you would find it a good idea.
so thanks for the comment. My wife says why do you not take a balloon of 36" and fill it with polyurethane foam en cut it in halve and you have your perfect round dome.
I am going to try that too just for fun.
Adrian.Leave a comment:
-
Please do. Photobucket has started charging $400 a year for third party hosting. They will let you get away with it for a while. Then all of a sudden your linked pics will look like the one below. My build thread is useless at the moment. It will take me some time to edit each pic.Could you please post the picture of your IT back here instead of linking to photobucket? It was perfect before, but too much crap comes up on my browser when I follow the link...
Leave a comment:
-
Adrian, nice combination of lots of previous innovations on the IT. Important to incorporate Russell's comments above, but great version of IT (simple, flexible, re-purposed, and multi-purpose with a future).
Could you please post the picture of your IT back here instead of linking to photobucket? It was perfect before, but too much crap comes up on my browser when I follow the link...
Thanks in advance and great job!Last edited by SableSprings; 08-17-2017, 10:59 AM.Leave a comment:
-
Welcome to the forum gang. Very nice looking farm house you have done.
A couple comments. The pivot point of the IT looks like a couple inches or maybe a centimeter off the floor surface. You need to be aware the lower brick courses will be the radius you started with but the upper courses and top diameter of the dome will be couple inches or a centimeter higher than the radius of the floor. Ideally, the pivot point should be at the center of the floor at "floor level". Second center line of the IT "rod" should intersect the centerline of the brick or the brick will not be perpendicular to the center of the dome floor. Each row will be off slightly and it is a cumulative effect over all the courses which makes the brick face being "off" perpendicular to the center of the floor more pronounced. The nice thing of the set up is it is more adjustable for variances in the dome. You should resolve the two items I mentioned or be aware of adjustments that will need to be done.Last edited by UtahBeehiver; 08-17-2017, 04:17 PM.Leave a comment:
-
Do you builders think that this will work?
It is easy to take the pressure of the brick and easy to change the hight. I just have to make markers where the lower handle is.
Your comments please. Adrian.Leave a comment:
-
If you have a small clamp your wood looks thick enough that you could just clamp a carpenter's pencil to draw your inner and outer diameters, and you would not need to cut anything. Alternately you could go the pencil holder route with perhaps another small piece of all thread to extend out for drawing the outer diameter. I think once I cut my floor bricks I didn't need the OD any more, and just used the pencil on the ID to mark the internal curve of my arch. Since I had a welder and some scrap square tube I made my own variation of Russell's holder
Two other IT build related comments. I made my IT so I could move the all thread in and out several inches, so changing the length from ID to OD was very simple. I also started out with a relatively wide L bracket which ended up being too large for bricks as I got near the top of the dome, necessitating the fab of a thinner bracket.Leave a comment:
-
You can use the same all thread for your pencil holder which is used for two things, marking the inner and outer diameter of the dome for a tapered arch. I just bought a cheap HD carpenter pencil holder and epoxied a nut to the holder then screwed into the IT.Leave a comment:
-
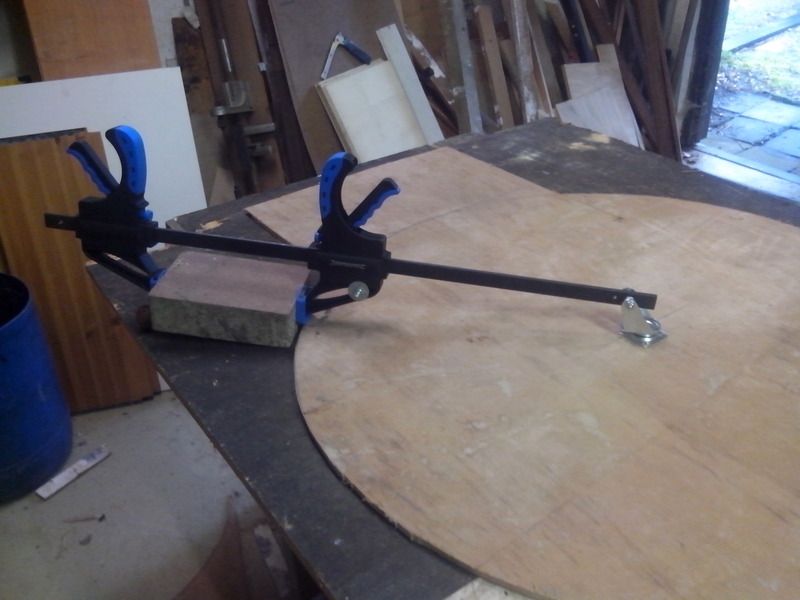
I finished pouring my hearth this weekend and took advantage of curing time to work on my IT. I was wondering what distance/plane/location other people had put their pencil attachment. I made my L bracket out of a couple pieces of wood, but I am unsure at which orientation to point the pencil? Also, I'm not sure I'll be able to put my pencil directly in line with the centerline of the bolt/threaded rod.
I am thinking I will make my pencil attachment by cutting a slot in the wooden bracket, and I just want to make sure I'm putting it in the correct spot.
(Components are: scrap wood, castor (& a few washers to hold centered), R-pin, 1/2" threaded rod, 2 nuts, 1 threaded coupling, 1/2" bolt)Leave a comment:
-
There is another way to get those dimensions I think. I like to use two terms for the movement of the IT - pivot point and axis of rotation. The axis of rotation gives the oven it's round shape when looking down from the top and is always be in the center of the oven. The pivot point sets the hemispherical shape looking at the oven from the side and can be centered or offset. If you use a design with a hinge for the pivot point, have it offset from the center of the oven by 1" and make the arm 18" from the pivot point, you will get a 38 inch oven with an 18 inch height. See the link below from a previous post in this thread. The poster used a hinge and his pivot point was offset from the center of the oven. He had both his axis of rotation and pivot point above the oven floor on a lazy Susan, but I would just use a hinge attached to a "wooden brick" so it was at floor level, or if you need to raise them up you can adjust the arm length appropriately.Leave a comment:


Leave a comment: