Announcement

Collapse
No announcement yet.

Mongo's 42" CT Build

Collapse
X
 
  • Filter
  • Time
  • Show
Clear All
new posts

  • #46
    Re: Mongo's 42" CT Build

    Been away for a bit, I'm back in the oven construction business for a few days.

    After casting the arches, I let them cure for a few weeks. A couple of days ago I cast the lintels over the hearth doorways. It was raining when I did it, so no photos.

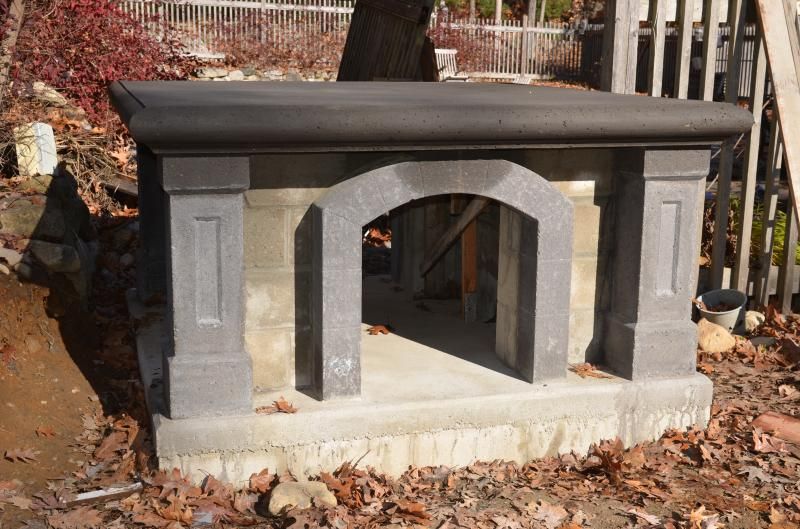
    Yesterday I stood the arches up and mortared them in place.


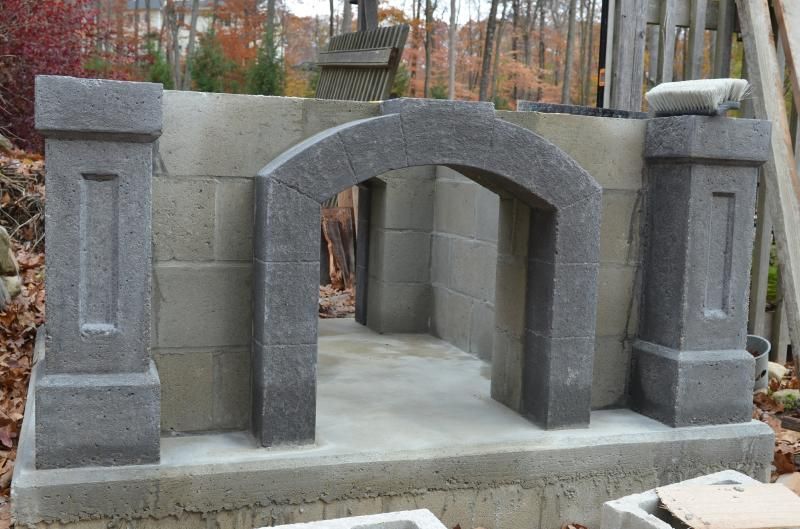
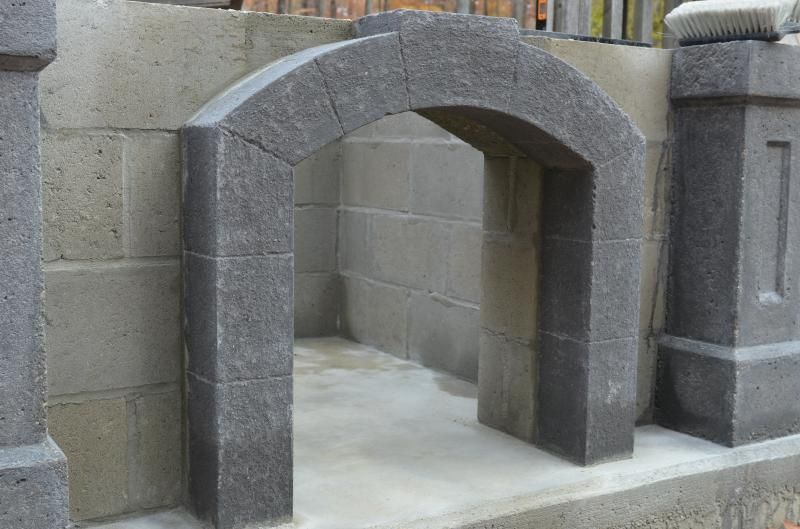
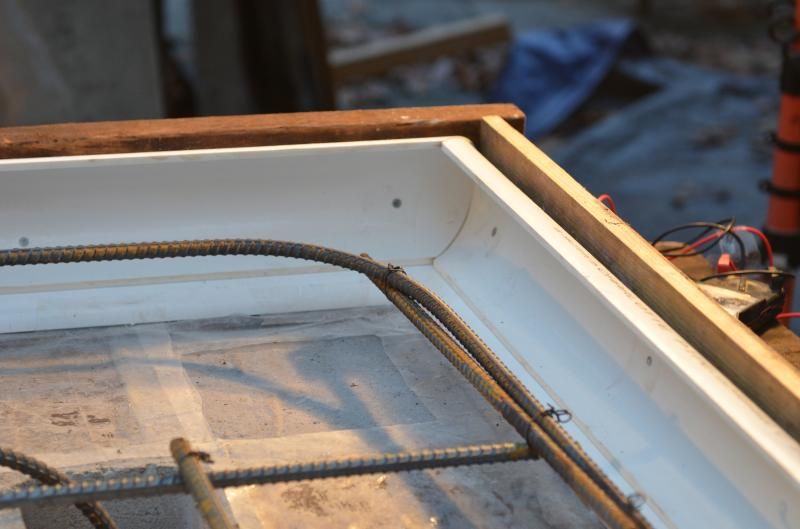
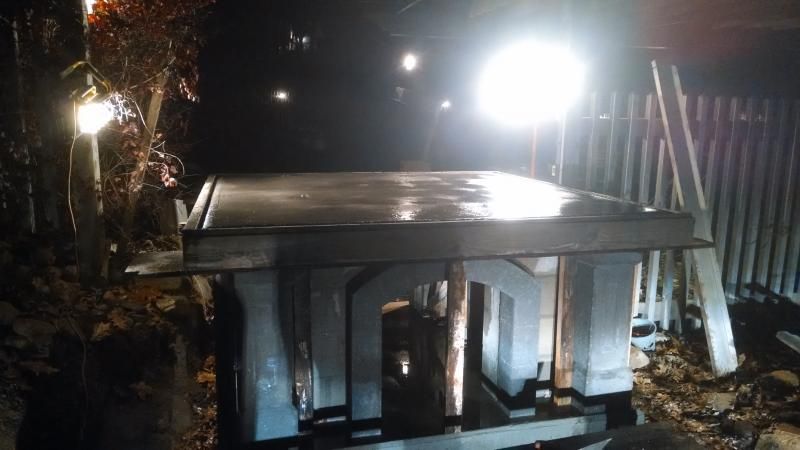
    Today is supposed to be fairly warm before more rain and cold arrive, so I'm going to try to form up and cast my hearth slab today. This pallet should be empty when I'm done. I calculated about 40 bags for the slab.


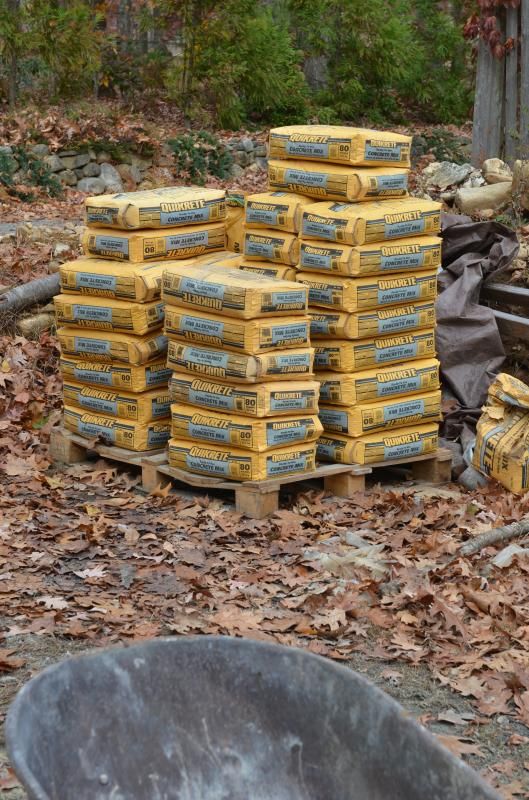
    Gonna be a bit of a day with the wheelbarrow and mason's hoe.
    Last edited by mongota; 03-15-2017, 06:56 PM.
    Mongo

    My Build: https://community.fornobravo.com/for...-s-42-ct-build

    Comment


    • #47
      Re: Mongo's 42" CT Build

      Welcome back! Looking really awesome. Wish you the best on getting all that concrete mixed for the hearth slab, that and a small pile of ibuprofen..
      Tony

      Link to my oven build thread:
      40 inch indoor pompeii in NNY

      Comment


      • #48
        Re: Mongo's 42" CT Build

        Thanks Tony.

        The pour went well. The slab is 5-1/2" thick and about 80" square, and I wanted to color the concrete, so to save on pigment I was running two batches of mix; pigmented for the edges of the slab and unpigmented for the core of the slab.

        I ended up using PVC to make the covered bullnose edge. Took a length of 2" PVC schedule 40 pipe and ran it through the table saw to rip it into quarter-circles. Took a length of 4" PVC and ripped it in half. The forms went together okay, and the mitered corners seemed good and tight.


        I didn't get started mixing until just before sunset, so I had the work lights set up outside and finished up in the dark. It was a little chilly out last night, it took about 4 or 5 hours before enough water had bled off enough to hit it with a trowel. I think I did the final troweling sometime between 11pm and midnight!

        The ringing of the metal trowel on concrete coupled with the howls of the coyotes made for some interesting night music.
        Last edited by mongota; 08-03-2018, 08:05 PM.
        Mongo

        My Build: https://community.fornobravo.com/for...-s-42-ct-build

        Comment


        • #49
          Re: Mongo's 42" CT Build

          I'll have to title this post "The Good, the Bad, and The Ugly".

          The Good? The idea of using the Schedule 40 PVC to make the ogee edge of the hearth cap slab. Worked out well. Easy to fabricate, easy to assemble.

          The Bad? Planning the pour. I wanted to get the pour done before a cold snap was scheduled to hit town. I finished the form late in the day and didn't start mixing concrete until just before sunset. The slab plus filling the CMU cores was about a 39 bag pour, and I was mixing by hand. I finished a couple of hours after sunset using some halogen lights to light up the work site.


          Overall the pour went well. The form held up fine. No form blowouts, no real negative issues. I think I worked at a pretty good pace. The slab as a whole? Here you go, first an overall shot:


          A close up of the bullnose corner:


          Overall not too bad. Some voids, which I wanted. I'll slurry fill them later on. Ah...but what about The Ugly? Well, here you go:

          The Ugly?: The strange part is that this happened right where I finished the pour for the entire slab. The mix had great workability. As I was finishing up I was thinking it was almost too loose. When I was placing it, I'd use my margin trowel to work the mix into the PVC ogee. But apparently not here. The weird thing is that when I vibrated the form by banging the outside with a 2-lb hammer, it didn't "collapse" in this section to fill the PVC.

          Grrrr.


          To add insult to self-induced injury, this is the FRONT edge of my slab!

          Overall I'm happy. But geez.

          Oh well. I'm gonna go out and mix up a small batch of pigmented mortar and do a little fill work.
          Last edited by mongota; 07-29-2018, 05:11 PM. Reason: correct spelling
          Mongo

          My Build: https://community.fornobravo.com/for...-s-42-ct-build

          Comment


          • #50
            Re: Mongo's 42" CT Build

            Overall I would say it came out great. I really like the edge profile you did, and the corner pillars are awesome. As anyone that works with concrete on a regular basis knows, It happens. I have on several occasions thought to my self "Man that pour went great" only to pull the forms and go "WHAT the HECK" . Can't wait to see what you do next.
            P.S. This early winter weather is the Pits, I still need a good 4-5 days of no freezing night time temps to finish mine.
            Start of the Outdoor Kitchen Thread http://www.fornobravo.com/forum/f35/...ild-18433.html

            Oven Build Thread http://www.fornobravo.com/forum/f8/j...ild-20791.html

            Comment


            • #51
              Re: Mongo's 42" CT Build

              Thanks. I am happy with the overall look.

              The patch came out fine.

              Any aggregate in the mix would have wreaked havok with feathering out the repair, so I mixed up a little mortar mix and tinted it with pigment. Texturally it may look a little different, but no worries on my end.

              I cut a roughly 18" long piece of the 4" PVC off of the form, feathered the sharp edges smooth, and used that as a screed to roughly shape the half-round repair. With the repair fairly well formed, I added another thin veneer of mortar over the shaped patch, then covered the patch with a small piece of plastic, then set the PVC screed back over it, tapped it a bunch of times with a hammer, and braced the PVC in place to act as a bit of a form to prevent the mortar patch from slumping.

              While that was setting, I worked my way around the perimeter and did a little void-filling. Eventually worked my way back to the patch, pulled off the PVC form and the plastic, and it looked surprisingly good.

              First the void:


              Then the patch. It was dusk when I took this shot so the camera had a little trouble focusing, so it looks a little weird, even with the flash:

              Last edited by mongota; 03-15-2017, 07:00 PM.
              Mongo

              My Build: https://community.fornobravo.com/for...-s-42-ct-build

              Comment


              • #52
                Re: Mongo's 42" CT Build

                Nice fix Mongo. I think if you didn't know it was there originally, you would never notice it.
                Tony

                Link to my oven build thread:
                40 inch indoor pompeii in NNY

                Comment


                • #53
                  Re: Mongo's 42" CT Build

                  Checked it this morning. The patch looks good.

                  I still have the support structure in place underneath the slab. I'm figuring I'll leave that in place for a well-hydrated cure. Under the slab is poly sheeting, plywood, then the vertical 2x4 support legs.

                  I was going to tarp it tomorrow.
                  Last edited by mongota; 03-15-2017, 07:02 PM.
                  Mongo

                  My Build: https://community.fornobravo.com/for...-s-42-ct-build

                  Comment


                  • #54
                    Re: Mongo's 42" CT Build

                    I doubt that you will have any curling on that thick of slab, on that short of distance. But, I would throw that tarp over it as soon as possible, to help keep it evenly hydrated for the cure. It will also help keep it from freezing.

                    This time of year, I like to space out some wooden slats over a pour. That allows for just a little air space between the tarp and the surface of the concrete.

                    Great! form work .
                    Last edited by Gulf; 11-15-2014, 10:39 AM.
                    Joe Watson " A year from now, you will wish that you had started today" My Build Album / My Build

                    Comment


                    • #55
                      Re: Mongo's 42" CT Build

                      We simul-posted. Thanks.

                      Laid out the oven footprint on top of the slab and then used a bit of thinset to fill in the low spots, feathering it out as I went.

                      Does not have to be pristine as the 4" of board insulation will take up most of the minor irregularities.

                      Click image for larger version

Name:	WFO floor layout on slab resized.jpg
Views:	1305
Size:	171.9 KB
ID:	406949Click image for larger version

Name:	WFO leveling slab under dome resized.jpg
Views:	1215
Size:	163.9 KB
ID:	406950
                      Last edited by mongota; 07-29-2018, 12:26 PM. Reason: added photos
                      Mongo

                      My Build: https://community.fornobravo.com/for...-s-42-ct-build

                      Comment


                      • #56
                        And...I'm back!

                        It's been a while, my son started a business so a good chunk of my disposable time over the past year went to assisting him.

                        If weather permits, I'll be starting on the brick dome tomorrow.
                        Mongo

                        My Build: https://community.fornobravo.com/for...-s-42-ct-build

                        Comment


                        • #57
                          The design goal is to have my brick dome covered with a natural stone dome. Igloo-style. Originally I was going to leave it exposed to the weather, but I'm leaning towards a roof.

                          Without a roof I was worried about the top slab saturating and moisture wicking up into the board insulation from underneath. So, possibly for better, and possibly for worse, I used some leftover RedGard to waterproof the top of the slab where the insulation will sit. That'll act as a moisture barrier between the slab and the board insulation.

                          Got the 4" of board insulation cut and installed, as well as the floor bricks. The dome floor is herringbone pattern, the landing is a running bond pattern.

                          I dry set the first course of half brick to start the dome. My first two courses will be half-bricks, untapered, and set flat. On the third course I'll start tapering the sides of the brick and tilting them in to start the dome shape.

                          Got the dome arch template fabricated and installed. The opening is 20" wide and 12-5/8" high. Essentially a 10" radius half-circle raised vertically 2-5/8".

                          I hope to mix mortar tomorrow. Homebrew, 3:1:1:1.

                          Tried uploading photos but no luck. Website keeps freezing.
                          Mongo

                          My Build: https://community.fornobravo.com/for...-s-42-ct-build

                          Comment


                          • #58
                            I don't think you can go wrong with a roof. Even if you could totally waterproof your oven and stand, firing the oven or cooking while standing in the rain does not sound like much fun. We get lots of rain/drizzle here in the Pacific Northwest so the roof was a must for me.
                            My build thread
                            https://community.fornobravo.com/for...h-corner-build

                            Comment


                            • #59
                              All right, I got three pics to upload. One of the slab covered with RedGard, another showing the 4" of board insulation with the floor brick, and a third showing the arch (keystone not set) and the first three courses of dome brick complete.
                              Mongo

                              My Build: https://community.fornobravo.com/for...-s-42-ct-build

                              Comment


                              • #60
                                Click image for larger version

Name:	pizza inside archB.jpg
Views:	1537
Size:	137.9 KB
ID:	406948

                                This was my method for figuring out the cut lines for the dome arch bricks. This was confusing to me until I started building the dome, once I saw it with my eyes it became so very simple.

                                The red line in the drawing represents a line radiating from the center of the dome floor, essentially, the IT. I used my IT to get my cut points, but a string anchored to the center of the floor would suffice as well.

                                The yellow dot represents the inside radius of my brick dome, for a 42" oven, that'd be 21" from floor center.

                                The blue dot shows where the bottom of the arch brick meets the inside face of the plywood arch form. That may also be 21" from center, or it may be slightly different. It depends on where you place your arch form and the geometry of your oven opening.

                                The orange dot represents the outside diameter of the brick dome, for my 42" oven that would be 21" + 4-1/2" thick brick = 25-1/2".

                                The basics of the layout? With the brick in its proper place on the arch template form, position the IT (or string) next to the side of the brick so that the outside diameter marking (orange dot) on the IT or string intersects the top edge of the brick. Holding it steady, mark the location of the orange dot, and on the side face of the brick, mark the inside diameter of the dome (yellow dot). You can now set the IT or string aside. Mark the blue dot on the underside of the brick where the bottom edge of the brick meets the inside top edge of the arch template form. You'll connect the orange dot to the yellow dot, and the yellow dot to the blue dot. Those are your cut lines. Because the geometry of the dome/arch intersection changes a bit as you higher up the arch, you can mark both sides of the brick and adjust your cuts as needed.

                                I built my arch from the left and right feet of the arch, simultaneously moving upward, meeting at the keystone brick at top dead center.

                                Prior to cutting any brick, I placed my arch bricks on the arch form, shimming them in place. I chose to not taper them. I aligned the outside edge of each arch brick with the outside face of the plywood arch template. With the template being plumb, that'll assure the face of your arch is plumb. The bricks will overhang the arch template, projecting inside of the dome. With the arch bricks shimmed in place, mark on the outside face of the arch template where the left and right edges of each brick sit on the arch form. You'll be taking the bricks off and replacing them, the marks assure that when you replace them you'll keep your planned pattern, spacing, and layout, and when mortaring them you'll prevent mortar joint creep. Number the bricks so you get them back in their correct spots. I numbered them L1, L2, etc, for the left side of the arch, and R1, R2 for the right side.

                                I used the IT as shown in the photo to get the cut points on my L1 base brick. I connected the dots, cut the brick, and mortared it in place. I then shimmed my second L2 brick in its place. I transferred the cut edges of the already mortared L1 brick to the adjacent side of the L2 brick, and used my IT (or anchored string should you prefer) to indicate the orange, yellow and blue dots on the "upper side" of the L2 brick. Connect the dots, skewing the lines as needed. Make the cuts. Mortar L2 in place, paying attention to your layout lines on the arch template, and move on to L3.

                                You can cut and dry shim them all first, then mortar them later in a single batch. Or cut and mortar one at a time. Either way is fine. Just stay on your layout lines.
                                Last edited by mongota; 07-29-2018, 12:08 PM. Reason: added picture
                                Mongo

                                My Build: https://community.fornobravo.com/for...-s-42-ct-build

                                Comment

                                Working...
                                X